Review: Telestream Wirecast
There's an old Hollywood joke with the punch line, "but I really want to direct." I'm not sure what the actual joke is, or if it's funny, but the reason I bring it up is that if you talk to writers, most would say, "but I really want to be on TV." Certainly the web and websites such as Livestream and Ustream have made that possible to some degree. But most product offerings lack features such as DVR playback, live green screen, and other effects and capabilities. Well, to all you wannabe broadcasters out there, I have good news and bad news.
The good news is that you can get most of the relevant functionality used by your local TV station by purchasing Telestream Wirecast, which runs on both Mac and Windows machines and costs $449. The bad news? Well, judging from my own experience, you may not look as good on camera as you thought, and those lovely, grubby days of getting to your desk without shaving and/or doing your makeup are definitely over-at least on broadcast days.
As an overview, Telestream Wirecast is a software-only live (or live to disk) video production tool that mixes multiple inputs; adds transitions, titles, and other effects; and produces a stream that you can have delivered by CDNs such as Limelight and Akamai and live streaming service providers such as Livestream, Ustream, Justin.tv, and WebCast-TV. When configured with Wowza Media Server 2 Advanced, Wirecast can serve multiprotocol streams to the iPhone and the iPod touch; to Flash, Silverlight, and QuickTime web players; and to IPTV set-top boxes.
Capabilities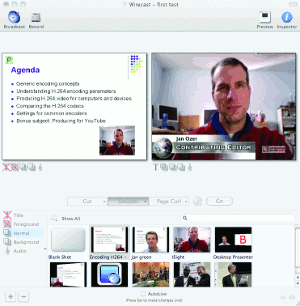
To put Wirecast's capabilities in perspective, think back to the last newscast that you watched. The newscast cut between the anchors in the studio and the reporters in the field, added titles over the video, played canned clips from other sources, and showed a live green-screen shot of the weatherperson (doubtless he or she was predicting more snow and cold for the freakish winter of 2010). Well, Wirecast does all of that and more, and you can run it on a Mac or Windows notebook.
Specifically, Wirecast can accept input from most devices that you can connect live to your computer, including webcams, DV/HDV camcorders, and other cameras via hardware analog inputs. In my tests, which were done primarily on a MacBook Pro, I configured two live feeds, the iSight web cam and a Canon ZR500 Camcorder. I also configured in multiple additional sources that you can see on the shot list contained on the bottom row of Figure 1.
Figure 1 shows the basic Wirecast interface. On the top right is the "live" stream, and on the top left is the stream queued to appear next, or the Preview window, which explains the P in the upper left-hand side of the screen. You can switch feeds one of two ways. If you click the AutoLive check box on the bottom of the interface, simply click on a different scene to switch to it using the configured transition, which defaults to a 1-second cross dissolve. This works well when you're both the talent and the operator, since it only takes one click to switch.
Or, if you uncheck the check box, click on a scene to load it into the preview window and then press the Go button beneath the live window to switch over, again, via the selected transition. If you're the operator switching for other presenters, this is probably the mode you'll use because you can preview the next scene to make sure the configuration is correct before going live.
Wirecast's (Initially Hidden) Layers
Conceptually, think of Wirecast as having four visual layers, which are shown on the bottom left of Figure 1. Titles have an obvious function, while the Foreground is for logos and other overlay graphics. Normal is the most used layer. It contains shots such as your live cameras, disk-based content, full-screen graphics, and the like. The Background layer is for backgrounds that appear when foreground elements don't fill the screen. There's also an audio layer where you configure the input from your audio sources.
All video layers work separately, and you can switch between them individually. This allows you, for example, to turn a title on or off without impacting the live video beneath it. To control what's being seen on a certain layer, click that layer's title on the left to reveal the available contents, and click the shot that you want to include. For example, in Figure 2, I've selected the Title layer.
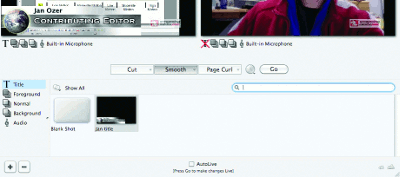 To make a shot disappear, click the Blank Shot button on the extreme left, or cross out the layer beneath either the preview or the live window. Though the Jan Title shot in Figure 2 is selected in the Title panel, I've crossed it off beneath the live window on the right, so it's gone from the frame. If I clicked the Foreground layer, you would see a button labeled SMC logo, which contains the StreamingMedia.com logo you see in the frame. To get rid of the logo, I would click the button to the immediate right of the crossed-out Title button, or click the Blank Shot button in the Foreground shot list.
Initially complicating the operation is a default view that's so streamlined, it doesn't even show the layers on the lower left. This is a Mac program, of course, so clutter is bad, and "less is more" rules the day. Your first step should be to reveal the layers through a menu command. But then it still takes two clicks to change your presentation, one to access the layer, the next to choose the content. Plus, you can't see what's in (or more importantly, what's not in) the layer until you click it, which can get awkward. Fortunately, you can also open up separate mini-windows for each layer, which gets cluttered, but it makes your content much more accessible.
Related Articles
The newest version of this popular live video production tool offers significant improvements and is a no-brainer upgrade for existing customers.
15 Jan 2014
Live streaming on a notebook can be the best of all possible worlds, but how powerful a machine do you need, and how do the various live streaming software programs stack up? We look at tools from Adobe, Kulabyte, Microsoft, and Telestream.
18 Feb 2011
Companies and Suppliers Mentioned