Click Here! How to Use YouTube Annotations to Increase Engagement
Anyone who remembers VH-1's "Pop Up Videos" knows that the only thing more entertaining than a video is a video filled with snarky captions. YouTube annotations don't have to be sarcastic, but if you make them as interesting, relevant, and engaging as possible, you can keep your viewers around longer and get your message across while you simultaneously heighten your YouTube profile.
 Subaru Canada used annotations to offer three alternative camera angles. Each box leads to another YouTube video, pumping up the engagement ranking.
Simply put, annotations are clickable text overlays that you can add fairly easily to your videos to increase viewer engagement, give more in-depth info, and/or create calls to action that take your viewers to where you want them to go next, be it another video, your website, or some kind of subscription. YouTube offers five styles of annotations to experiment with—speech bubbles, notes, labels, spotlights, and titles—each of which has its own particular characteristics and uses. But don't feel overwhelmed. "Notes and spotlights are the only two that people really use," says YouTube specialist and consultant David Walsh.
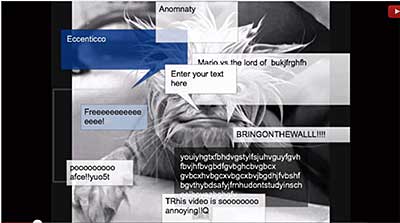
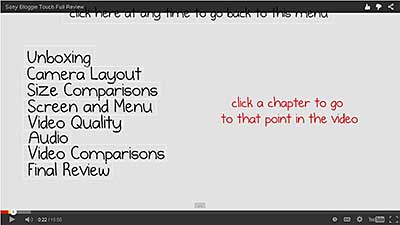 This 16-minute product review uses annotations to create a clickable index so viewers can jump to the part that interests them.
Deployed creatively, as in this video or this one, annotations can make a video become truly interactive and fun. Imagine an index at the beginning of a long video, or a "choose your adventure" video with branching storylines. But deploy them badly, and you risk ending up with a mess. As video producer and tech entrepreneur Jon Acosta, a big fan of annotations, says, "Annotations can be used beautifully, or they can be used really really annoyingly." It's worth the effort to learn the proper techniques. "My clickthrough rate went up 60 percent when I started adding annotation buttons in my videos," Acosta says.
Getting Started With Annotations
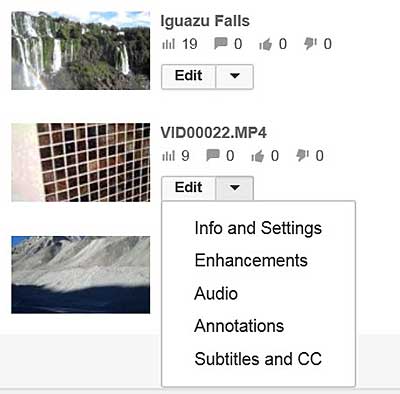 Annotations are available from the Edit dropdown adjacent to each of your videos.
Where do you find the tools? Go to your YouTube channel, and click on the Creator Studio button. You'll arrive at a list of your videos, each of which is now accompanied by an Edit button. Click that button, and then click on Annotations at the top of the next screen. You're now in the annotation editing interface, where you can begin to insert, edit, and play with annotations using the adjustable timeline, which works somewhat like a simple video editor. Spend about 30 minutes, and you'll get the hang of it, and there are plenty of great tutorials online to help you out.
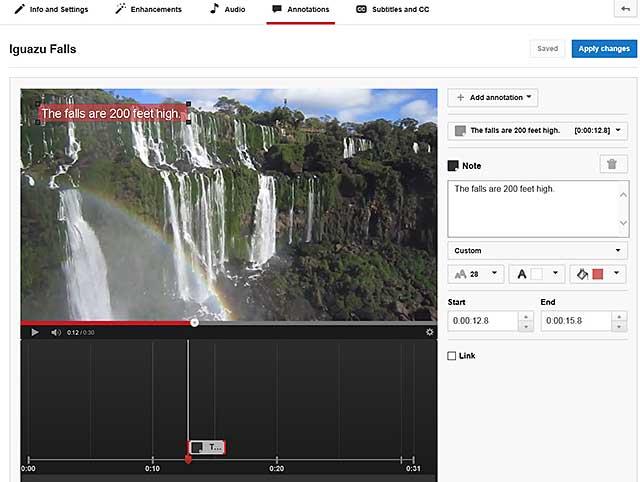 Anyone who edits videos will be comfortable with the annotation interface, which includes an easy-to-use adjustable timeline.
Remember that your big goal is to drive viewers somewhere else, either to your own website if you have something to sell (use the "associated website" menu) or to another one of your videos (or to any YouTube video) to heighten your profile. YouTube rewards you with higher rankings if you keep people engaged longer, so one way to use annotations effectively if you're just trying to get traffic and raise awareness is to send people to more of your videos or elsewhere on YouTube. In order to get that credit, make sure you go to webmaster.google.com and make the connections between you, your videos, your website, and Google. (YouTube also offers its own guidance on how to optimize your annotations.)
 Use annotations at the end of your video to direct viewers to a one-click call to action, to another video, or to your website.
"You need to find a balance between sending people to your website and keeping people on YouTube because if every video you post sends them off to your site, that's going to affect your rankings," says Walsh. "And if you put your annotation halfway through a four-minute video that leads to your website, then you earn only a two-minute watch time on that video. You won't get the same ranking. It's better to link at the end of your video."
Expert Clicks for YouTube
"I get the biggest response from a simple text note on-screen," says Acosta. "I'll position it on the far left or right, out of the way of the main video image. It looks like a button, and people are naturally curious to push it to see where it leads." He notes that putting a working link within a video is far more effective than simply typing it into the boring three-line video description area below the video window.
 Tempted to overuse annotations? Resist.
As an experienced video editor, Acosta sometimes goes an extra step and adds text—his URL, for example—directly into his video and then "lights it up" by building an annotation box around it. That way he gets professional-looking text and it remains visible even in mobile viewing, where annotations currently do not work. (You can do this easily with the YouTube Editor.) Other expert tips:
- Never obstruct crucial content with an annotation.
- Don't bombard viewers with too many distracting annotations. "I recommend using only one or two at the most during the course of a short video," says Acosta, "plus a call to action at the end."
- Don't give viewers a chance to exit early. Put things like subscription offers at the end of the video. "You want to have a 15 to 30-second end card that includes links to other videos or to your site," Walsh says.
- Don't put annotations at the bottom of the video if you have ads turned on because the ad will cover them up. In fact, YouTube may put an ad on your video even if you don't, so it's best to avoid bottom-dwelling annotations altogether.
- And don't put annotations at the very top of the video window because if you embed the video somewhere else, a black bar will cover them.
- Don't open a linked annotation in a different window at the end of your video. Turn off that option so viewers continue to watch videos in your window and keep the clock ticking. That's a top YouTube video ranking factor.
- Use YouTube Analytics to gauge how your annotations are affecting the way viewers are watching your video and then adjust them as necessary. "It helps me a lot," says Acosta. "You can learn so much about viewer retention, where you're losing people, and even how many times your annotations have been clicked. It's very effective for trial-and-error, pure Marketing 101."
- Don't hit the delete key on your keyboard during the annotation editing process because it will take you back a page, and you'll lose your work. Instead, use the annotation trash can located on the edit page.
- Click on the link at the top of the annotation edit page to preview how the viewer will experience your annotations. Be sure you like what you see before you publish.
- Don't be shy. Use colors. Bevel the box. Give it a shadow. "Using bright colors is better than sticking with the standard transparent gray box. You'll get a bigger clickthrough rate," Acosta says.
- Remember to hit the Publish button to make your annotations go live.
Don Willmott's article first appeared on OnlineVideo.net
Companies and Suppliers Mentioned