Deliver an Awesome Webcast from Your Desk
So you've been tasked (or you decided) to produce If you're working in a small home or office with a webcast from your office. Congratulations, it's a great way to communicate directly with one or hundreds of viewers. Of course, one critical factor impacting how effectively you communicate is the quality of your audio and video. In this article, I'll explore a range of tips and techniques you can use to maximize that quality.
At a high level, the key is to discretely address -- one by one -- all the critical functions involved in movie production, from set designer to camera operator to director. If you have internal resources to help, you should take advantage of them. But most of these tips and techniques are well within the capabilities of any computer-literate presenter, and you shouldn't need much help to implement them.
It All Starts With Bandwidth
Before jumping in, let's discuss the first item you should check, which is outbound bandwidth, or the speed that you can push data to the internet. If you don't have sufficient upload speed -- say 600Kbps or higher -- none of these production techniques can help.
If you're working in a small home or office with cable or DSL, be aware that your upload speed is usually much lower than your download speed. In my office, for example, I get 10Mbps downstream and 866Kbps upstream. It's not a lot, but it's enough for a decent quality SD stream.
In an office environment, you probably have much higher upload speeds, but usually you don't control how much of that capacity you can access. If, during your webcast, a co-worker starts uploading bulky video files to your cloud encoding service, your outbound throughput may drop precipitously.
The webcaster's best friend is a website called Speedtest.net, which measures upload and download bandwidth. If you're working from a small office or home, check your upload speed as soon as possible to make sure it's sufficient. If it's not, check with your service provider for a faster package. Then make sure that nothing else happens during the webcast to degrade this capability. If you're working within a larger organization, check your bandwidth. Assuming that it's sufficient, check with your IT department to see if there's any way you can reserve it during the webcast.
Set Design
Once bandwidth is taken care of, it's time to focus on production, starting with set design. There are several issues to consider. First, don't shoot with a window or any bright light in the background; this causes backlighting and darkens your face unacceptably.
Second, avoid backgrounds that contain excessive detail, such as plants with tiny leaves, wallpaper with fine patterns, or materials such as rattan curtains, which shimmer and create distracting artifacts during the webcast. One frequent mistake is to plaster a company name or logo throughout a painted wall or curtain background. This detail gets degraded during webcasts, and it's highly noticeable to viewers. In addition, avoid backgrounds with motion, which can distract the viewer and degrade quality.
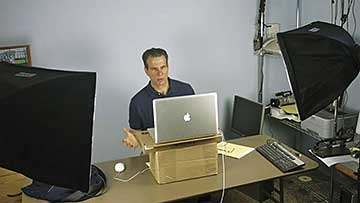 As you're probably realizing, it's best to keep it simple. For example, for webcasts from my office, I use a light blue wall, which is cheap, simple, and effective (see Figure 1). A single color background also makes it easy to choose clothing that contrasts with the background.
Speaking of contrast, remember that the primary function of the background is to provide contrast with the speaker's clothing, hair, and face. Without this contrast, the speaker can blend into the background, which is distracting and looks unprofessional.
With this as background, let's turn our attention to wardrobe.
Wardrobe
So, you already know that the clothing should be a different color than the background. What are the other concerns? As with backgrounds, excessive details in patterns should be avoided, as they can create issues such as moire patterns and other visible artifacts. Solid colors are always best.
Avoid excessive contrast ratio in the outfit, where the brights are really bright (white shirt) and the darks are really dark (black coat). Cameras and codecs have a difficult time preserving detail in both extremes, and that can make the clothing look like blobs without buttons, collars, or pockets. Better to use browns, grays, or blues -- whichever contrasts best with your background.
If you have long hair, pull it back, and minimize the bling, which can get glittery during compression. If you wear glasses, switch to contacts, if you have them, to avoid light reflecting off the lenses. As discussed later, you can light from the side to eliminate the reflection, but it's always easier to avoid the problem altogether.
Lighting Technician
Simply stated, if lighting is insufficient, it's impossible to produce a good quality image. Fortunately, lighting has gotten simpler and cheaper over the last few years, particularly with the advent of inexpensive LED lighting. And lighting doesn't have to be complicated; a single light located behind the camera or webcam can improve quality dramatically. But let's start with a few rules to observe.
First, if all lighting is from the ceiling, the bottom of the face will be unacceptably dark. So you'll have to supplement your ceiling fluorescents, or even turn them off and use other lighting, which is what I'm doing in Figure 1.
Second, don't mix lights of different color temperatures, which can cause bizarre-looking white balance issues. For example, don't mix incandescent with fluorescent lights unless you have gels to adjust the lighting temperature of one of the lights. Don't mix window-based daylight with any light unless you're sure the color temperatures match, which depends upon time of day. Often, it's simpler to shut the curtains and just use lights.
Third, your goal should be a bright, evenly lit face with no shadows. You can do this with a single light as mentioned above, placed directly behind the camera. Use a compact fluorescent (CF) or LED light, and it won't make the speaker squint, though it will reflect on the speaker's glasses.
I prefer the approach shown in Figure 1, with two, equally powered lights about 45 degrees from my nose line, pointing down at about 20 degrees. This is easier on the eyes and produces a more attractive look than a single light behind the camera. If you have a speaker with glasses, you can position the lights even further to the side until the reflection of the lights is eliminated.
Lighting purists recommend a hair light shining down on the speaker's head and shoulders to enhance contrast with the background. While this is best practice, if you plan your background and clothing so that the contrast is sufficient, you should be able to produce a nice, clean image without the hair light.
Every topic covered so far will enhance the quality of your webcast whether you're using the webcam on your notebook or an expensive HD camera. Obviously, using the embedded webcam and microphone on your notebook is easier, but external webcams, cameras, and microphones can enhance quality significantly. The obvious price is in cost and complexity.
Cinematographer
The easiest way to improve video quality is to use an external webcam rather than the embedded camera on your notebook. Don't get me wrong; embedded cameras can do an amazing job, but two critical factors that control image quality are the size of the lens and the imaging chip. On notebooks, both are tiny. On webcams, both are larger; they're larger yet on professional cameras.
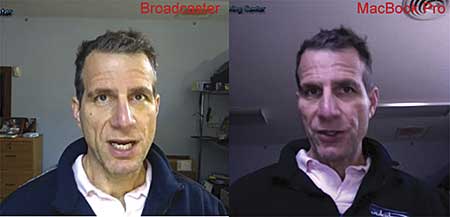 You can see the quality difference between the Logitech Broadcaster webcam and the embedded webcam on a MacBook Pro in Figure 2. The Broadcaster is sharper and clearer, and the colors are more accurate. Plus, a webcam is easier to position since it's not installed atop the notebook's LCD panel.
How do webcams compare to traditional camcorders? Webcams are obviously simpler; you connect the webcam to your USB port and you're done. With DV and HDV cameras, it's equally simple; just use the Firewire port instead of USB. However, most newer video cameras don't offer Firewire output, so you'll need HDMI or HD-SDI input into your encoding station.
It's definitely doable, and if I'm behind the camera, I prefer working with the fine-tuning controls that professional cameras offer. Still, the quality gap between an embedded camera and external webcam is much greater than the gap between the external webcam and a professional camera, so the extra hassle may not be worth it, particularly in the context of a one-person production.
Sound Technician
This leads us to audio. As you probably know, web viewers expect high-quality audio even when video quality is degraded. Like video, audio is a garbage in/garbage out medium, and if you use the microphone on your notebook, you're definitely starting with garbage in.
Microphone alternatives vary with the video device that you choose. If you use the webcam on your notebook, I recommend a lavalier microphone that connects into the microphone input port on your computer, which is typically a 3.5 mm (0.125") mini-plug. You should be able to find a high-quality unit for well under $40.
All webcams come with microphones that will do a better job than the microphone embedded in your computer, so if you're using a webcam you may not need a separate microphone. Still, the webcam will be at least 3'-4' feet from your mouth, while a lavalier will be less than a foot away, which means less noise. So if you plan to buy a webcam for webcasting, consider buying a model with a microphone input, which will use the same type of lavalier system discussed previously.
If you're using a separate camera for your webcast, you'll need (and will probably already have) a separate microphone system that connects to the camera. If you don't have one, there are myriad models available; just be sure to buy a system that connects to the microphone input ports on your camera, which will either be XLR or 3.5 mm. Since the camera will likely be 4'-6' feet away from the speaker, either buy a wireless system or make sure the cable is long enough to comfortably reach the camera.
Other Gear
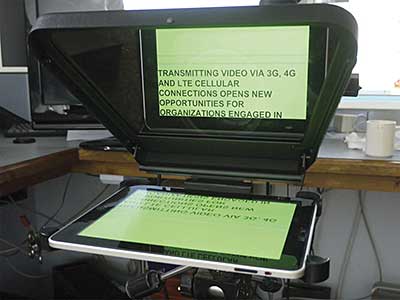 Most of my webcasts are long training events that are impractical to script. However, if your webcast requires a clear and cohesive message, such as an important policy change or similar announcement, consider buying a teleprompter. It's cheapest if you buy a teleprompter that uses an iPad, which start at around $700 or so. Make sure the unit includes both an iPad app for the prompter and an iPhone app to start and stop the scrolling; otherwise it's tough for one person to operate it.
Director
Two things here: scene integrity and framing. For the first, check the video to make sure there are no power cords, sticky notes, or other detritus in the picture.
In terms of framing, position the subject in the middle of the camera, with the eyes about one-third of the way down from the top of the frame (rule of thirds positioning). If your video resolution is small, such as 320x240, use either a close-up shot (top of the shoulders to top of the head) or medium close-up shot (armpits to top of head). If it's full SD, such as 640x480, use a medium shot (waist to top of head) or medium close-up.
The Day Of
On the day of the webcast, recheck your bandwidth, and then run through the discrete functions one at a time in roughly the order presented. Be sure there's nothing extraneous in the background, that your clothing contrasts well with the background, that lights are on and positioned correctly, with curtains closed and ceiling lights turned off (if required). Wash your face to get the oil off a few moments before the webcast begins.
In cinematographer mode, verify your camera settings (Auto focus? Auto white balance?) and that you're receiving audio from the microphone if it's attached to your camcorder. Run some test shots to disk to ensure that exposure and white balance are correct.
When thinking about audio, turn off all extraneous computers and other office gear (including air and heating unless absolutely essential), turn off your phone and cellphone, and run some tests to disk to make sure that audio levels are loud enough without being distorted.
If you're using a teleprompter, you should have practiced several times before now, so queue it up. Give one last check to make sure you've got the proper framing and positioning, and you should be ready to go.
Lights! Camera! Action!
This article appears in the forthcoming 2013 Streaming Media Industry Sourcebook.
Related Articles
So you need to start webcasting—should you choose a webcast platform, a live streaming service provider, or a conferencing solution?
27 Mar 2014