The Apple Final Cut Pro X 10.0.3 Update: Read Our Hands-On Review
You know the back story, so let's jump right in. Apple recently released Final Cut Pro X 10.0.3 which offers several new features, most notably multicam, advanced chroma keying, XML 1.1 and a beta version of broadcast monitoring. I don't have the hardware to test the last new beta feature, so I'll focus on the first three.
 I should also note that Apple added the ability to import layered Photoshop files. I tested it, it works, ‘nuff said.
On the other features, the Cliffs Notes version is this: The new multicam feature is fabulous, miles ahead of Final Cut Pro 7 and well ahead of Premiere Pro. Advanced chroma keying has some nice new twists, but I'd trade them all for an 8-point garbage matte effect. And, XML 1.1 looks pretty anemic from where I sit, though this isn't an important feature for what I do.
Multicam in Final Cut Pro X
Let's start with the highlights. The new multicam feature in Final Cut Pro X is miles ahead of Final Cut Pro 7, because it can handle multiple diverse formats, puts your tracks on a timeline so you can easily apply effects to them, and because for many projects, it aligns the clips automatically using audio waveforms. If you're a DSLR live event shooter limited to 10 minute chunks, FCPX now either saves you the $149 you'd otherwise spend on Singular Software's PluralEyes or hours of time syncing your clips together.
FCPX's multicam is also superior to Adobe Premiere Pro's multicam offering in two very key ways. The first is the auto-sync feature discussed above; the second is the number of supported angles. Where FCPX supports up to 64 angles, Adobe supports only four. This works for most event and corporate shooters who rarely go beyond four cameras. But if you're shooting major events like the Paul McCartney concert I used in my tests, four clips isn't enough. It will be interesting to see if Adobe responds to either of these new features in the next version of Premiere Pro.
Multicam -- How it Works
Beyond the new features discussed above, multicam works similarly to Final Cut Pro 7: first you group your clips into a multiclip, then you add it to a timeline and select your camera angles. To create your multiclip, you select your clips, then right click and choose New Multicam Clip. In Figure 1, you can see the Use Audio for Synchronization check-box, which I used in my tests. Or, as with Final Cut Pro 7, you can synchronize based upon time code or start point. I used audio to sync the clips in my tests, and it worked well.
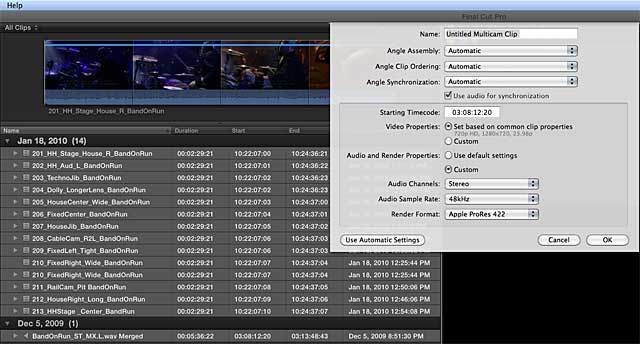
For the record, in addition to my own test clips, I used clips from the DVD included in Mastering MultiCamera Techniques, From Preproduction to Editing and Deliverables, by Mitch Jacobson, which should be the bible for anyone producing serious multicamera projects. There are clips from two major projects on the DVD, Sir Paul singing "Band on the Run," and Elton John singing "Funeral for a Friend (Love Lies Bleeding in my Hand)."
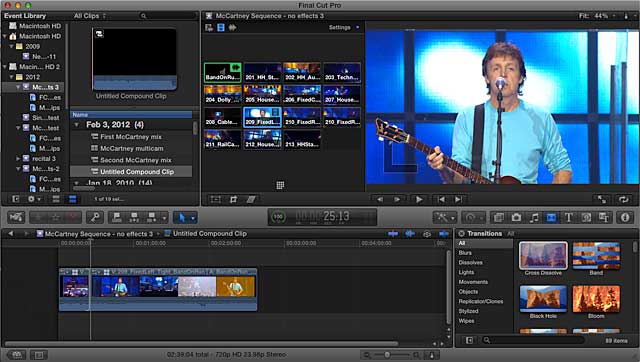
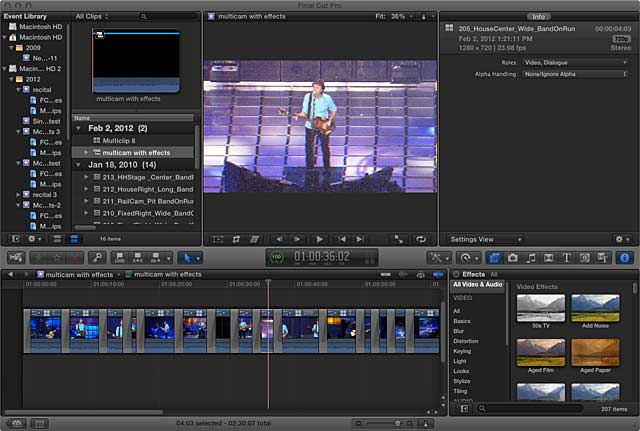
Once you have your multiclip, you can drop it into a timeline or create a new compound clip. From there, operation is pretty much identical to Final Cut Pro 7; you play the clip in real-time and choose the desired camera angle in the Angle Viewer, shown in the top middle of Figure 2. Using the icons on the top left of the viewer, I parked the audio selection on the audio mix and changed camera angles by clicking the desired angle, all in real-time.
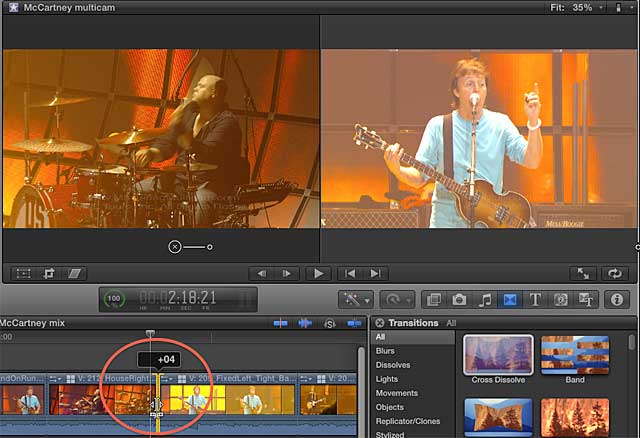
As before, you can easily fine-tune the timing of the angle switch with a simple trim control, shown circled in Figure 3. This opens up the two trim windows at the top so that you can see the last frame of the first clip and the first frame of the second. You can also right-click the camera angle to choose a different angle, if desired.
The only glitch I found was that I couldn't add transitions between the camera angle switches, which I could do in Final Cut Pro 7. This is a matter of taste, and many producers differ, but I like a 3 to 5 frame cross-dissolve between camera angle switches to soften the switch. In Final Cut Pro 7 (and Premiere Pro) you can shorten the default transition to 3 to 5 frames, select all the clips, and insert the transition en mass.
When I tried that in FCPX, I got the error message shown in Figure 4. Curious, I clicked Create Transition anyway to see if the project duration would decrease (and cause loss of sync) but Final Cut Pro didn't insert the transition. Perhaps there's a switch I'm not seeing; if anyone reading this can set me straight, please do so in the comments.
Beyond automatic audio sync, the most significant feature in the multicam facility is the angle editor, shown in Figure 5. This gives you individual access to the clips in the multicam so you can change the order, add or delete clips, and, most importantly, add and customize effects to the individual clips. Adding clip-wide effects to a multicam project was awkward in Final Cut Pro 7 because individual clips in the multicam never appeared in a timeline; you either had to apply effects in the Browser, which lacked effective preview capabilities, or apply effects to the clip, render it out, import it back in, and then include it in the multicam.
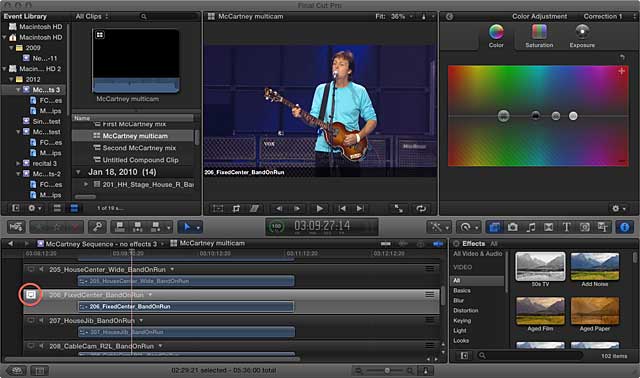
To give credit where credit is due, the FCPX angle editor is similar to how Premiere Pro syncs its clips for multicam, and applying effects to clips included in a multicam was never a problem for Adobe producers. Still, Apple trumped Premiere Pro by making it easier to view a clip in the multicam simply by clicking the white display icon circled in Figure 5. In Premiere Pro, you'd have to turn off the display of all clips above the one you're trying to view, which isn't a big deal with four clips, but could be a major pain if Premiere Pro ever expanded to 8 or 16 clips.
How Good is the FCPX Auto Sync?
Audio sync worked perfectly with the test clips I used; no surprise, since my test projects were either professionally produced from the book DVD or my own event-oriented HDV shoots, which involve three cameras, each producing one long file. These types of projects are walks in the park for any audio synchronization tool, and are also pretty easy to sync by hand because so few files are involved.
The real hard case involves multiple segments from a DSLR or similar camera. Since I didn't have a project like this on hand, I asked the folks from Singular Software, the developer of PluralEyes, to send a test for me to try in Final Cut Pro X. For those that don't know, PluralEyes is a tool for synching multiple camera feeds from multiple sources. Yes, I know, Singular has a stake in FCPX's audio sync not working well, since otherwise they're the best option for automatic sychning.
Long story short, FCPX couldn't sync the project that they sent, while PluralEyes could, no surprise there, seek and ye shall find. All I can say is that while FCPX worked fine on my projects, it may not be the most comprehensive solution around. Don't get me wrong; even if you have to buy PluralEyes, FCPX is miles ahead of Final Cut Pro 7 in multicam capabilities, so it's a serious improvement either way.
Try the multicam audio sync and see how it works for you; just don't be surprised if it's not perfect. The other functionality in the tool I'm almost sure you'll like.
Advanced Chroma Keying in FCPX
In the original release of Final Cut Pro X, the keyer was already quite competent, breezing through my two standard test clips in automatic mode; no adjustments necessary. Now I've added two more greenscreen clips to the test and the results are about the same, though the edges are rough in one of the clips, as they often are when compositing.
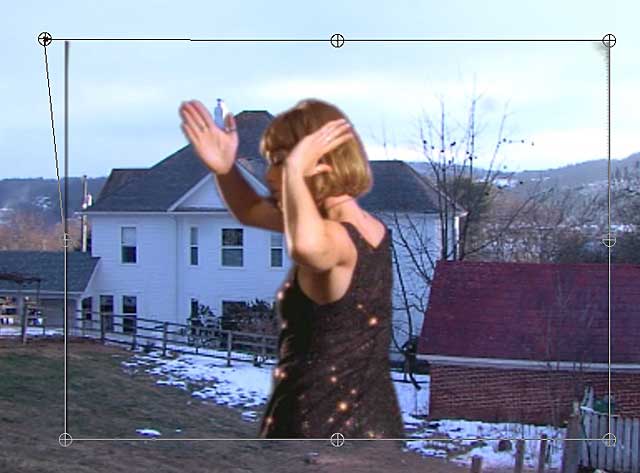
When I looked for the garbage matte effect to clean up the edges, I noticed that there wasn't one. If you're not familiar with the concept, check out Figure 6, a screen shot from Premiere Pro showing the 8-point garbage matte, which I've applied to the dancing girl that I'm compositing over my next door neighbor's house. Each of the round thingies is a movable point in the mask; anything outside the box gets excluded, anything inside shows through.
As you can see, there is a big dark line on the left, and chroma key residue in the upper right corner, and though you can't see it, in the bottom right corner as well. With the 8-point garbage matte, which is also available in Final Cut Pro 7, you drag the edges in a bit and eliminate the problem. In Final Cut Pro X, you're supposed to import the clip into Motion and apply the matte there. Obviously, this only works if you have Motion and the time to learn how to use it.
Fortunately, it's fairly easy to create a matte effect in Motion that you can apply in FCPX, even if you don't have Motion installed. Even more fortunately, some third parties have already created such an effect, one of which you can download here. I'm sure most users would prefer a native garbage matte effect, though with free third-party tools available, it's not a show-stopper.
Fortunately, when Apple taketh away, sometimes they giveth, and so is the case with chroma keying in Final Cut Pro X, which sports some enhanced controls for color sampling, edge quality, and light wrap. I spent the most time on the final new feature.
By way of explanation, light wrap helps the foreground subject blend in with the background by wrapping the color from the background over the foreground edges. It's a technique that pros have used for awhile, but in some tools it takes four or five effects to make it work. For example, here's a tutorial that shows how to produce a light wrap in an older version of After Effects. In FCPX 10.0.3, it's a simple slider control.
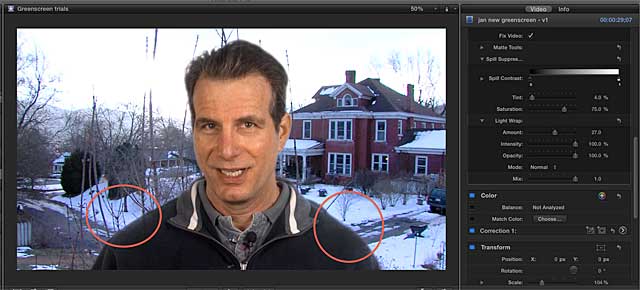
Be careful when you apply this effect, however, since it can cause the background to bleed through a bit, as you can see in the red ovals on my shoulders in Figure 7. If this happens to you, don't back down on the Light Wrap adjustment until you try correcting it with the Fill Holes adjustment, just a few controls up in the Keyer effect. This fixed the problem for me and let me use the light wrap technique with no negative consequences.
Before testing the new release, I tried these same test clips in Final Cut Pro 7, and without question, FCPX is miles ahead of version 7 in regards to the ease and quality of chroma keying. Premiere Pro's Ultra Keyer is a wonderful tool, but it doesn't offer Live Wrap, though with the 4-, 8- and 16-point garbage mattes in Premiere Pro, I'd probably call the whole thing a draw.
XML 1.1 and FCPX
XML has never been that important to me, since I could perform all the functions that I needed within the Final Cut Pro suite. However, now that Intelligent Assistance has released a $9.99 tool called 7toX for Final Cut Pro which converts Final Cut Pro 7 XML to Final Cut Pro X XML 1.1, XML has become more important to me and to all users seeking to edit their legacy projects in Final Cut Pro X. So, to test XML 1.1, I bought the product and converted some projects.
Operation is simple. You export XML from Final Cut Pro 7, then run 7toX. You choose whether to send the resulting file to Final Cut Pro X, or save it as an XML file that you can import yourself.
The first few times that I chose Send to Final Cut Pro X, I got the error message shown in Figure 9, which company officials attribute to my running Snow Leopard, and to which they hope to issue a fix soon. The simple workaround was creating the XML file and then loading that into FCPX, which worked fine.
Multicam was on my mind for obvious reasons, so I created a multicam clip in Final Cut Pro 7, applied effects to each clip, and then exported the result. As you can see in Figure 10, the result looked pretty good - it even nailed the transitions between the clips in the timeline.
Then I started looking for the effects in the transferred clips and noticed that most weren't there. When I spoke with the company about it, they mentioned that filter settings for many effects don't carry over because they're not supported in XML 1.1. So, if you're looking for complete and comprehensive backwards compatibility, you'll probably be disappointed. On the other hand, nuts and bolts like clip positioning, trimming, audio fades, transitions, and the like seem well supported.
To their credit, Intelligent Assistance did a comprehensive job describing what works, how it works and what doesn't work here. Overall, on most projects, the tool should save you more than enough time to justify its cost.
The Verdict on FCPX 10.0.3
I presented four critical deficits
last time I looked at Final Cut Pro X; two of which, layered Photoshop file import and multicam editing, Apple addressed in this release. The other two; true DVD authoring and a multi-track audio editor, will likely never be addressed. Given my current practice, this means that I can't currently do without the Adobe Creative Suite or even the old Final Cut Suite.
Looking at the bigger picture, Apple deserves credit for delivering on a promise and doing a largely good job of it. Functionally, Final Cut Pro X can now get the job done for most event and other multicam intensive shooters, at least on the video editing side, if not DVD creation. For high-end TV or indie film producers, I can't say. For most web producers, the answer is also probably yes.
Whether FCPX is a better tool than Adobe Creative Suite, Avid Media Composer, or Sony Vegas is an entirely different question for another day. Whether Final Cut Pro X is the best choice for those migrating from Final Cut Pro 7 is also an entirely different question. At the very least, for many producers, release 10.0.3 gets FCPX in the conversation.
Jan Ozer's article first appeared on OnlineVideo.net