Review: Camtasia 7
During recording itself, I found the operation unchanged from previous versions. But I captured my test project at 1280x720 at 15 fps, which isn't all that demanding. For this release, TechSmith claims that capture rates have been boosted by up to 50% "for smoother motion when recording things like 3D design software, real world video, or Flash animations." To test this, I recorded a 720p video from YouTube that had embedded timecode so I could easily see if any frames were dropped during capture.
I recorded first at 854x480, and Camtasia captured most frames. There were occasional dropped frames that likely related more to synchronization than capture performance because Camtasia can't sync its precise 30 fps capture rate to the frames displayed by YouTube. Then I captured at 1280x1024, and Camtasia captured only about one in three frames. The ideo was still smooth enough for casual viewing, but some stutters were evident. Captured file sizes were quite large, however, with a 90-second file consuming about 1.3GB in disk space at the lower resolution. Obviously, I don't advocate illegally copying and distributing streaming video. But if you've got the disk space and can live with 854x480 resolution video, Camtasia can capture a very good quality stream.
With the recording done, let's move to editing. 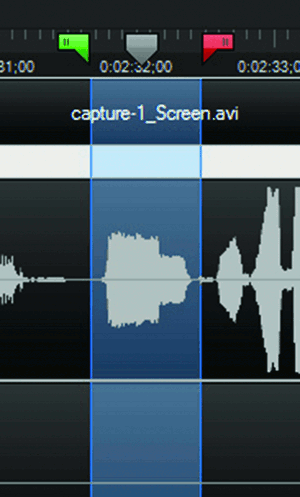
Editing in Camtasia Studio
Camtasia Studio has a three-window interface comprising a timeline, a preview window, and a utility window that serves as the repository for all content as well as configuration options. In most projects, I start by cutting away unwanted sections of the screencam. Here, operation has been enhanced by the ability to easily set in and out points via in and out markers on the cursor. You can see this in Figure 5, where the green marker is the in point, and the red marker is the out point. To delete the "um" you see on the audio timeline, set the green marker where you want the cut to start, set the red marker where you want it to end, and then right-click and choose Cut (or click the scissors icon). The unwanted frames are gone.
This is an excellent idea in concept, though operation could be improved in a couple of ways. First, there's no way to preview what the edited video will look or sound like after the cut; you can preview, but the playback stops at the out point, which can make it hard to see or hear if you're cutting at the right place.
Second, Camtasia doesn't leave an edit mark like a split at the deletion point-if you cut away a section from a single video, you're left with a single, shorter video. This has two implications-one good, the other bad. The good implication is that it's much easier to apply pan and zoom effects to a single video rather than to the dozens of videos you'd have on the timeline if this tool left a split. The bad one s if you later discover that you inadvertently cut out some necessary footage, you may have no way to undo the deletion without undoing all the intermediate steps, which is an option you lose if you save the file and close the program.
Of course, you can use the Split tool to trim away unwanted footage and leave an edit point on the timeline. However, this gets complicated if you apply lots of pan and zoom effects. Choice is good; just make sure that if you use the scissors tool, you mind the old carpenter’s redo to “measure twice and cut once.” The consequences of a mistake might be severe.
Zooming and Annotating
 Once you've cut away the chaff, it's time to start editing your screencam into its final form. When you're outputting your screencam at a smaller resolution than the capture resolution, one of the most valuable techniques is panning and zooming around the interface. To explain, I captured my test screencam at 1280x720 resolution, but I produced it at 854x480. Rather than scale the entire captured video to fit into the smaller window, which makes the text harder to read, most producers prefer to follow the action around the interface and show the most relevant regions at as close to 100% as possible.
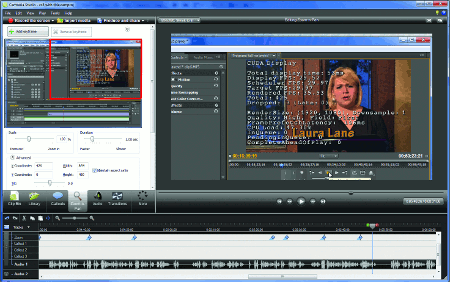
You can see this in Figure 6. On the left, the red box indicates the portion of the video actually being displayed at that point in the timeline, with the Scale control set at 100%. In the preview window on the right, the text in Premiere Pro's preview window is very clear and easy to read because it's displayed at 100% resolution.
With Camtasia Studio, when you first drag a video into a project, you choose the output resolution. If it's smaller than the capture resolution, Camtasia will apply SmartFocus to pan and zoom around the interface and optimize the presentation. SmartFocus is a good starting point, though most producers will want to adjust the parameters selected by Camtasia and add more pans and zooms. Camtasia makes this quite simple; with the Zoom-n-Pan workspace selected, you can play the video and pause at any point in the timeline. If you move the red box in the workspace (it's actually grayish in the actual program) or change the zoom parameters, Camtasia automatically creates a keyframe. Obviously, you could do the same type of panning and zooming in Final Cut Pro or Premiere Pro, but it's quicker and easier in Camtasia.