Review: Camtasia 7
 Camtasia has been my go-to screen recording application on Windows since forever, and I have at least 200 Camtasia recorded projects under my belt. But seldom, if ever, have I edited and produced my project in Camtasia, preferring the more familiar environs of Adobe Premiere Pro or Apple Final Cut Pro. To be brutally honest, in previous versions, Camtasia's editing application, Camtasia Studio, felt clunky, inefficient, and frequently dysfunctional, as if it were created by engineers who had never really edited video. Its resemblance to consumer video editor Microsoft Movie Maker did nothing to dispel that notion.
So when I started this review of Camtasia Studio 7, I assumed that the screen capture component of the product would be as good or better than version 5, the version I had standardized on. But I really wondered if Camtasia Studio had advanced enough to make it edit-worthy. In short, it has. Even with Premiere Pro CS5 installed on the same HP Z400 workstation, when faced with editing a screencam-based project, I'll use Camtasia Studio going forward. 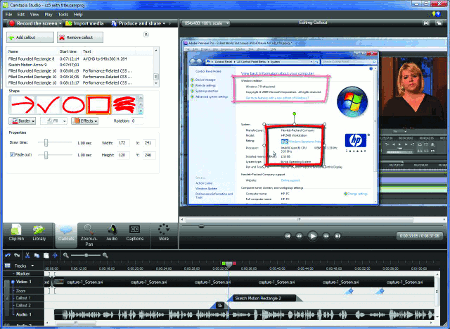
Why? In a nutshell, while Premiere Pro (and Final Cut Pro on the Mac) are clearly superior general purpose editors, TechSmith has optimized the most frequently used screencam-related editing functions-features such as pan, zoom, and adding callouts-so that they're more accessible, faster to apply, and more feature-rich in Camtasia Studio than in any other general purpose editor. You can see a good example of this in Figure 1, which shows off Camtasia's new sketch motion effects that you can hand draw on the page while you're speaking; a great way to hold the viewer's attention.
TechSmith has also improved basic functions such as trimming and cutting and pasting, making these operations efficient as well. Overall, now that TechSmith includes highly competent screen capture and editing functionality, it's a lot easier to justify the $299 price. That's the short answer. Let's take a closer look at the components of Camtasia Studio 7. If you'd like to see an example of some of the components that I'm describing, check out the tutorial on Adobe Creative Suite 5 that I created with Camtasia Studio 7 as part of this review on www.streamingmedia.com.
Overview
Another great feature is the ability to lock the recording to an application so you get perfect edges around the application that you're recording. If you specify the size (say 1024x768) and then lock the recording to the application, you're guaranteed a perfectly edged recording at the required size (Figure 3).
With most other screencam recording programs, you either record the entire screen, which creates extra cropping work during editing, or you have to manually adjust the edges of the recording zone to match the application and then somehow get both to match the desired recording resolution. Typically, this leads to either some extra pixels outside the application window or inadvertent cropping of the application you're recording.
To my dismay, when I first started working with version 7, I thought TechSmith had removed this feature because the familiar check box on the front of the recording application was gone. TechSmith had, in fact, moved it to a menu option, a puzzling decision that makes the application harder to find and access.
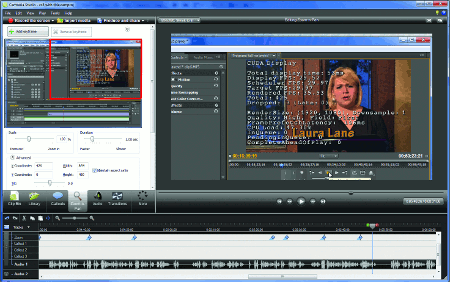
While discussing negatives, I should point out that although the "Force popup dialogs into region" option sounds great, it doesn't work reliably, at least with the applications that I spend a lot of time recording. Here's the problem. Say you're recording a screencam. You click File > Import, and the import window opens outside of the recording zone. In theory, checking the "Force popup dialogs into region" option should prevent this problem. But as you can see in Figure 4, Premiere Pro's preview window's "wing" menu appears outside the recording zone shown by the white brackets highlighted by the red arrows. I get the same result with the Import dialog, which is a stand-alone pop-up window.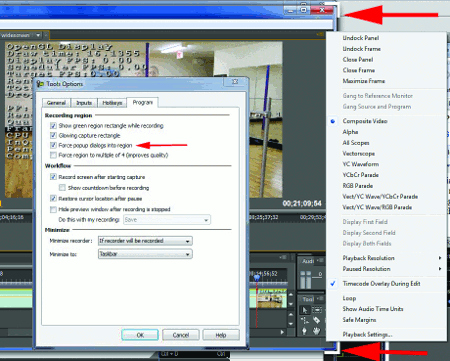
I first reported that Camtasia didn't reliably perform this function back in my review of Camtasia 5. To which TechSmith responded, "Yeah, it seems to be a balancing act of trying not to be too obtrusive with other apps processes, so yes,
we need to do a better job of trapping and will address this in a minor upgrade ASAP so most likely right away in 5.0.1." Still waiting, guys. For some perspective, however, as far as I know, no other screen recording program has this feature, so Camtasia's lack of ability to perform it reliably isn't a competitive disadvantage. Just don't pull your hair out trying to make it work if it doesn't while you're recording.
As a workaround, when I know a pop-up window is going to open outside of the recording zone, I pause the recording just after clicking the menu option that opens the window (and before he window opens), resize and reposition the window as needed, and then resume recording; this offers a great example of how Camtasia's ability to pause and restore cursor positioning can simplify your life. When working with an attached menu as in Figure 4 or with right-click menus that appear outside the recording zone, you have to force the application to position the menu within the recording window.
In the situation shown in Figure 4, for example, I would move Premiere Pro to the right edge of the screen and record from there because Adobe would force the menu to display within the recording zone. If I were recording right-click menu commands that extend beneath the application window, I would record the application on the bottom of the screen.
By the way, if you're doing lots of screencam work, I recommend using a 30'' monitor such as the HP LP3065, which I've used for the past couple of years. That way, you have plenty of room to position the application you're recording, any notes that you've jotted down digitally to guide your workflow (Google docs is ideal for this), and any other necessary ancillary applications. Since I'm on the subject, those who are new to producing screencams with Camtasia should check out my 2008 tutorial, "Producing Screencams in Camtasia Studio" to see a good overview of the techniques and procedures that I use. OK, with that diversion aside, we now return to the regularly scheduled review.
During recording itself, I found the operation unchanged from previous versions. But I captured my test project at 1280x720 at 15 fps, which isn't all that demanding. For this release, TechSmith claims that capture rates have been boosted by up to 50% "for smoother motion when recording things like 3D design software, real world video, or Flash animations." To test this, I recorded a 720p video from YouTube that had embedded timecode so I could easily see if any frames were dropped during capture.
I recorded first at 854x480, and Camtasia captured most frames. There were occasional dropped frames that likely related more to synchronization than capture performance because Camtasia can't sync its precise 30 fps capture rate to the frames displayed by YouTube. Then I captured at 1280x1024, and Camtasia captured only about one in three frames. The ideo was still smooth enough for casual viewing, but some stutters were evident. Captured file sizes were quite large, however, with a 90-second file consuming about 1.3GB in disk space at the lower resolution. Obviously, I don't advocate illegally copying and distributing streaming video. But if you've got the disk space and can live with 854x480 resolution video, Camtasia can capture a very good quality stream.
With the recording done, let's move to editing. 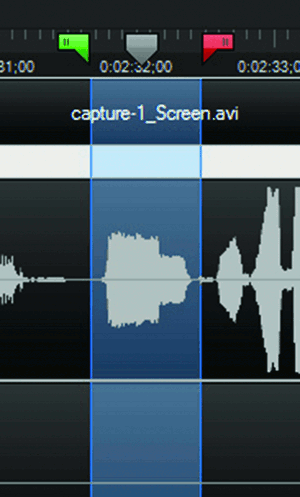
Editing in Camtasia Studio
Camtasia Studio has a three-window interface comprising a timeline, a preview window, and a utility window that serves as the repository for all content as well as configuration options. In most projects, I start by cutting away unwanted sections of the screencam. Here, operation has been enhanced by the ability to easily set in and out points via in and out markers on the cursor. You can see this in Figure 5, where the green marker is the in point, and the red marker is the out point. To delete the "um" you see on the audio timeline, set the green marker where you want the cut to start, set the red marker where you want it to end, and then right-click and choose Cut (or click the scissors icon). The unwanted frames are gone.
This is an excellent idea in concept, though operation could be improved in a couple of ways. First, there's no way to preview what the edited video will look or sound like after the cut; you can preview, but the playback stops at the out point, which can make it hard to see or hear if you're cutting at the right place.
Second, Camtasia doesn't leave an edit mark like a split at the deletion point-if you cut away a section from a single video, you're left with a single, shorter video. This has two implications-one good, the other bad. The good implication is that it's much easier to apply pan and zoom effects to a single video rather than to the dozens of videos you'd have on the timeline if this tool left a split. The bad one s if you later discover that you inadvertently cut out some necessary footage, you may have no way to undo the deletion without undoing all the intermediate steps, which is an option you lose if you save the file and close the program.
Of course, you can use the Split tool to trim away unwanted footage and leave an edit point on the timeline. However, this gets complicated if you apply lots of pan and zoom effects. Choice is good; just make sure that if you use the scissors tool, you mind the old carpenter's redo to "measure twice and cut once." The consequences of a mistake might be severe.
Zooming and Annotating
The primary new rendering-related feature is HD upload to YouTube, which proved a bit rocky in my tests. My first hurdle was the error message shown in Figure 8, which advised me that my video contained "at least one feature not supported by the YouTube plug-in." I clicked OK to encode anyway, but I got another error message stating that "An error occured and the video did not upload." Note that this occurred after the upload started, indicating that login and password weren't the issue.
Camtasia allowed me to save the file it produced, which I manually uploaded to YouTube without a problem. Thinking that the problems might have been project-specific, I attempted to upload the test project that Camtasia supplies with Studio to YouTube, and I got the same error. I've asked TechSmith about these issues, but I haven't heard back from them.
The Verdict?
What's the verdict? Despite the bumps in the road mentioned throughout this review, Camtasia is the most functional screen capture utility around, with several unique features that dramatically promote efficiency. With version 7's additions and improvements to Camtasia Studio, it's now the best editor for most screencam projects. If you're serious about producing screencams on the Windows platform, this is he tool you need to get.
[Note: This review originally appeared in the June/July 2010 issue of Streaming Media magazine.]
Jan Ozer's article first appeared on OnlineVideo.net