Tutorial: Removing Pops and Clicks and Background Noise in Adobe Audition CS6
Two types of noises degrade the audio you shoot with your video: random noises like microphone clicks and pops, and consistent noises like white noise or air conditioning hum. This tutorial demonstrates how to remove both of them in Adobe Audition CS6.
Addressing the Overall Low-Volume Audio
Now we've taken care of all the pops and clicks, but as you can see in the waveform, the audio is way too low. We can fix that in the Favorites menu by choosing Favorites > Normalize to -0.1 dB (Figure 11, below). This boosts the entire audio file so that the loudest region is just under 0 dB, which is as loud as you can get without introducing distortion into the audio file.
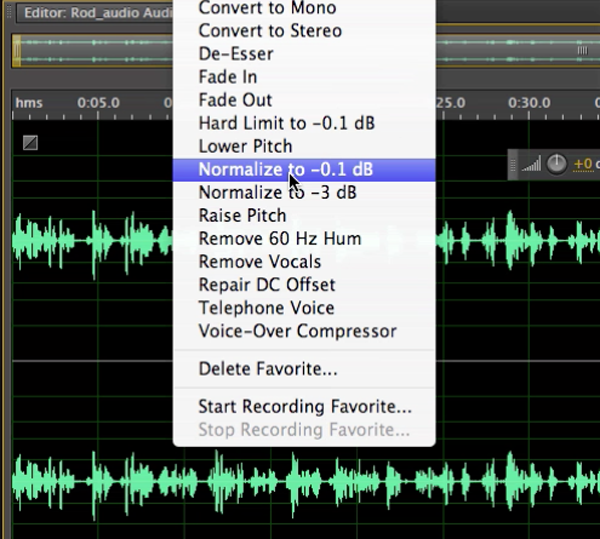
Figure 11. Increasing the volume of the clip by normalizing to -0.1 dB
After applying this filter, as you can see in Figure 12 (below), the audio file looks pretty healthy.
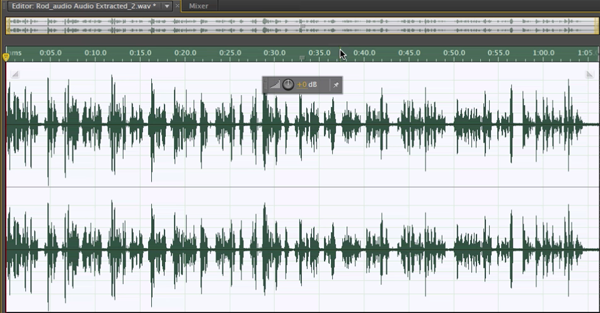
Figure 12. Clicks are gone, and overall volume looks good.
Dealing with Gain Noise
But we've got one problem and that problem is the gain noise I talked about earlier. If you zero in on quiet (or near-silent) regions of the waveform and it looks bushy (see Figure 13, below), this bushiness typically means you're going to have some audible noise that resulted from the boost you gave to your audio when you normalized to -.01 dB. In this clip we can hear background noise that we just couldn't hear before.

Figure 13. Bushiness in quiet regions of the waveform (such as the area highlighted here) means gain noise introduced when we boosted the audio.
There are two ways to address this. As with pops and clicks, the first thing you want to try is the automated approach. Double-click in the waveform to select the entire waveform, and then choose Effects > Noise Reduction Restoration > Adaptive Noise Reduction, as shown in Figure 14 (below).
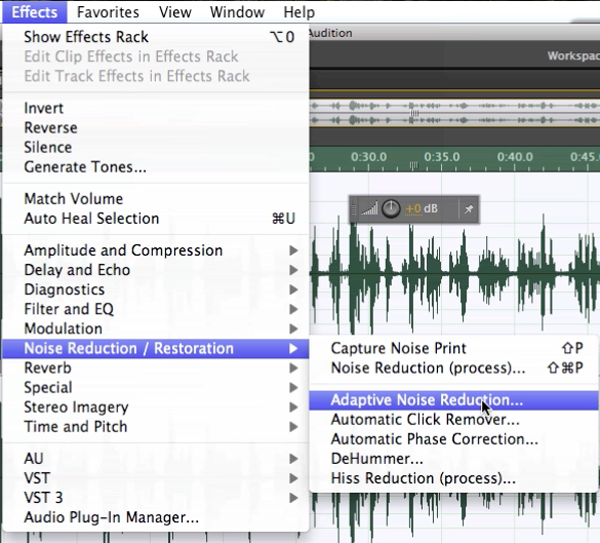
Figure 14. Choosing the automated Noise Reduction approach
I recommend starting with Light Noise Reduction (Figure 15, below).
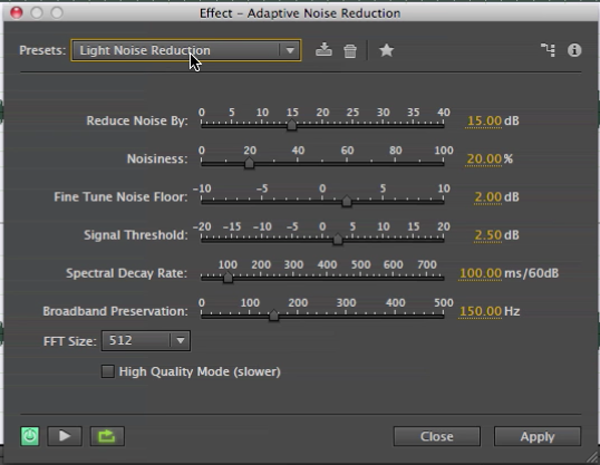
Figure 15. Try Light Noise Reduction first.
You can see in Figure 16 (below) that most of the bushy lines between the waveforms are gone. There's still a bit of noise, but it's vastly reduced.
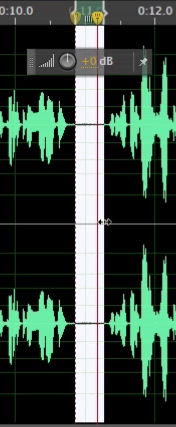
Figure 16. Most of the bushy lines are gone, which means we've removed most of the gain noise.
In most instances, I would probably say that's okay and move onto the next edit. But if it's not adequate in the project you're working on, there's something else you can try. To undo the last filter and try a more precise approach, go to Edit > Undo Adaptive Noise Reduction, as shown in Figure 17 (below).

Figure 17. Undoing the Adaptive Noise Reduction
Related Articles
This tutorial demonstrates Adobe Audition's Remix feature, which allows you to shorten the length of a music track to match the duration of your video edit.
This tutorial demonstrates how to use an After Effects alpha matte to make your video "shine through" your text.
Today Adobe announced updates to all Creative Cloud video apps that will debut at NAB. Here are details on the updates, plus a video tutorial on four key new features in Premiere Pro CC: Master Clips, Live Text, Masking and Tracking, and new 4K format support.
While After Effects may be daunting for some Premiere Pro editors, here is an easy-to-follow workflow that can enliven your text and titles with pre-built animations found in Adobe Bridge, applied in a few simple steps in After Effects, and imported directly into your Premiere Pro timeline.
iShowU, a Mac-based screencam app from ShinyWhiteBox.com, is quick, easy-to-use, and inexpensive; here's a look at how to use it to produce pro screencams that you can import into Adobe Premiere Pro CC to integrate into your video projects.
In this tutorial, we'll look at how to create screencams with TechSmith Camtasia, and then import them into Adobe Premiere Pro to incorporate them into your existing Premiere Pro projects to create professional-quality instructional videos that seamlessly combine screencams and HD footage.
Here are three quick tips that will streamline your titling workflow in Premiere Pro when you create styles you like and want to use them consistently without reinventing them each time.
This video tutorial demonstrates how to restore muffled sections of spoken audio using the Multiband Compressor in Adobe Premiere Pro CC or Adobe Audition.
This video tutorial demonstrates how to use and leverage 3 key new features in Adobe Media Encoder CC: Lumetri Looks support, and image, text, and timecode overlay.
This tutorial demonstrates how to apply an effect to a portion of a video image while leaving the rest of the clip untouched, and how to track that portion of the image throughout the duration of the clip, using the Track Matte effect in Adobe Premiere Pro CC.
Recent upgrades to Adobe CC make it easy to apply graded looks in Adobe Premiere Pro CC and match shots with different color temperatures via seamless roundtripping between Premiere Pro CC and SpeedGrade CC.
Exploring 3 new key features in Audition CC, the newest version of Adobe's professional audio editing application: Sound Removal for eliminating hums and other variable-frequency unwanted noises, the Loudness Radar Meter for matching and adhering to broadcast volume standards, and Automatic Speech Alignment for ADR.
Background noise and pops and clicks in audio are an unfortunate fact of life for many productions. In this tutorial we'll explore some fixes you can try in Final Cut Pro X.
Jan Ozer sits down with Bill Roberts to discuss the trends impacting the future direction of Adobe Creative Suite for video pros, including the decline of 3D, the rise of 4K, and second-screen viewing. Other topics included the growth of Creative Cloud, and the development arc of Apple Final Cut Pro X.
There have been lots of comparisons between Final Cut Pro X and Premiere Pro CS6, with most focusing on features and workflows. This article discusses a series of multiple-format benchmark tests that analyzed comparative performance between the two programs.
Adobe Creative Suite gets cloud treatment, giving producers options for licensing Photoshop, Premiere Pro, After Effects, Flash Pro and other CS6 applications on a month-by-month subscription basis, rather than paying for boxed product with perpetual licenses.
Adobe's ingest and simple transcoding tool won't rid you of the task of logging, but for those who are staying within an Adobe-only environment, the features of Prelude will make your editing, compositing, or even live-production clip-creation workflows quite a bit easier.
When you compress video for the web, the video can darken and colors can become muted. In this tutorial, I'll show you how to correct color and adjust brightness and color saturation with Adobe Premiere Pro's Fast Color Corrector.
If you're a streaming producer you have to know how to produce H.264 for both Flash distribution and for mobile devices. Fortunately, Adobe Media Encoder makes this simple with multiple presets for desktop and mobile players which I'll show you how to find and customize in this tutorial.
The Adobe Flash Media Live Encoder (FMLE) works on both Windows and Mac computers and is free. Though you'll need a bit heftier of a computer to run FMLE than some other software encoders, you'll be rewarded by a high-quality, consistent video stream. In this tutorial, I'll walk you through the steps of producing a live event with FMLE.
In this tutorial you'll learn how to maximize the brightness and contrast of your video in Adobe Premiere Pro CS6 using the Brightness, Contrast, and Gamma Correction controls for effective and balanced adjustments.
Video encoding and editing expert Jan Ozer provides three useful tips that will enhance your workflow and get you out of some editing jams in your Adobe Premiere Pro projects: editing audio without unlinking; Fill Left and Fill Right to create stereo audio; and creating nested sequences for smoother edits and creating reusable set pieces in your projects.
Adobe Premiere Pro Instructor extraordinaire Luisa Winters explains how to use the new and enhanced Multi-Camera Monitor for quick and efficient multicam edits in Adobe Premiere Pro CS6 in this video and text tutorial.
The new version of Adobe Media Encoder, included in the just-released CS6 collection as well as as a standalone product, offers significant improvements in usability and performance, as well as new features. Here's what you need to know about it.
In the final installment of the NAB Interviews with Shawn Lam, Shawn talks with Adobe's Al Mooney about key new features in Premiere Pro CS6 and Adobe Media Encoder.