Tutorial: Streaming Live with the Adobe Flash Media Live Encoder
The Adobe Flash Media Live Encoder (FMLE) works on both Windows and Mac computers and is free. Though you'll need a bit heftier of a computer to run FMLE than some other software encoders, you'll be rewarded by a high-quality, consistent video stream. In this tutorial, I'll walk you through the steps of producing a live event with FMLE.
Let's start by talking about the high-level requirements for streaming a live event. In addition to FMLE and associated camera, lights and audio gear, you'll need a live streaming server to distribute the live stream. I use PowerStream.net for most of my live events and testing. Once you sign up for the service, they'll send you two sets of credentials.
Connecting and Sending Encoded Streams to the Server
The first thing you'll do is input into FMLE to connect to and send the encoded streams to the server. You can see what this looks like in Figure 1 (below). Once you enter the FMS (Flash Media Server) URL and Stream name, you click Connect. If everything is Kosher, you'll be rewarded by the Connect button converting into the Disconnect button. If not, you'll get an error message.
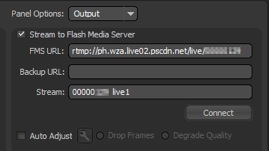
Figure 1. Connecting to the server
The second set of credentials will provide connection information for the web page to which the server will deliver the streams. With PowerStream, you're in charge of building a landing page and player that makes the stream accessible to your viewers, though some other services provide a simple player for you. If all this sounds too complicated, consider using a live streaming service provider like LiveStream or UStream.tv, which will input your live stream and create the player and landing page for your viewers. You can use FMLE with these services as well, though it's probably simpler to use the software provided by LiveStream and UStream for these purposes.
Installing and Working with FMLE
Still here? OK, let's download and start working with FMLE (Figure 2, below). You can download the server at http://www.adobe.com/products/flashmediaserver/flashmediaencoder/. Install as normal.
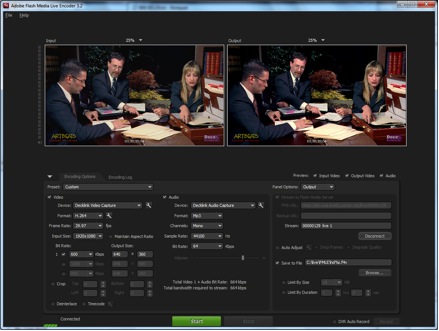
Figure 2. FMLE in all its glory
Figure 2 shows FMLE in all its glory, open to the Encoding Options tab. On the upper left is the preview window, on the upper right the output. Following this theme, configuration and encoding options are on the left and in the middle, while output options are on the right.
Configuring Audio and Video Inputs
Start by configuring your video and audio inputs. If you're working with DV source, this is simple: You'll choose the same non-configurable option for both. If you're shooting HDV, things get more complicated because FMLE can't connect to an HDV device. You'll have to use a product like the Blackmagic Design DeckLink card shown in Figure 3 (below). Click the wrench next to the Device input to open the Settings window shown on the right.
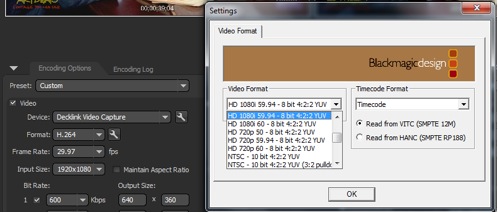
Figure 3. Configuring the DeckLink video capture card
Choose the Video Format that matches the output from your live feed, whether you're streaming directly from a camera or from your production system. This should be easy enough to select, since you won't see any video in the preview window until you choose the right format.
Same deal with audio: Choose your capture device, click the wrench, configure the desired audio format, turn on your source with audio enabled, and then click over to the Audio Stream tab to see if the volume levels are moving. If so, you're good to go, if not, diagnose and resolve the issue before getting started.

Figure 4. Configuring your audio inputs
By the way, I typically configure talking head-type live events as mono, since the microphones are typically all mono, and to save bandwidth. That's why you only see one channel in Figure 4.
If you're looking for a capture device to use with FMLE, check Adobe's device matrix.
Related Articles
Two types of noises degrade the audio you shoot with your video: random noises like microphone clicks and pops, and consistent noises like white noise or air conditioning hum. This tutorial demonstrates how to remove both of them in Adobe Audition CS6.