Streaming Over 4G with the Teradek Cube, Pt. 1: Setup
With the rise and increased penetration of 4G networks, live streaming over cellular is becoming more and more accessible. For this review, we tested the Teradek Cube encoder and Bond 4G cellular transmitter
The Cube
The encoding chores are handled by the Cube, which can stream via 4G, Wi-Fi, and Ethernet and connect to multiple server types, with presets for many CDNs and live streaming service providers like Livestream. The Cube comes with several notable options, including the aforementioned Lithium-ion battery, headphone output, microphone input, a MicroSD slot to record the encoded video, and a MIMO access point that's like a Wi-Fi hotspot on steroids.
You can drive the unit via the onboard OLED screen and joystick controls or via browser-based controls on your computer, iPad, or iPhone. Once you get the unit connected to your LAN, any computer on the LAN can run TeraCentral, which logs into the unit via the shared LAN connection. In the field, you can configure the Cube's Wireless connection into Master mode, which sets up the MIMO Wi-Fi connection that your iPad or iPhone can connect to, enabling control via apps on these devices. I used my iPad in my remote 4G tests, and it's a great convenience.
All platforms show a browser-based interface with tabs up top providing access to key configuration options like choosing your target server and encoding parameters. Though there's the usual "where the heck is this option?" feeling you get with all new interfaces, it proved workable in short order.
Configuring Your Target Server
My first step was configuring my target server, which you accomplish in the Stream Setting menu off the Video Setup tab. First you choose your stream mode, and then your configuration options based upon this selection. To stream to a generic RTMP server, for example, you choose this option and then enter the server address and user credentials. For Livestream, you enter your username, password, and channel name, plus configure common options (Figure 2, below). My target for this testing was Livestream and the configuration couldn't have been simpler.
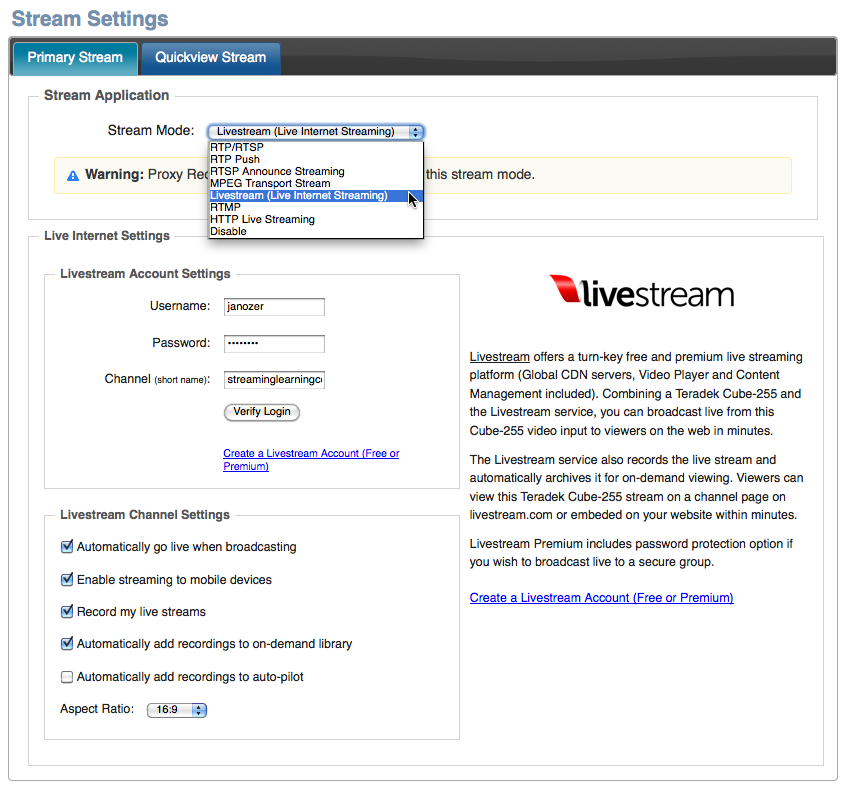
Figure 2. Pointing the encoder towards my Livestream account.
Just for the record, I was testing with my old Livestream account; the Livestream Broadcaster is the only hardware encoder that can broadcast to the New Livestream. Conversely, Livestream Broadcaster supports only the New Livestream, not the old.
Video and Encoding Configuration
My next task was configuring my video input, which was 720p/30 from an AVCHD camcorder delivered via HDMI. By the time I got to this screen, the software had already correctly detected the signal and configured the software appropriately. In addition to HDMI input, you can also connect a separate microphone to the unit's microphone input, in case you don't want to use the HDMI audio from the camcorder.
Next up was choosing encoding settings, which are pretty straightforward, but restricted, so you're limited to data rate and resolution presets and can't input your own values. For example, there is no resolution selection for 360p, and you can't enter it manually, so you're forced to choose between 848x480 (480p) and 360x240 (240p); neither worked particularly well for the limited outbound bandwidth in my office. I asked about this and Teradek commented that they will add a 360p preset in the next couple of firmware upgrades.
Moving on to additional options, on the right of the Encoder Settings screen (Figure 3, below), note the ability to manually configure Rate Control Mode, which is what happens when bandwidth drops. As you can see, you can manually set QP settings to control quality, opt out of strict CBR mode, set a maximum bitrate, and enable adaptive frame rate, so the unit can drop the frame rate if throughput drops, as well as data rate. These are definitely useful, but I probably would opt for the Auto setting until you get used to the unit, and I used auto for all of my tests.
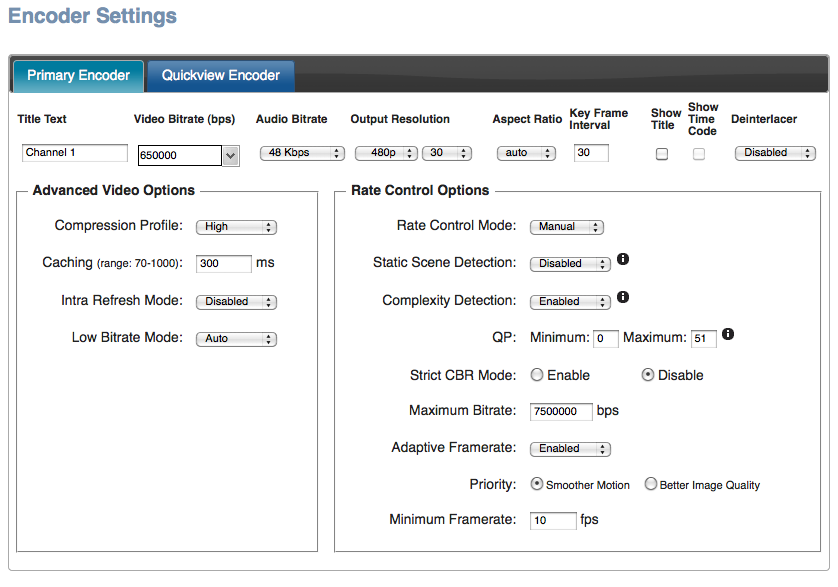
Figure 3. Choosing my encoding options.
Once your target server and encoding options are set, you're ready to stream, which you can start on the Cube unit itself or via software controls. In Part 2 of this article we'll move on to the actual testing, beginning with low bitrate testing in my office.
Related Articles
Teradek's rental program will immediately offer complete Bond packages, which include a Cube encoder, Bond unit, a managed Sputnik server, power accessories, and three 3G/4G modems with unlimited data from the customer's operators of choice
TeraCentral SDK provides Teradek customers with access to the Cube's live video stream, as well as low-level functions to encourage novel third-party solutions for a variety of wireless video applications
In Part 1 of this article, we looked at how to set up a live webcast over 4G with the Teradek Cube and the Bond 4G Cellular Transmitter. Now we'll look at the results of the testing with the setup we assembled.