Tutorial: Using iShowU HD Pro Screen Captures with Adobe Premiere Pro CC
iShowU, a Mac-based screencam app from ShinyWhiteBox.com, is quick, easy-to-use, and inexpensive; here's a look at how to use it to produce pro screencams that you can import into Adobe Premiere Pro CC to integrate into your video projects.
iShowU HD Pro is a high-quality screen capture program created by ShinyWhiteBox.com. It's quick, has an easy-to-use interface, it's relatively inexpensive ($59.95), and it's compatible with Mac OS X 10.7. In this tutorial, I'll demonstrate how to create a screencam with iShowU HD Pro, and then import it into Adobe Premiere Pro CC to mix with your existing video footage. The workflow I'll demonstrate has worked well for our studio in past projects, including the screencam-based tutorial at the beginning of my previous article for Streaming Media Producer.
I produced the example project for this tutorial using a MacBook Pro running OS X Mavericks and iShowU HD Pro v. 2.36.
A Few Preliminary Tips
Here are four general tips to keep in mind before you start recording your iShowU screencam (or any other screen capture, for that matter):
- Close unnecessary applications
- Use slow mouse movements
- Know the dimensions of your final video
- Practice and prepare.
Setting Screencam Parameters in iShowU Pro HD
Figure 1 (below) shows the iShowU Pro HD UI that you'll see when you launch the application.

Figure 1. The iShowU Pro HD UI as it appears after you launch the program. Click the image to see it at full size.
Going from left to right, let's take a look at our options. We'll begin with the Capture area (top left in Figure 1). Here you can choose the region of the screen to record via the Choose pull-down menu. To customize, choose Set size to bring up the screen shown in Figure 2, below, where you can drag the edges of a bounding box to draw the area of the screen you want to capture.

Figure 2. Customize the area of the screen you want to capture here. Click the image to see it at full size.
Alternatively, you can select one of the preset options available in the Choose pull-down (Figure 3, below) to choose the portion of the screen you want to capture. For this example, we know we're working with a 1920x1080 timeline, so we'll choose Same as video size (1920 x 1080) as our screen capture recording size.

Figure 3. Choosing a capture area size from the Choose pull-down.
The Output Video pull-down gives you a number of options for setting the parameters of your output video. We'll start with the first, Change size (Figure 4, below). For this project, we want 1920x1080 to match the Premiere Pro project into which we'll be importing this screencam, so I'll choose Same as capture size.

Figure 4. Choosing an output size that matches the capture size.
Next we'll look at Change format. For this project, for Change format we'll select Apple ProRes422 (Figure 5, below). JPEG is a good choice if you're capturing a still image rather than a video. You can go ahead and use H.264 if you want to reduce your file size, but ProRes 422 allows us to maintain the highest quality possible.

Figure 5. Choosing ProRes 422 output to maintain the highest quality possible.
Finally, we'll change the frame rate to 29.97 (Figure 6, below) because this is frame rate we'll be working with in our Premiere Pro project.
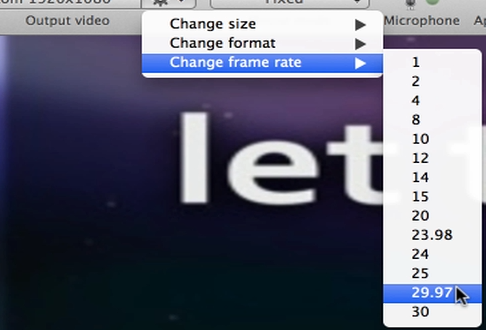
Figure 6. Setting the frame rate to 29.97 to match our Premiere Pro project.
Moving on to Mouse Mode, we'll select the default, Fixed (Figure 7, below). You can explore the other options in other iShowU tutorials.

Figure 7. Choosing Fixed Mouse Mode.
For now we'll leave Microphone and Applications alone; we'll adjust these when we customize advanced settings.
Just to the right of Mouse Mode you'll find Keys. Keys is a nice feature that iShowU HD Pro provides that allows you to show viewers the keys you're pressing when you're recording. This is useful for educational videos or to show keyboard shortcuts. Moving along to the right, we'll leave Camera off for now, but this is a setting you'll want to enable if you want to record yourself using a webcam during your screen capture.
Moving over to Media (Figure 8, below), this is where you can import media such as still images, or anything else on your system into iShowU HD to augment your screencam.

Figure 8. Accessing media assets on your system with Media selected. Click the image to see it at full size.
Related Articles
In this tutorial, we'll look at how to create screencams with TechSmith Camtasia, and then import them into Adobe Premiere Pro to incorporate them into your existing Premiere Pro projects to create professional-quality instructional videos that seamlessly combine screencams and HD footage.
Here are three quick tips that will streamline your titling workflow in Premiere Pro when you create styles you like and want to use them consistently without reinventing them each time.
New SpeedLooks in SpeedGrade, Mask Tracker in After Effects, Sync Settings in Adobe Media Encoder, improved multicam in Premiere Pro, expanded UltraHD/4k support, and more
Using Adobe Lightroom 5 to color-grade and apply metadata to DSLR video files is simple and efficient and can benefit live-switchers doing minimal edits, editing novices, and pro editors exploring non-traditional workflows.
Recent upgrades to Adobe CC make it easy to apply graded looks in Adobe Premiere Pro CC and match shots with different color temperatures via seamless roundtripping between Premiere Pro CC and SpeedGrade CC.
In this final round between audio editing champs iZotope RX 3 and Adobe Audition CC, we compare the two audio editors in noise reduction and reverb/echo reduction.
In this first installment of a two-part series, Jan Ozer compares the declipping and crackle and pop-removal features in iZotope's new RX 3 pro audio editor to the parallel features in Adobe Audition CC.
Exploring 3 new key features in Audition CC, the newest version of Adobe's professional audio editing application: Sound Removal for eliminating hums and other variable-frequency unwanted noises, the Loudness Radar Meter for matching and adhering to broadcast volume standards, and Automatic Speech Alignment for ADR.
If you ever find yourself having to render multiple sequences from Premiere Pro, there's an easier way to do it than by using the Premiere Pro Export control. This tutorial will explain the easier and more efficient way using Adobe Media Encoder.
Here's a quick tutorial for Premiere Pro CC users on how to migrate encoding presets that you created to customize and streamline encodes in Adobe Media Encoder CS5/6 into Adobe Media Encoder CC so you can pick up right where you left off.
In this tutorial you'll learn how to create and edit industry-standard closed captions for video using the new closed-captioning capabilities in the just-released Adobe Premiere Pro CC.
Two types of noises degrade the audio you shoot with your video: random noises like microphone clicks and pops, and consistent noises like white noise or air conditioning hum. This tutorial demonstrates how to remove both of them in Adobe Audition CS6.