Tutorial: Producing Closed Captions in Adobe Premiere Pro CC
In this tutorial you'll learn how to create and edit industry-standard closed captions for video using the new closed-captioning capabilities in the just-released Adobe Premiere Pro CC.
In this tutorial I’ll introduce you to the new caption-related features in Premiere Pro Creative Cloud (CC). I’ll be using some of the assets from my book, Premiere Pro CC: Visual QuickStart Guide, which is available now on Amazon.
In terms of perspective, the new caption-related features are primarily designed to help people edit existing captions rather than creating new ones. As you’ll see, you can create new captions with the caption tools here, but it’s pretty tedious for anything longer than a one- or two-minute file.
Importing Captions into Premiere Pro as an MCC File
There are two ways to bring captions into Premiere Pro. You can bring them in embedded in a QuickTime file or you can bring them in as separate Scenarist (.scc) files or MacCaption (.mcc) files. For this tutorial we’ll use an MCC file. You cannot, in this version, bring in embedded captions in an MPEG-2 transport stream or any file that uses the MP4 or MPEG-2 importer. So if you want to create a file that you can import into Premiere Pro with captions I would suggest using QuickTime until Adobe adds MPEG-2 and MP4 import capabilities, which is definitely coming, just didn’t make it into the first version.
Figure 1 (below) shows the QuickTime file with the embedded captions highlighted in the Project panel. Click on it and Premiere Pro displays the captions in the file in the Source Monitor.
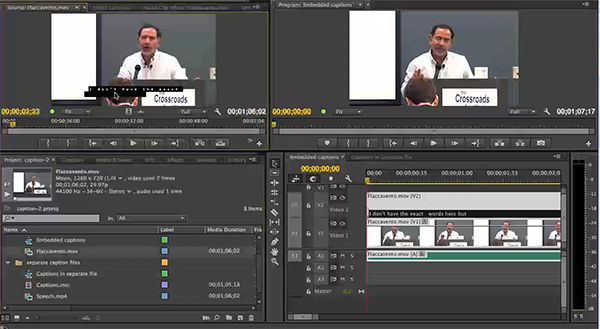
Figure 1. Displaying imported captions in the Source Monitor
To enable and disable caption display, click the Settings (wrench) button at the bottom of the Source Monitor to open the Settings dialog and toggle on and off the Closed Captions display (Figure 2, below).

Figure 2. Enable or disable captions display here.
You can also choose Closed Caption Settings from this dialog. You can choose the standard--CEA608 is NTSC, primarily the U.S., and Teletext in Europe (Figure 3, below).

Figure 3. Choosing the Closed Caption standard.
After you’ve chosen the standard, you can choose which stream (Figure 4, below). If there’s one caption file, typically, that’s going to be CC1. You have the same controls over caption display in the Program Monitor as well.

Figure 4. Choosing the caption file.
Related Articles
This tutorial demonstrates how to use an After Effects alpha matte to make your video "shine through" your text.
Today Adobe announced updates to all Creative Cloud video apps that will debut at NAB. Here are details on the updates, plus a video tutorial on four key new features in Premiere Pro CC: Master Clips, Live Text, Masking and Tracking, and new 4K format support.
While After Effects may be daunting for some Premiere Pro editors, here is an easy-to-follow workflow that can enliven your text and titles with pre-built animations found in Adobe Bridge, applied in a few simple steps in After Effects, and imported directly into your Premiere Pro timeline.
iShowU, a Mac-based screencam app from ShinyWhiteBox.com, is quick, easy-to-use, and inexpensive; here's a look at how to use it to produce pro screencams that you can import into Adobe Premiere Pro CC to integrate into your video projects.
In this tutorial, we'll look at how to create screencams with TechSmith Camtasia, and then import them into Adobe Premiere Pro to incorporate them into your existing Premiere Pro projects to create professional-quality instructional videos that seamlessly combine screencams and HD footage.
Here are three quick tips that will streamline your titling workflow in Premiere Pro when you create styles you like and want to use them consistently without reinventing them each time.
This video tutorial demonstrates how to restore muffled sections of spoken audio using the Multiband Compressor in Adobe Premiere Pro CC or Adobe Audition.
This video tutorial demonstrates how to use and leverage 3 key new features in Adobe Media Encoder CC: Lumetri Looks support, and image, text, and timecode overlay.
This tutorial demonstrates how to apply an effect to a portion of a video image while leaving the rest of the clip untouched, and how to track that portion of the image throughout the duration of the clip, using the Track Matte effect in Adobe Premiere Pro CC.
Recent upgrades to Adobe CC make it easy to apply graded looks in Adobe Premiere Pro CC and match shots with different color temperatures via seamless roundtripping between Premiere Pro CC and SpeedGrade CC.
Adobe has end-of-lifed Adobe Encore, which is bad news if you need to burn DVDs or Blu-ray Discs or build Flash DVDs. This article will discuss how to install Encore if you're a CC subscriber and don't have Encore CS6 already installed on your computer; the terms and implications of Encore's end-of-life status; and how to work around the lack of Dynamic Link transfers from Premiere Pro CC to Encore CS6.
Repetitive tasks are part of video editing, but they don't have to be tedious in Adobe Premiere Pro CC if you use one of the multiple techniques described in this tutorial.
New SpeedLooks in SpeedGrade, Mask Tracker in After Effects, Sync Settings in Adobe Media Encoder, improved multicam in Premiere Pro, expanded UltraHD/4k support, and more
Exploring 3 new key features in Audition CC, the newest version of Adobe's professional audio editing application: Sound Removal for eliminating hums and other variable-frequency unwanted noises, the Loudness Radar Meter for matching and adhering to broadcast volume standards, and Automatic Speech Alignment for ADR.
If you ever find yourself having to render multiple sequences from Premiere Pro, there's an easier way to do it than by using the Premiere Pro Export control. This tutorial will explain the easier and more efficient way using Adobe Media Encoder.
Here's a quick tutorial for Premiere Pro CC users on how to migrate encoding presets that you created to customize and streamline encodes in Adobe Media Encoder CS5/6 into Adobe Media Encoder CC so you can pick up right where you left off.
Adobe Premiere Pro CC includes dramatic new editing features, customizations, and improvements to help editors work efficiently, and it integrates powerful color workflows, with the addition of the Lumetri Deep Color Engine to easily apply rich color grading looks