Tutorial: Reducing Background Noise and Removing Pops and Clicks in Final Cut Pro X
Background noise and pops and clicks in audio are an unfortunate fact of life for many productions. In this tutorial we'll explore some fixes you can try in Final Cut Pro X.
Removing Clicks
Next, let's go after the clicks. You can hear one playing at the 4:54 mark in the video tutorial (just before the 4-second mark in the timeline). To fix this issue, zoom in on the timeline and click the B key to turn the selector into a razor blade. Now you can use the razor blade to isolate the click region, as shown in Figure 8 (below).
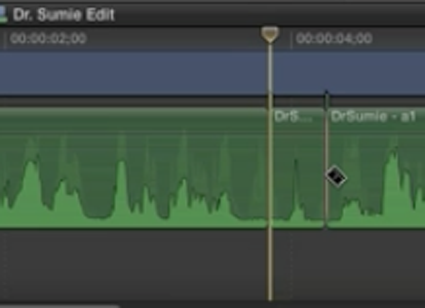
Figure 8. Using the razor blade to surgically remove the click.
Once you've isolated the click, select A to bring back the selection pointer. Now, if you wanted to delete this area, just select it and choose Delete. But if you choose this approach, you'll hear dead air in the deleted area (listen at 5:29). In most cases, this is not a good solution, since it eliminates the room tone that's in the rest of the clip which makes the edit obvious and distracting.
Press Command+Z to undo and return the deleted region to the audio clip. The better approach is to replace the click with some ambient noise. In this project, if you scan the waveform, you'll notice ambient noise just before and after the click, as represented by the low, flat regions of the waveform (see the flat area below the selector in Figure 9, below).

Figure 9. The flat area in the waveform below represents an area of the clip where there's only ambient noise.
To replace the click with ambient noise, press the T key to select the Trim pointer, and then click and drag inside the isolated clip region until you see ambient noise area come into the cut area where the click used to be. If you listen to audio that plays at the 6:35 mark in the video tutorial, you'll hear that click is gone and replaced with ambient noise. You can see how that region now looks in Figure 10 (below)—very low volume, no peaks.
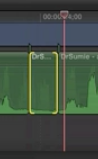
Figure 10. The click region replaced with ambient noise.
Next, we'll attack the big click at the end. Zoom in, press the B key to select the razor blade. Isolate the clip, press the T key to select the Trim cursor, and then drag a nearby region of ambient noise here into the click region here by left-clicking the mouse and dragging it over. Again, we've replaced the click with ambient noise and fixed the problem.
So that's it. You're seldom if ever going to capture absolutely perfect audio on location, but it's nice to know that Final Cut Pro has a couple of ways to help remove pops and clicks, boost volume, and remove background noise to make your audio sound better.
Related Articles
In this first installment of our new tutorial series, Glen Elliott demystifies Final Cut Pro X, illustrates its core functions, and focuses on one of the most powerful new features for organizing, accelerating, and streamlining your edits: metadata keyword tagging.
No matter how fast, efficient, and determined a 48 Hour Film Project production team is, they need to finish strong with a streamlined edit. Final.revised editor Scott Strimple describes how Apple Final Cut Pro X allowed him to deliver the goods on deadline, by leveraging key features that could make any edit cook.
There have been lots of comparisons between Final Cut Pro X and Premiere Pro CS6, with most focusing on features and workflows. This article discusses a series of multiple-format benchmark tests that analyzed comparative performance between the two programs.
Two types of noises degrade the audio you shoot with your video: random noises like microphone clicks and pops, and consistent noises like white noise or air conditioning hum. This tutorial demonstrates how to remove both of them in Adobe Audition CS6.
One of the most convenient new features in Final Cut Pro 10.0.6 is the ability to quickly and easily export to a single destination, or a bundle of destinations, that contain multiple outputs. In this tutorial, you learn how to create a single destination and a bundle of destinations.
The histogram and the waveform in Apple Final Cut Pro X are effective, easy-to-master tools that provide the clear input you need to diagnose and fix the contrast issues in your video simply and intelligently. In this video tutorial, video editing and encoding expert Jan Ozer explains how they work.
When Apple originally released Final Cut Pro 10, the biggest deficit for Pro users was the lack of multicam. With the 10.0.3 release, Apple has addressed this with a highly functional and easy-to-use multicam feature, which Jan Ozer explains in this tutorial.