Review: Logitech Broadcaster
You can use Logitech Broadcaster ($199) to record video on your iOS device or Mac, or to serve as a webcam for Skype, FaceTime, Livestream ProCaster, or Telestream Wirecast, or broadcast directly to Ustream. This review will focus primarily on using the unit to connect to Ustream.
Mac Operation
To install the application on your Mac, navigate to www.logitech.com/broadcaster. You'll be prompted to choose your OS, and then to download the Broadcaster software. Install that as normal, and the software will walk you through a series of steps to turn on the camera, name the camera, connect it to your Wi-Fi, and then scan an onscreen QR code to finish the connection.
Note that this software does not run on Windows; you'll need a Mac, iPad, or iPhone to set up the unit.
Once installed, you have several preferences to set; most important is NTSC vs. PAL. Most others relate to setting up Wi-Fi and Ustream connections, which you'll configure in the normal course of operation.
The Broadcaster software has two interfaces: one for recording to the computer, and the Broadcast to Ustream interface shown below in Figure 2. As you can see in Figure 2, there are two status indicators beneath the preview window: one showing the strength of your Wi-Fi connection, the other showing remaining battery life.
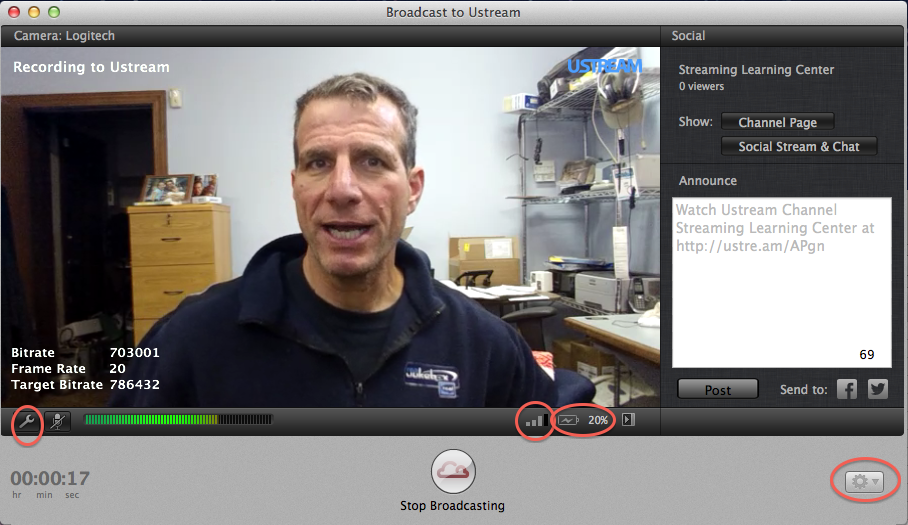
Figure 2. This is the interface you use to broadcast to Ustream on your Mac. Note the status info on the lower left, showing the actual and target bitrate and frame rate.
Audio and video configuration controls are modest and shown below in Figure 3; you can adjust exposure and audio gain, or leave both in auto as I did in my tests. You access these by clicking the wrench on the lower left of the Broadcast to Ustream window.
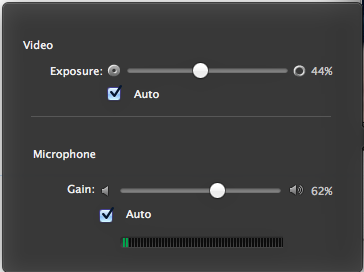
Figure 3. These are your exposure and gain adjustments.
Ustream-related configuration options are also modest, and shown in Figure 4 (below), accessed via the configuration button on the lower right of the Broadcast to Ustream interface. You can choose one of four video resolutions, with your choice typically dictated by the outbound bandwidth of your Wi-Fi connection. For the record, the 176p broadcast targeted 262 Kbps while the 360p targeted 525 Kbps, both data rates my outbound DSL connection was able to achieve.
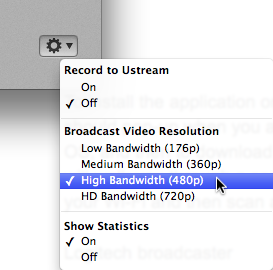
Figure 4. These are your Ustream recording options.
At 480p, the Broadcaster targeted 786 Kbps, and the actual data rate often fluctuated beyond the capabilities of my DSL connection, resulting in noticeable gaps in the video. At 720p, the unit targeted 1,573 Kbps, well beyond my outbound connection speed. All tests maxed out at 24 fps, though as you can see in Figure 2, the unit will drop frames if bandwidth is insufficient to meet the target.
The other options shown in Figure 4 include whether to record the broadcast and show statistics. If you don't record the broadcast, it will appear live but won't be saved by Ustream; this is good for experimenting and configuring, but you probably want to enable this for most regular broadcasts. With statistics enabled, you get the information shown on the lower left of Figure 1, which I found pretty useful.
Once you've got these items configured, you press the Start Broadcasting button on the bottom of the Broadcast to Ustream window. This button then toggles into a Stop Broadcast button used to stop the broadcast.
Related Articles
Sitting down with contributing Jan Ozer on the red carpet at Streaming Media West to review the highlights and key takeaways of the show, including live streaming using the cloud, the exploding market for live stream applications, the Logitech Broadcaster Wi-Fi Webcam, Livestream's Studio HD500, and the ongoing reality/perception divide on Flash and HTML5.