Tutorial: Removing Video Noise with the Neat Video Plug-in
In this tutorial, Jan Ozer demonstrates how you can use the Neat Video plug-in to remove noise from video, improving output quality for all outputs.
Adjusting Noise Reduction and Sharpening Amounts
You might find that you want to mess a bit with the noise reduction amounts—that is, how much of the noise is actually eliminated—and the sharpening results.
In this example, we're already seeing that the filter is reducing the noise 100% in the three spatial frequencies—high, mid, and low—shown in Figure 8 (on page 2 of this article).
It's reducing only 60% of the noise in the Y channel, which is necessary to avoid giving your subjects a plastic-type look.
In this case, the Noise Reduction settings look fine, so let's adjust Sharpening.The filter provides several useful views for that, which you can choose via a control in the lower left hand corner.
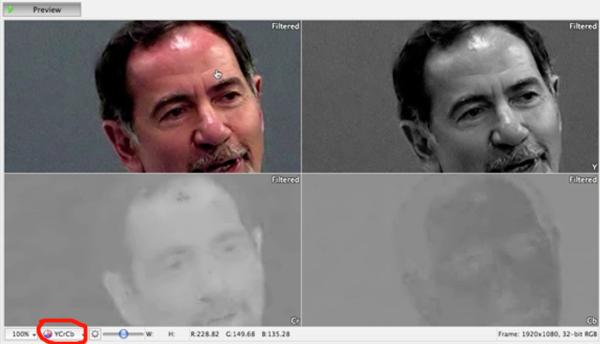
One view, shown in Figure 12 (below), is the YCrCB view, with Y in the upper right, Cb in the lower right, Cr in the lower right, and the Original in the upper left.
Figure 12 (below) shows the four-part split-screen preview.
With the sharpening options that I chose earlier—the Filter and Sharpen preset—sharpened only in the Y channel, not the Cr and the Cb. This is the Conservative option (Figure 13, below). But you might be able to get a little bit sharper video if you adjust the Cr and Cb channels manually. You can adjust the spatial frequency of the noise in all three of these channels in the high, low, and mid.
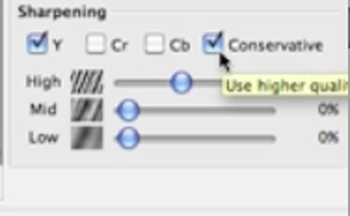
Figure 13. Sharpening settings
Whenever adjusting Sharpening, you want to sharpen the ut increasing artifacts in the background. In this example, if we sharpen the High regions to the max, we don't create any artifacts in the background that aren't already there, but we don't make it look much sharper either. If we boost sharpness in the Mids, we increase sharpness without creating any obvious artifacts, as you can see in Figure 14 (below), which is a beneficial adjustment.
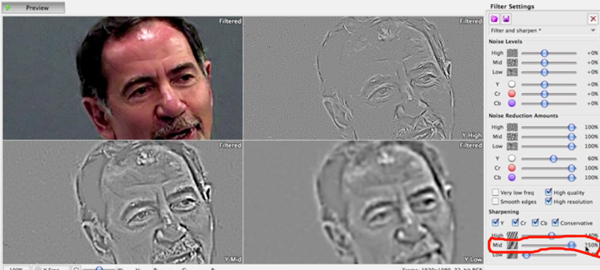
Figure 14. Increasing sharpness by pushing the Mids
If we adjust the Low, as shown in Figure 15 (below), we get the same thing: a sharper image without creating any additional artifacts.
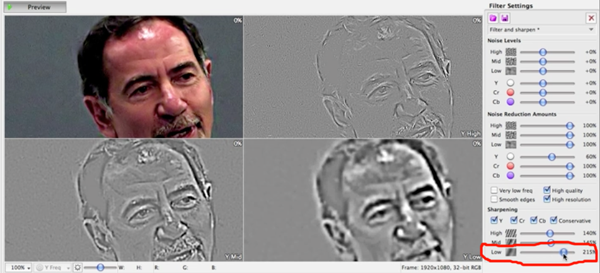
Figure 15. Increasing sharpness by pushing the Lows
Now, you'd want to review these adjustments in Normal mode to verify that you didn't create artifacts like the haloing around the speaker's head, as shown in Figure 16 (below). We can remove that by dialing back the Mids, even though we lose a little sharpness in the face, so everything is a balance. When it comes to filtering, you've got to make your own decisions.
Figure 16. Haloing artifacts
Once you've chosen your sharpening and noise reduction settings, click Apply.
Related Articles
Magic Bullet Denoiser II is the latest version of Red Giant's popular plug-in for removing video noise from troublesome footage. Event and documentary filmmaker tests the plug-in on two different clips and shows before-and-after results and assesses Denoiser's usability, effectiveness, and rendering speed.
In this tutorial you'll learn how to maximize the brightness and contrast of your video in Adobe Premiere Pro CS6 using the Brightness, Contrast, and Gamma Correction controls for effective and balanced adjustments.
The histogram and the waveform in Apple Final Cut Pro X are effective, easy-to-master tools that provide the clear input you need to diagnose and fix the contrast issues in your video simply and intelligently. In this video tutorial, video editing and encoding expert Jan Ozer explains how they work.
Video encoding and editing expert Jan Ozer provides three useful tips that will enhance your workflow and get you out of some editing jams in your Adobe Premiere Pro projects: editing audio without unlinking; Fill Left and Fill Right to create stereo audio; and creating nested sequences for smoother edits and creating reusable set pieces in your projects.