Tutorial: Removing Video Noise with the Neat Video Plug-in
In this tutorial, Jan Ozer demonstrates how you can use the Neat Video plug-in to remove noise from video, improving output quality for all outputs.
Fine-tuning Noise Filter Settings
In this clip, we've got a quality setting of 89—which is well above the 60 we need—and we're ready to fine-tune our settings. What we've done so far is determine the amount of noise in the image. Now we've got to set some other settings in the filter.
To do that, mouse-over and click the Noise Filter button at the top of the UI. The Filter Settings dialog opens (Figure 8, below).
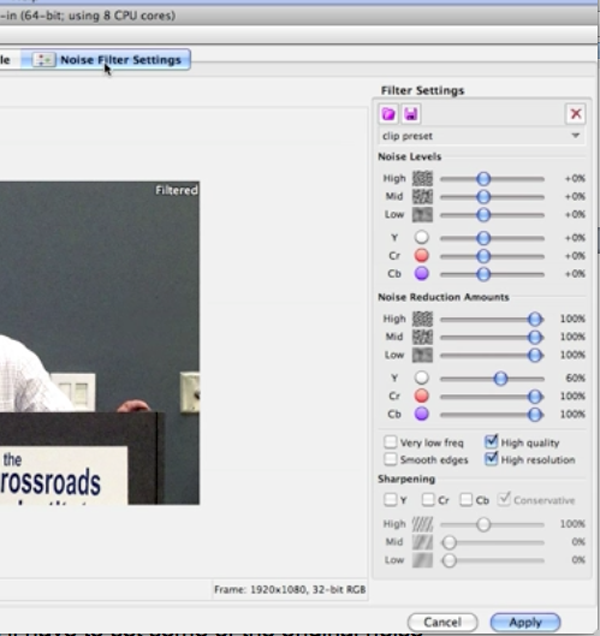
Figure 8. Noise Filter Settings
At the top of the dialog you'll see the Noise Levels. These are the settings that were set automatically by the Device Noise Profile selected in the previous section. Since we found a flat region, we're OK with the Noise Levels. If you didn't have a flat region, you'd have to manually adjust the Noise Levels and the other two parameters in this dialog, Noise Reduction Amounts and the Sharpening levels found below.
Using Sharpen and Filter Clip Presets
The easiest way to adjust the noise reduction and sharpening amounts is to see if there's an appropriate preset. To do so, click the Clip Preset drop-down list as shown in Figure 9 (below). You'll see several Advanced presets there (also shown in Figure 9). Some of them handle pretty specific instances, like if you've got out-of-focus video or thin lines.
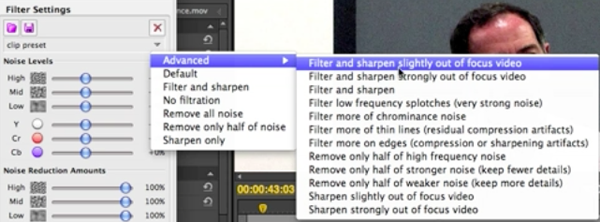
Figure 9. Basic and Advanced Clip Presets
In this example, we've got a bunch of filtering to do, because we shot in low light, and whenever you do a lot of filtering, you want to also sharpen, because filtering can blur some details. So we'll choose "Filter and sharpen" as shown in Figure 9, above.
Once you're in this mode, you can enable and disable Preview by clicking the Preview button in the upper-left corner of the screen (Figure 10, below), which obviously shows your clip with and without the filter. At this point it helps a lot to be in full-frame mode to see as much detail as possible in your video and accurately assess the adjustments you're making. You can see before and after in Figure 11 (below Figure 10).
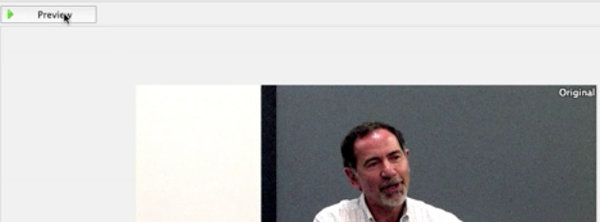
Figure 10. Enabling and disabling Preview
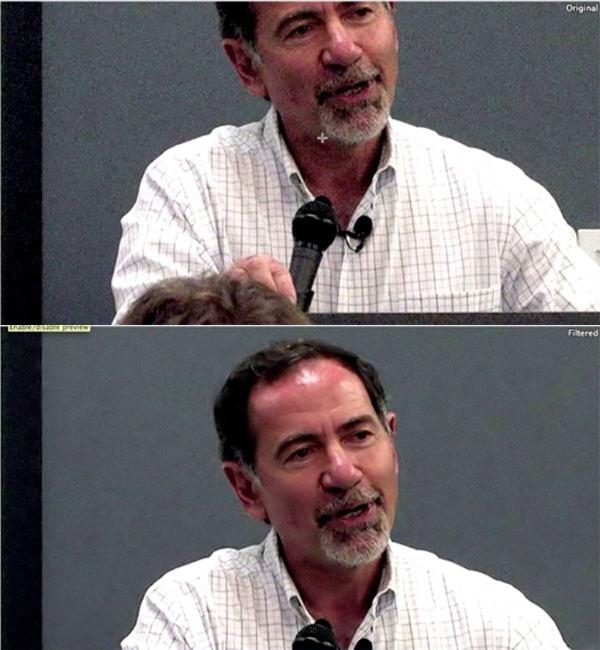
Figure 11. Before applying the filter (top)—"original"—and after—"filtered"—with the noise substantially reduced (bottom)
Related Articles
Magic Bullet Denoiser II is the latest version of Red Giant's popular plug-in for removing video noise from troublesome footage. Event and documentary filmmaker tests the plug-in on two different clips and shows before-and-after results and assesses Denoiser's usability, effectiveness, and rendering speed.
In this tutorial you'll learn how to maximize the brightness and contrast of your video in Adobe Premiere Pro CS6 using the Brightness, Contrast, and Gamma Correction controls for effective and balanced adjustments.
The histogram and the waveform in Apple Final Cut Pro X are effective, easy-to-master tools that provide the clear input you need to diagnose and fix the contrast issues in your video simply and intelligently. In this video tutorial, video editing and encoding expert Jan Ozer explains how they work.
Video encoding and editing expert Jan Ozer provides three useful tips that will enhance your workflow and get you out of some editing jams in your Adobe Premiere Pro projects: editing audio without unlinking; Fill Left and Fill Right to create stereo audio; and creating nested sequences for smoother edits and creating reusable set pieces in your projects.