Video Tutorial: Maximizing Brightness and Contrast in Adobe Premiere Pro CS6
In this tutorial you'll learn how to maximize the brightness and contrast of your video in Adobe Premiere Pro CS6 using the Brightness, Contrast, and Gamma Correction controls for effective and balanced adjustments.
Using Gamma Correction to Adjust the Midtones
Unfortunately, the face, is still too dark, and most of the pixels are well below 60 IRE. How do we address that? We attack it with the Gamma Correction effect (Figure 11, below). What does gamma do? According to the Premiere Pro Help file, the Gamma Correction effect lightens or darkens a clip without substantially changing the shadows or the highlights. So, in theory, this should allow us to boost just the midtones in the face without pushing up the whites or pushing down the blacks. Let's see how it works.
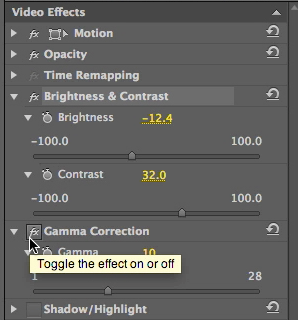
Figure 11. Enabling the Gamma Correction effect
After enabling Gamma Correction as shown in Figure 11, I'll drag the slider to increase brightness in the midtones. If I drag it to 9, as shown in Figure 12 (below), we see that we're pushing some of the blacker pixels up off the 0 IRE, but we're seeing very little movement in the whites.

Figure 12. Adjusting Gamma Correction to 9
If we push the Gamma Correction effect farther to the left, we crush the whites a bit, but not to the same degree as adjusting the brightness control directly. If I dial Gamma Correction back to 8, I'd also adjust the Contrast a to keep the black pixels at 0 IRE.
To test the adjusted values, I'd return to the Timeline to the location where there's movement in the face, move the CTI around and check the levels of the pixels in the face. In my video, I see a lot more pixels extending up over the 60 IRE line and even close to touching the 80 IRE, which is OK because we got a really nasty bright spot there that should be around 80 IRE.. I'll stay with a gamma correction of 8 for a nice, bright face (Figure 13, below).

Figure 13. Face brightened with the Gamma Correction effect
Boosting Midtones with Compression in Mind
The reason I focusing on brightening the face is because I'm going to compress this and upload it to YouTube where it will be compressed again. I want the face as bright as possible so it's preserved through all those compression cycles.
Related Articles
Two types of noises degrade the audio you shoot with your video: random noises like microphone clicks and pops, and consistent noises like white noise or air conditioning hum. This tutorial demonstrates how to remove both of them in Adobe Audition CS6.
Jan Ozer sits down with Bill Roberts to discuss the trends impacting the future direction of Adobe Creative Suite for video pros, including the decline of 3D, the rise of 4K, and second-screen viewing. Other topics included the growth of Creative Cloud, and the development arc of Apple Final Cut Pro X.
In this tutorial, Jan Ozer demonstrates how you can use the Neat Video plug-in to remove noise from video, improving output quality for all outputs.
There have been lots of comparisons between Final Cut Pro X and Premiere Pro CS6, with most focusing on features and workflows. This article discusses a series of multiple-format benchmark tests that analyzed comparative performance between the two programs.
The histogram and the waveform in Apple Final Cut Pro X are effective, easy-to-master tools that provide the clear input you need to diagnose and fix the contrast issues in your video simply and intelligently. In this video tutorial, video editing and encoding expert Jan Ozer explains how they work.
Video encoding and editing expert Jan Ozer provides three useful tips that will enhance your workflow and get you out of some editing jams in your Adobe Premiere Pro projects: editing audio without unlinking; Fill Left and Fill Right to create stereo audio; and creating nested sequences for smoother edits and creating reusable set pieces in your projects.
Adobe Premiere Pro Instructor extraordinaire Luisa Winters explains how to use the new and enhanced Multi-Camera Monitor for quick and efficient multicam edits in Adobe Premiere Pro CS6 in this video and text tutorial.
The new version of Adobe Media Encoder, included in the just-released CS6 collection as well as as a standalone product, offers significant improvements in usability and performance, as well as new features. Here's what you need to know about it.
In the final installment of the NAB Interviews with Shawn Lam, Shawn talks with Adobe's Al Mooney about key new features in Premiere Pro CS6 and Adobe Media Encoder.