Video Tutorial: Maximizing Brightness and Contrast in Adobe Premiere Pro CS6
In this tutorial you'll learn how to maximize the brightness and contrast of your video in Adobe Premiere Pro CS6 using the Brightness, Contrast, and Gamma Correction controls for effective and balanced adjustments.
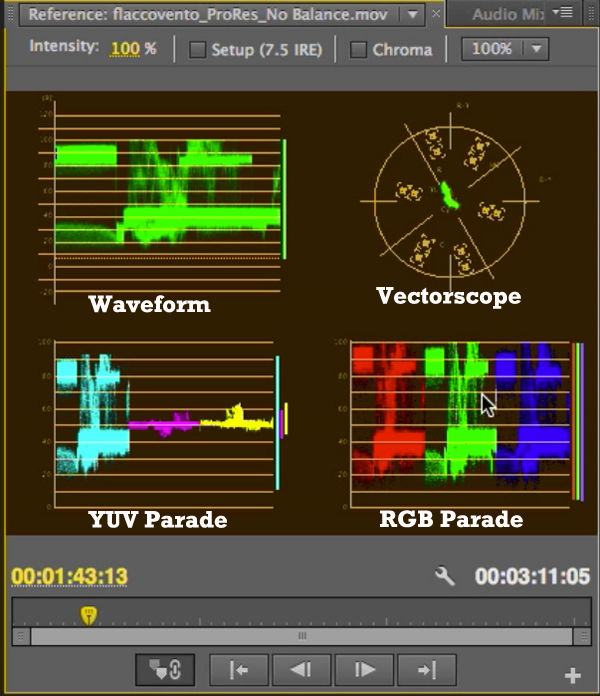
Click All Scopes to see all the scopes available. Figure 5 (below) shows an RGB parade, a YUV parade, a waveform, and a vectorscope. I like working with just the YC waveform and don't get a lot of benefit from these other three scopes. So choose YC Waveform to return to just that view.
Working with the YC Waveform
What does the YC Waveform show us? Basically it shows us the brightness of the pixels at their respective location in the frame. So, over on the left of the video in Figure 6 (below), we see a whiteboard, and over on the left of the waveform, we see a clump of pixels that represents the brightness of the pixels in the whiteboard.
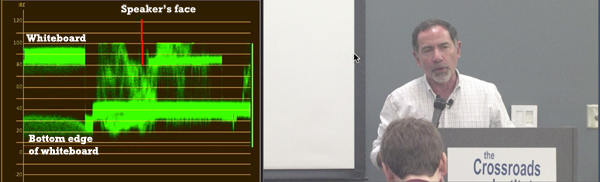
Figure 6. We can see where the white and black areas of the image are represented in the waveform, but the levels aren't what they should be in either case.
In a well-lit, well-contrasted scene, the whites should be up around 100 on the IRE (Institute of Radio Engineers) scale, which ranges from 0 to 100. As you can see, the whites start at about 80 and range up to about 95.
Blacks, such as those we see on the bottom edge of the whiteboard--and directly below the cluster of whites in the waveform--should be right around 0 IRE. As you can see, the darkest pixels are 20 IRE or above, which is the cause of most of our contrast issues.
The third region we examine when adjusting contrast are the pixels in the face, which should be between 65 and 75 IRE at their brightest. To get the best view of the brightness of the face, move the current-time indicator (CTI) to a spot on the timeline where there is movement in the subject's face, and drag the CTI back and forth. In my example, I can see that the bulk of the pixels are moving below 60 IRE. This means the face, which should be registering around 65-75 IRE, is too dark. The whites are close to where they should be (ranging 80-97 IRE or so), but the blacks are faded (bottoming out around 18), and that's why the image lacks contrast.
The control you'll use to attack this problem is the Brightness & Contrast control--no surprise there--that you see in the Effect Controls on the left in Figure 3. Let's see how the two adjustments work.
If you drag the Brightness slider to the right, the Waveform Monitor shows that all the pixels move upwards in the waveform as the entire image becomes brighter (compare Figure 7, below, to the waveform in Figure 6).
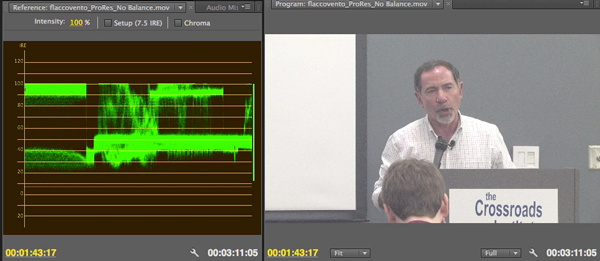
Figure 7. Adjusting Brightness upwards doesn't just make the whites brighter--it moves up the levels of everything in the image.
The Contrast adjustment, by contrast, pushes the pixels further away from each other--reflecting the definition of contrast as the difference between the brightest and the darkest pixels in an image. This pushes the whites toward 100 IRE and the blacks toward 0 IRE, as shown in Figure 8 (below).
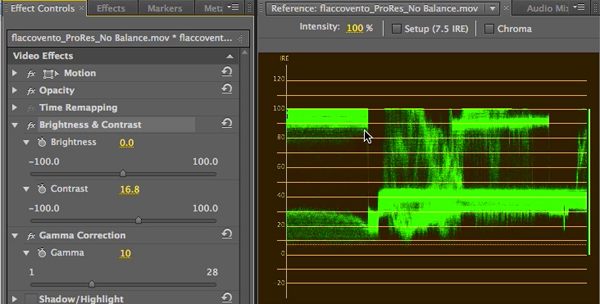
Figure 8. Adjusting the Contrast
Every video is different and your adjustment strategy will differ as well. In this video, as you can see in Figure 6, the whites are closer to 100 than the blacks are to zero. So, I would adjust the Brightness down, and then adjust the Contrast to push the white and black levels towards the extremes. Now we have the whiteboard at or around 100 IRE, as shown in Figure 9 (below). The black pixels are at or around zero, and the dinginess is gone.
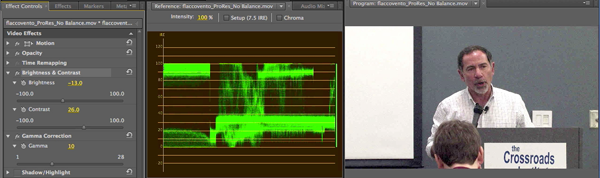
Figure 9. Brightness and Contrast adjustments combined
Now, if you push this too far--in this case, I've pushed the whites up to the 100 IRE range--you can lose detail in the image, as I've lost detail in the speaker's shirt (Figure 10, below). If I continue to push the Brightness to the right, I'll see less and less of the shirt, and that's called crushing the detail. So, whenever you start to see a lot of pixels really close to 100 at the top of the waveform or really close 0 at the bottom, you start worrying about losing detail.

Figure 10. Crushing the detail in the whites by pushing more and more white pixels up to the 100 IRE limit
In this scene, the shirt is not a critical area, though the sign on the podium is. As you can see in Figure 10, the sign remains clear—we're not losing any detail there.
So, to summarize our progress so far, we started off by pushing the brightness down, which made the face darker. We've got the blacks at 0 IRE, and that's where we want them. The whites are at 100, that's where we want them.
Related Articles
Two types of noises degrade the audio you shoot with your video: random noises like microphone clicks and pops, and consistent noises like white noise or air conditioning hum. This tutorial demonstrates how to remove both of them in Adobe Audition CS6.
Jan Ozer sits down with Bill Roberts to discuss the trends impacting the future direction of Adobe Creative Suite for video pros, including the decline of 3D, the rise of 4K, and second-screen viewing. Other topics included the growth of Creative Cloud, and the development arc of Apple Final Cut Pro X.
In this tutorial, Jan Ozer demonstrates how you can use the Neat Video plug-in to remove noise from video, improving output quality for all outputs.
There have been lots of comparisons between Final Cut Pro X and Premiere Pro CS6, with most focusing on features and workflows. This article discusses a series of multiple-format benchmark tests that analyzed comparative performance between the two programs.
The histogram and the waveform in Apple Final Cut Pro X are effective, easy-to-master tools that provide the clear input you need to diagnose and fix the contrast issues in your video simply and intelligently. In this video tutorial, video editing and encoding expert Jan Ozer explains how they work.
Video encoding and editing expert Jan Ozer provides three useful tips that will enhance your workflow and get you out of some editing jams in your Adobe Premiere Pro projects: editing audio without unlinking; Fill Left and Fill Right to create stereo audio; and creating nested sequences for smoother edits and creating reusable set pieces in your projects.
Adobe Premiere Pro Instructor extraordinaire Luisa Winters explains how to use the new and enhanced Multi-Camera Monitor for quick and efficient multicam edits in Adobe Premiere Pro CS6 in this video and text tutorial.
The new version of Adobe Media Encoder, included in the just-released CS6 collection as well as as a standalone product, offers significant improvements in usability and performance, as well as new features. Here's what you need to know about it.
In the final installment of the NAB Interviews with Shawn Lam, Shawn talks with Adobe's Al Mooney about key new features in Premiere Pro CS6 and Adobe Media Encoder.