Tutorial: Maximize Brightness and Contrast in Apple Final Cut Pro X
The histogram and the waveform in Apple Final Cut Pro X are effective, easy-to-master tools that provide the clear input you need to diagnose and fix the contrast issues in your video simply and intelligently. In this video tutorial, video editing and encoding expert Jan Ozer explains how they work.
Working with FCP X's Color Controls
Let's look at the toolset Final Cut Pro X provides to accomplish that. Figure 6 (below) shows the color controls. To turn the Inspector on or off, click the clip in the timeline, click the Inspector (i) icon at the top-right of the timeline, and the controls appear.
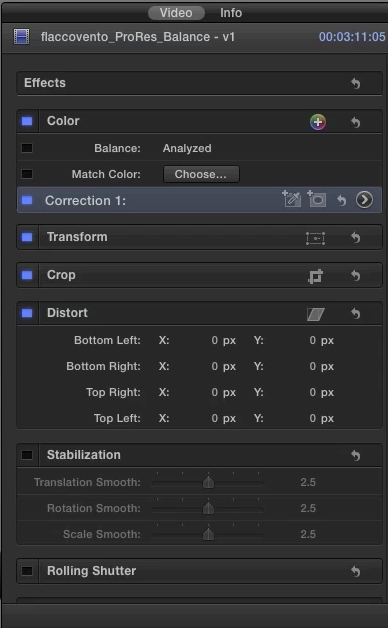
The first option to try is Balance, triggering an auto-adjustment that lets Final Cut Pro do the work. Click the blue box to the left of Balance under the Color controls. In this case, the waveform shows that this adjustment pushed the black pixels down to 15-20, which is an improvement, but the whites still aren't close to 100 IRE, and the brightness of the face was pushed down along with the blacks. So, we have some work to do.
To begin, I'll disable auto Balance by clicking the blue box, and then click the right-facing arrow to the right of Correction 1 (see Figure 6, above) to enter the Color Board.
Using the FCP X Color Board
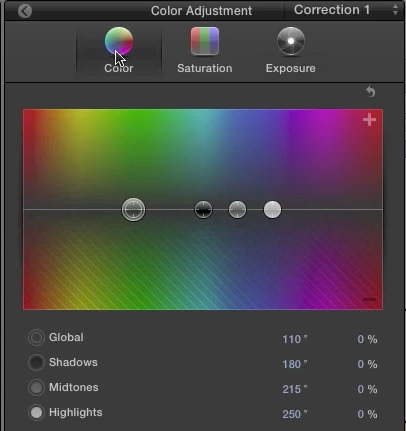
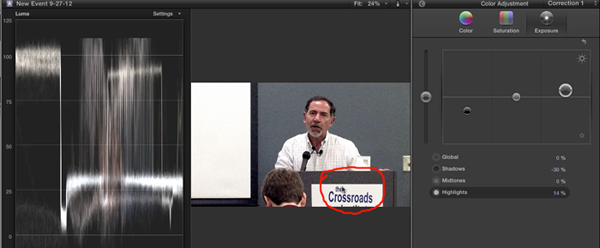
There are three tab-like regions in the Color Board (Figure 7, below). First is Color. This image is fine color-wise, so we're not going to touch that. Next is Saturation, which again, we don't need to adjust, while the third is Exposure.
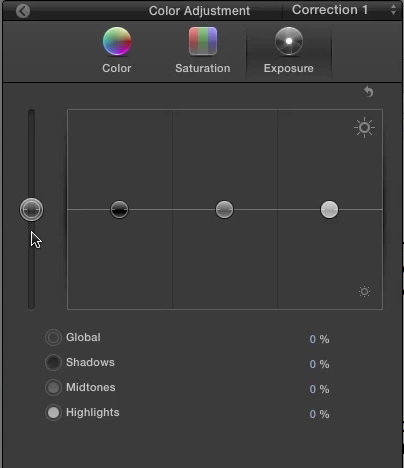
We'll work on the video using the Exposure controls (Figure 8, below). Final Cut Pro X's Color Board controls all provide either 3 or 4 adjustments. The Global control, the largest button on the extreme left, adjusts brightness throughout the entire image. The three remaining color-coded buttons provide control over the Shadows (or blacks), the Highlights (or whites), and the Midtones, which are areas between the darkest and the brightest pixels.
When you move the Shadows, Midtones, or Highlights buttons, the adjustments are focused within that range of pixels, though, as you can see in the tutorial, the pixels in other ranges are also impacted to a lesser degree. Let's start by adjusting the Shadows. Here, we know the darkest regions in the image should be right around 0 IRE. I can adjust these regions by selecting the Shadows control and dragging that down. Immediately, the contrast improves because there's a greater range between the whites and the blacks in the scene (Figure 9, below). I'll keep adjusting the control until the black regions are close to zero IRE.
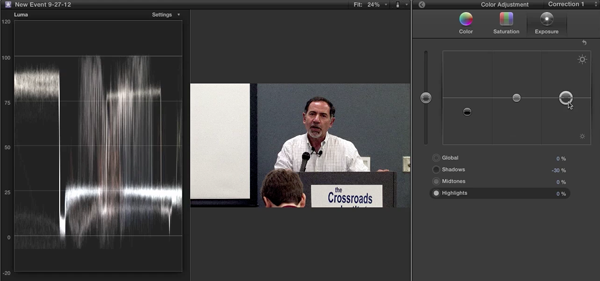
We can see in Figure 9 (above) that this adjustment has made the face too dark and darkened the whites, which I'll fix by dragging the Highlights button up until the whiteboard pixels are at or close to 100 IRE. Typically you never want to exceed 100 IRE because that crushes the detail in that region, causing a loss of detail. Fortunately, there is no detail on the whiteboard, so we don't have to worry about that. We can still see the detail in the whites in the circled area in Figure 10 (below). So, we're probably okay boosting it up even a little more.
Now we can concentrate on the face, which is still a little bit too dark. Since the face is mixed in with the other detail, it helps to find a region in the timeline where the candidate is moving his head a lot. Then you can scrub the play head around in that region so the pixels representing the face are clearly moving and visible in the Waveform monitor. Then I'll grab the Midtones control and drag that up to lighten the face to about 70 IRE. You can see in Figure 11 (below) that this adjustment will pull the blacks (Shadows) off 0 IRE, and boost the whites (Highlights) a little bit, but the concentration of the adjustment is in the Midtones region.
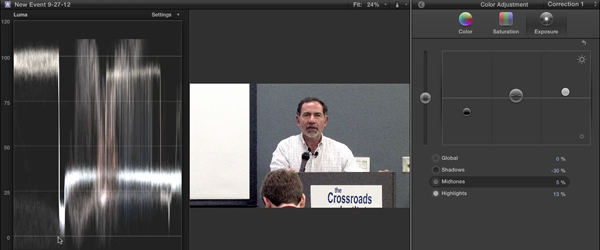
The face is often harder to see in the Waveform Monitor than pure whites and pure blacks, but it looks to be in an acceptable range. To offset the affect of the midtones adjustment, I'll drag the Shadows slider down to drop the black pixels back to 0 IRE and then call it an edit.
Related Articles
In this first installment of our new tutorial series, Glen Elliott demystifies Final Cut Pro X, illustrates its core functions, and focuses on one of the most powerful new features for organizing, accelerating, and streamlining your edits: metadata keyword tagging.
Background noise and pops and clicks in audio are an unfortunate fact of life for many productions. In this tutorial we'll explore some fixes you can try in Final Cut Pro X.
Jan Ozer sits down with Bill Roberts to discuss the trends impacting the future direction of Adobe Creative Suite for video pros, including the decline of 3D, the rise of 4K, and second-screen viewing. Other topics included the growth of Creative Cloud, and the development arc of Apple Final Cut Pro X.
In this tutorial, Jan Ozer demonstrates how you can use the Neat Video plug-in to remove noise from video, improving output quality for all outputs.
In this tutorial you'll learn how to maximize the brightness and contrast of your video in Adobe Premiere Pro CS6 using the Brightness, Contrast, and Gamma Correction controls for effective and balanced adjustments.
No matter how fast, efficient, and determined a 48 Hour Film Project production team is, they need to finish strong with a streamlined edit. Final.revised editor Scott Strimple describes how Apple Final Cut Pro X allowed him to deliver the goods on deadline, by leveraging key features that could make any edit cook.
When Apple originally released Final Cut Pro 10, the biggest deficit for Pro users was the lack of multicam. With the 10.0.3 release, Apple has addressed this with a highly functional and easy-to-use multicam feature, which Jan Ozer explains in this tutorial.