Tutorial: Making the Right Audio Connections for Live and Corporate Video
In this article we'll walk through the process of connecting a camcorder to an external microphone or soundboard for optimum, clean, balanced audio capture--critical skills for any videographer or online video producer doing corporate video or live events.
Step 9. Check levels with headphones and volume meters
The final step is to plug in some headphones and make sure the audio sounds good. The volume meters on most prosumer camcorders will also tell you when you’re properly connected and when audio is only flowing into a single channel. You want the bulk of your recordings to appear in the zone shown in Figure 7 (below), but always want to err on the side of being too low, rather than too high. You can always boost audio volume in post (or at the encoding station) but if the volume controls continually push against the top of the volume meters, you’re clipping your audio signal, which causes distortion.
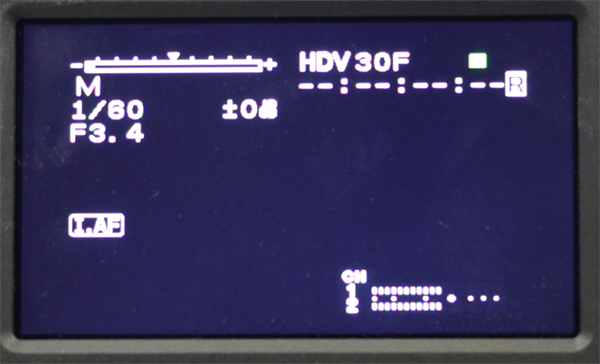
Figure 7. The volume meters on the bottom look just about right.
That’s the basic procedure. While it will vary from camcorder to camcorder, the overall structure should be fairly similar. Now let’s focus on connecting to a soundboard or similar line-powered source.
Connecting to Sound Systems
The basic procedure for connecting to a sound system is the same as the procedure defined above, except that you use Line input rather than Mic. Easy peasy. Typically, if problems arise, they come from one of four directions.
Often the soundboard isn’t set up close to the camera position, which can be a real problem. If you ask about this early enough, typically the sound guys or event manager can run a cable over to your position, but advance notice is required because the cable will have to be taped over or buried. If you show up an hour before the show and start asking questions, it may be too late to get the input.
Another source of problems is when there simply isn’t an output that the soundboard can spare. If you get in touch with the sound guy early enough, you can work around this, often by getting some kind of splitter cable that takes the outgoing signal and splits it into two. Figure 8 (below) shows the GLS Audio 6-Inch Patch Y Cable Cord that costs $9.99 at Amazon; buy two of these and you can split the left and right XLR outputs and create another output.
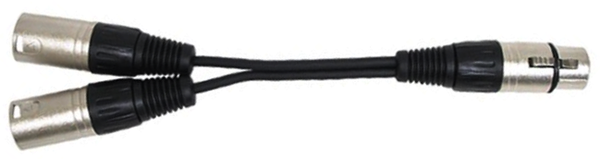
Figure 8. An XLR splitter can provide access to the soundboard.
The third source of problems typically relates to physical connections. Most lower-end soundboards use 1/4-inch connectors out, which can be stereo or mono. If you have mono outputs, you can buy many different adapters to convert from 1/4-inch to XLR, although stereo is tougher. Basically, every situation can be different and sometimes you’ll need to buy some kind of adapter to get the job done. Figure 9 (below) shows some of the adapters I’ve acquired over the years, but I still call a few days before the show, ask about the connections available, and try to test the connection a day or two before the event
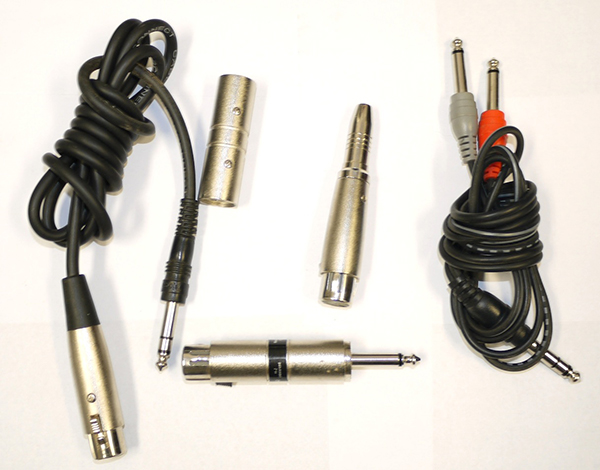
Figure 9. Some of the detritus bought to connect to multiple sound boards.
The fourth source of problems, which I’ve witnessed only from afar, is when the signal coming from the soundboard is too hot for the camera or other capture device to handle. Here you need a signal attenuator like the Shure A15AS (Figure 10, below) that has switchable values for a 15, 20, or 25 dB reduction in signal strength. To make this work, connect it between your output and your input, which obviously means that you suddenly need two cables.
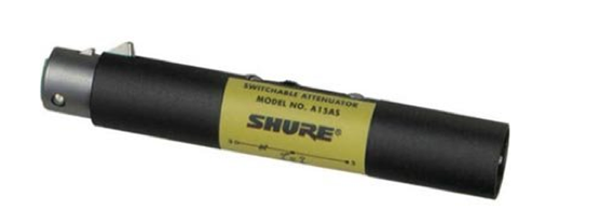
Figure 10. Attenuators reduce the levels coming from the sound board.
I saw an attenuator like this save the day at the J Street convention I helped produce in March 2012. Fortunately for me, it wasn’t the feed coming into my camera; it was in a different ballroom.
Without the attenuator, the signal was too powerful for the camcorder it was plugged into, producing significant noise. They fixed this about 11:00 the night before the convention, and if one of the sound guys didn’t have the adapter on hand, it would have gotten ugly. In short, when you’re streaming a live event and don’t control the sound, contact the sound guy as early as possible, identify the connections you’ll be given, and try to test the connection at least a day or two before the event.
Overall, the two absolutely critical resources every first-timer needs are plenty of connecting and testing time and the camcorder manual close at hand. Without both of these, you’re setting yourself up for a high-stress connection session with only a fair-to-middling chance of success.