Tutorial: Creating a Two-Camera Interview from a One-Camera Shoot
One-on-one interviews shot with two cameras pack a lot more punch than single-camera interviews, simply because they allow you to cut from two-shots of both participants to one-shots focused on the interviewee without distracting and unprofessional-looking zooms. So, how do you get that two-camera look when you've only got one camera available? This tutorial explains how, using Adobe Premiere Pro CS6 for the edit.
Framing Two Shots
Next, I import the footage into Premiere Pro CS6 as I normally would, knowing that when I drag it into the timeline, I'll see only a small portion of the 1920x1080 source footage in my new 640x360 frame. When I import my footage, Premiere Pro asks if I want to scale it to fit the settings of the project--this whole technique depends upon working at 640x360, so I say no.
I'll rough-cut and fine-tune this as I would any other video, adjust the audio as necessary in Audition, make color adjustments, add titles, and so forth, but that stuff is outside the bounds of this tutorial. You'll certainly want to make color adjustments before you start cutting your video (lest you have to fix color for each chunk). But let's assume we've taken care of that, and then move onb to framing out shots.
I want to make it as easy as possible to cut between my two-shot and my one-shot, as I would in a multicam edit. So I'm going to open the Effect Controls tab and create Motion presets (Position and Scale) for each "shot." Later on, I may want to make some additional framing adjustments to specific clips to add some variety to the edit, or underscore the intensity of certain portions of the interview by cutting to tighter shots, but for now, I want to create baseline one-shots and two-shots so I can cut easily between them.
For this tutorial, I'll use footage I captured for Streaming Media editor-in-chief Eric Schumacher-Rasmussen's interview with Daria Golyanina of Balakam.
I'll start with the two-shot. Obviously, how you fine-tune this to suit your projects and your footage will vary, but the same basic principles apply. Figure 4 (below) shows what the Program Monitor (preview) window looks like with the full 1920x1080 shot in my preferred Editing CS5.5 workspace in Premiere Pro CS6. Naturally, I'll need to scale this shot down and to get a good two-shot.
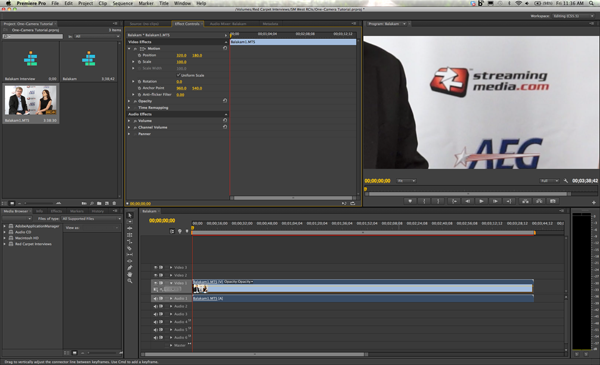
Figure 4. The 1920x1080 source footage in my 640x360 frame.
Now it's just a matter of experimenting and tweaking Position and Scale until I've got the shot I want. For the two-shot, if I've framed it properly in the footage, I can simply scale it down to 33%, and make minor tweaks from there. Figure 5 (below) shows the settings I chose.
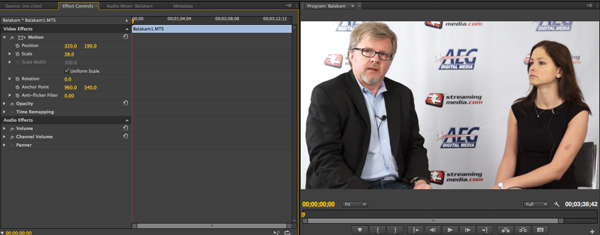
Figure 5. Position and scale settings for my 640x360 two-shot.
Now I want to save those settings so I can apply them when I cut from answers (one-shot) back to questions (two-shot) as the interview progresses. To do so, I right-click the Motion effect in the Effect Controls tab and select Save Preset, as shown in Figure 6 (below).
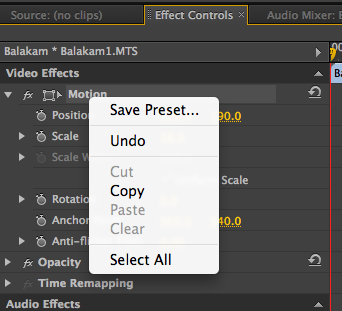
Figure 6. Saving the Motion settings as an effects preset.
I'll save that preset as Balakam Two-shot (Figure 7, below).
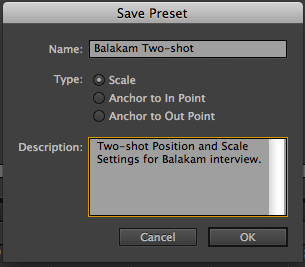
Figure 7. Naming the preset
The preset appears at the top of the Effects tab in the Media Browser in the Presets folder (Figure 8, below).

Figure 8. My Two-shot Motion preset.
Now I'll repeat the process for the one-shot. Note that this will require a bit more adjustment in the Position fields because footage as captured was framed as a two-shot. Figure 9 (below) shows my settings for the one-shot.
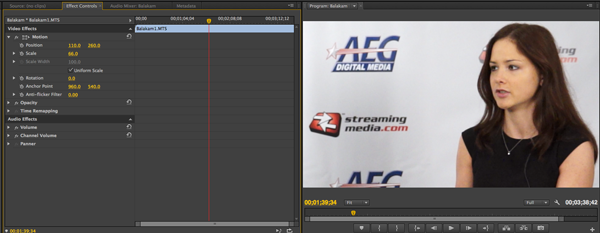
Figure 9. The one-shot
I'll save this one as Balakam One-shot (Figure 10, below).
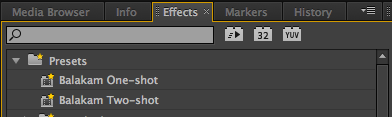
Figure 10. Both presets saved