Video Tutorial: Three Workflow-Enhancing Tips in Adobe Premiere Pro CS6
Video encoding and editing expert Jan Ozer provides three useful tips that will enhance your workflow and get you out of some editing jams in your Adobe Premiere Pro projects: editing audio without unlinking; Fill Left and Fill Right to create stereo audio; and creating nested sequences for smoother edits and creating reusable set pieces in your projects.
By
Jan Ozer
Posted on September 26, 2012
Nesting Sequences
Let's go to the start of the project. And we'll talk about the last tip, which relates to something called "nesting." I originally discovered the benefit of nesting through this particular problem. In Figure 7 (below), you can see 2 titles: Title 01, which talks about what's in the video, and Title 02, which is an advertisement. Again, this is from my own website, so there's some promotional materials. And then on top we have a logo.
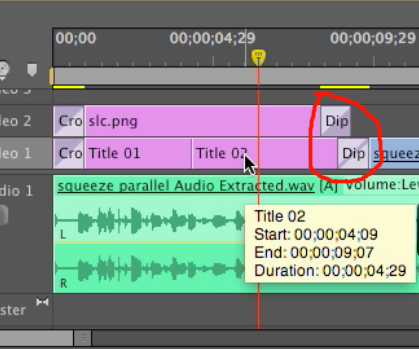
Figure 8. The 2 titles in the timeline
In Figure 7 (above), you can see that the logo and the title transition in at the same time. But here I'm transitioning on Track 1 from the title to the opening sequence of the screencam, so the 30-frame transition circled in Figure 8 is shared between this track and this track. 15 frames in Video 1, 15 frames in Video 2, while the transition in the Video 2 track is all 30 frames on the logo. So the logo starts to fade before the title starts to fade, and it's uneven, as you can see in Figure 7 (above).
Now, this is not a major deal, but they're even in the fade-in at the beginning. I really wanted them when they fade out, and there's no easy way to do that. I could mess with the transition duration by dragging this, and then I can do that, but that doesn't seem to produce an even result, and if you have multiple tracks above this, then you've got to do it for each track.
The quicker solution is to drag and select all three components, as shown in Figure 8 (below), and then choose Clip > Nest, as shown in Figure 9 (below Figure 8). And what I've done is nest the components, those three components that we saw, into a sequence called a nested sequence.
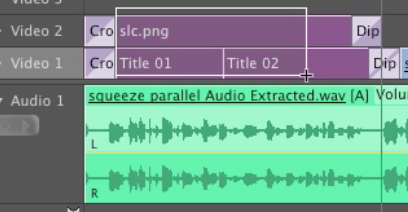
Figure 8. Selecting the component tracks
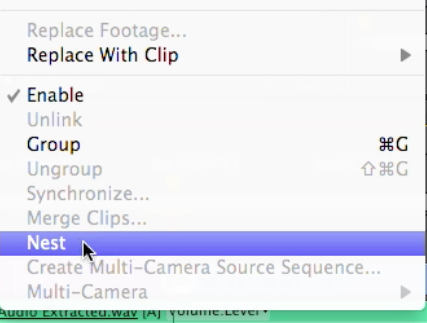
Figure 9. Choosing Clip > Nest to create a nested sequence
This creates a nested sequence called Nested Sequence 05. To give it a more descriptive name, I'll call that "Standard open and close" (Figure 10, below). And then if I want to see the content, I just double-click it, which opens Standard open and close, the nested clip.
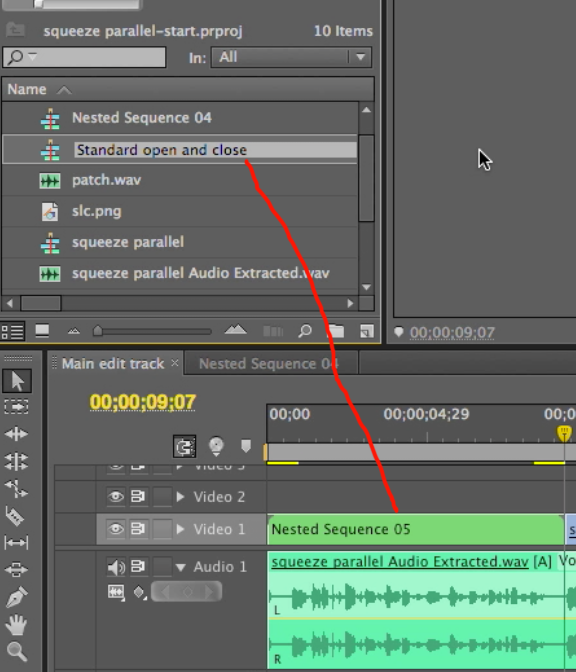
Figure 10. Renaming Nested Sequence 05 to something more descriptive
I want to remove the cross dissolve at the beginning of Video 1, the cross dissolve here at the beginning of Video 2, and the cross dissolve at the end of Video 1. And then insert one in the middle in between the two clips in the Video 2 track.
Then, if I go back to the main edit track, the transition is in there, as you can see in the video clip at the bottom of this page at the 5:30 mark, the video transition is there. And then I would apply the opening cross dissolve at the beginning of Nested Sequence 05, and then the dip to black at the end of Nested Sequence 05, centered at the cut by selecting Center at Cut in the Effect Controls menu. And now, what I've done is get the logo fading out in time with the title clip that's underneath it.
The other benefit of nested sequences is you can reuse the content pretty easily. And this is more the classic use. So I call this the standard opening and close, because I want to use the same materials in the open as I do in the close. So to reuse this content, all I have to do is drag across the timeline, and the content that was in the opening sequence is now at the end.
So that's nesting: a nice, convenient way to apply the same transition to multiple clips stacked together on the timeline, and something that's also very useful if you plan to reuse chunks of content.
Overall, nothing earth-shattering, but three techniques that at some point or another hopefully you'll find useful in some of your projects.
Related Articles
Two types of noises degrade the audio you shoot with your video: random noises like microphone clicks and pops, and consistent noises like white noise or air conditioning hum. This tutorial demonstrates how to remove both of them in Adobe Audition CS6.
Jan Ozer sits down with Bill Roberts to discuss the trends impacting the future direction of Adobe Creative Suite for video pros, including the decline of 3D, the rise of 4K, and second-screen viewing. Other topics included the growth of Creative Cloud, and the development arc of Apple Final Cut Pro X.
In this tutorial, Jan Ozer demonstrates how you can use the Neat Video plug-in to remove noise from video, improving output quality for all outputs.
In this tutorial you'll learn how to maximize the brightness and contrast of your video in Adobe Premiere Pro CS6 using the Brightness, Contrast, and Gamma Correction controls for effective and balanced adjustments.
There have been lots of comparisons between Final Cut Pro X and Premiere Pro CS6, with most focusing on features and workflows. This article discusses a series of multiple-format benchmark tests that analyzed comparative performance between the two programs.
Adobe Premiere Pro Instructor extraordinaire Luisa Winters explains how to use the new and enhanced Multi-Camera Monitor for quick and efficient multicam edits in Adobe Premiere Pro CS6 in this video and text tutorial.
The new version of Adobe Media Encoder, included in the just-released CS6 collection as well as as a standalone product, offers significant improvements in usability and performance, as well as new features. Here's what you need to know about it.