Color Calibration in the Field
How do you get all the different cameras you might use to cover an event to match? There is a trick you can use to set up a color profile for each of the cameras, and then use the corrections established there to correct for the rest of the footage from your project.
Fixing in Post
Now, after you shoot your footage, load it all into the computer. I'll be using Final Cut Pro, but the same actions here can be applied to the nonlinear editing software of your choice, as they are all fairly similar in terms of the features we'll be using here. The key is that you load up the calibration target footage and perform a three-point color correction using the black, gray, and white sections of the target.
Now, you would not expect a nearly $4,000 Sony 3-chip HDV camcorder to be matched by a $300 Canon PowerShot digital still camera. But you may be amazed at how close we'll get with a few clicks of the mouse.
For the sake of comparison, I did a splitscreen of the color calibration chart so I could also see, with my eye, how well the three-way color correction had worked. The second step in this process is that you need to blur the video of the calibration target because each frame carries some color variation-more so with the heavy compression in the digital still cameras than prosumer or professional video, but blurring both ensures that you get an average sample.
If you look closely at the closeup of the Canon footage, you can see color blotches--especially in the black and gray panels. I enhanced a frame grab to demonstrate this more clearly (Figure 2, below). Selecting one color blotch or the other will affect the accuracy of your color correction. So with a good blur setting, you blend these color variations together and get an overall setting for the camera. Note that you need to blur only the calibration target clip, not any of your other footage.
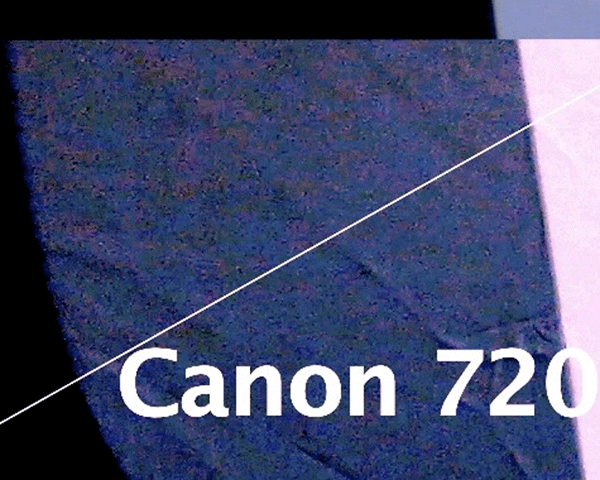
Figure 2. Note the color blotches in the black and gray panels in this frame grab from the Canon footage.
You can see the clear differences between the uncorrected and corrected calibration target shots in Figure 3 (below). The Sony (on top) was clearly bluer on the manual white balance, but it doesn't matter. Each of the color correction circles has an "eyedropper" tool. For the sake of clarity, I call it the "suck" tool because it sucks up the color in the image wherever you click it. Select the black "suck" tool for the Sony and click on the blurred black section of the target. Repeat for the gray and white color correction sections.
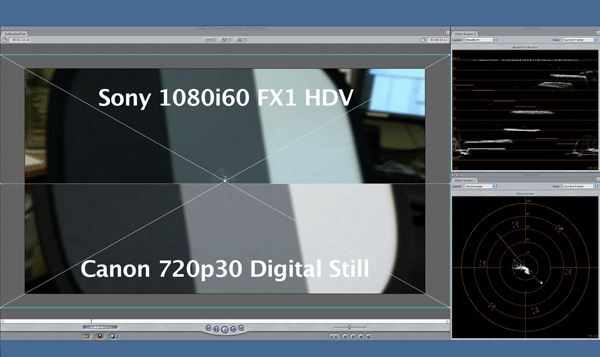
Figure 3. Note the differences between the uncorrected (top) and corrected (bottom) calibration target shots
Then change clips in your timeline. Apply a new, clean filter. Select the black "suck" tool and suck up some black from the other camera (for me, that's the Canon). It's important not to get confused and correct the Canon footage with the calibration chart in the Sony footage. The whole process will not work if you confuse which camera you are correcting. You do not have to do them splitscreen like I am doing here; I did this for the sake of the article to illustrate how they compare before and after correction.
After correcting black, gray and white, you can see in Figure 4 (below) how the calibration targets now very closely resemble each other. That was six clicks of the mouse to calibrate each camera's footage-a crucial factor if the clock is ticking as you match your footage. It really doesn't get much easier than this. Also, note the waveform scope at the right and how, before, the three panels of the calibration target were not only not aligned, but the middle target has a greater luminance difference than the other two targets.
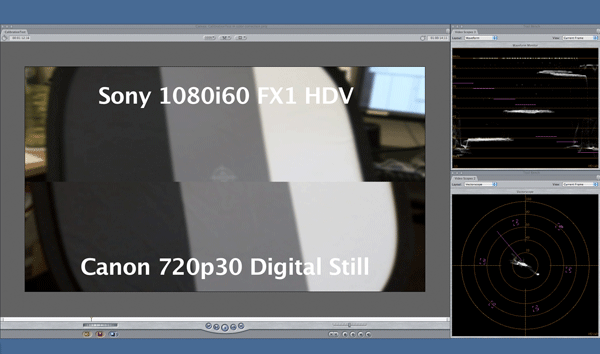
Figure 4. The same footage with the blacks, grays, and whites corrected
It would be very hard to make these adjustments by eye alone. The scopes accurately reveal the differences. Thankfully, the actual correction process is simple: Click on the color with the proper tool. Also, the vectorscope shows the uncorrected footage with a nice-sized plume down towards cyan, and after correction, that plume is gone.