Tutorial: Streaming Live with the Adobe Flash Media Live Encoder
The Adobe Flash Media Live Encoder (FMLE) works on both Windows and Mac computers and is free. Though you'll need a bit heftier of a computer to run FMLE than some other software encoders, you'll be rewarded by a high-quality, consistent video stream. In this tutorial, I'll walk you through the steps of producing a live event with FMLE.
Selecting Outputs
With our streams configured, it's time to move to the output side, as shown in Figure 9 (below). Here, again, is where you input your credentials for connecting to the streaming server.
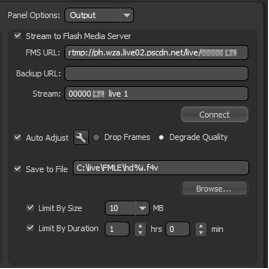
Figure 9. Setting your output options
Note the Auto Adjust checkbox in the middle of Figure 9, which lets you either degrade quality or drop frames should the maximum buffer size exceed the selected value (Figure 10, below). For example, in Figure 10, the maximum buffer size is 5 seconds. If the buffer exceeds that value, it means that FMLE is having a hard time delivering the stream to the server.
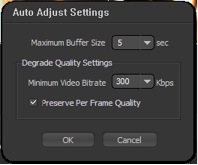
Figure 10. Using the Auto Adjust Settings to ensure that your stream gets to the server
With the settings shown in Figure 10, FMLE will drop the video data rate down to 300 Kbps, and drop frames to preserve Per Frame Quality, until the buffer drops below 5 seconds. If you're working with constrained outbound bandwidth, enable this control to ensure that a consistent stream gets through to the streaming server.
As you can see in Figure 9, you can also store a copy of the video file to your hard drive. Note that if you're encoding in H.264, FMLE will produce a fragmented file that won't play in any desktop FLV Player. To view the file, you'll have to use Adobe F4V Post Processor, a downloadable command line, Windows-only F4V viewer.
FMLE wouldn't be an Adobe product if it didn't give you room to input metadata; click the Panel Options list box down to Metadata, and you can enter the information shown in Figure 11 (below). Use the plus and minus keys to add or delete lines of metadata.
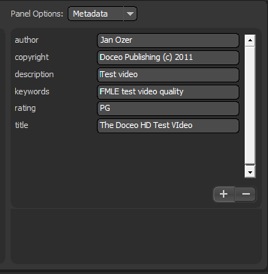
Figure 11. Adding your stream metadata
Going Live
Once all settings are configured, and you're ready to go live, click the Start button on the bottom left of the FMLE interface. The program will swap over to the Encoding Log, showing log information on the left, and streaming statistics on the right (Figure 12, below).
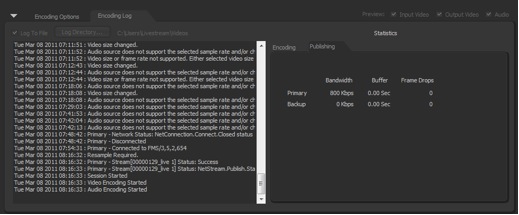
Figure 12. Monitoring the live event
As long as the buffer stays at or near 0 seconds, and you have no frame drops, you should be OK. In addition, if possible, it's good practice to log into the live presentation on either your capture station or (preferably) another local computer so you can watch the event live, and see any problems firsthand.
If the buffer starts overfilling, or you start experiencing massive frame drops, you can either continue as is or stop the stream, reconfigure your encoding settings to more conservative values, and restart the presentation. Neither option is ideal, which is why it's always best to test everything out before the event, if possible using footage that approximates what you'll actually be shooting.
Though FMLE does a good job maintaining a consistent data rate irrespective of content, you'll have more data spikes shooting a soccer game than you will with a debate. So if the live event will have lots of motion, test your settings beforehand with a similar level of motion to test your encoding options.
Related Articles
Two types of noises degrade the audio you shoot with your video: random noises like microphone clicks and pops, and consistent noises like white noise or air conditioning hum. This tutorial demonstrates how to remove both of them in Adobe Audition CS6.