Tutorial: Streaming Live with the Adobe Flash Media Live Encoder
The Adobe Flash Media Live Encoder (FMLE) works on both Windows and Mac computers and is free. Though you'll need a bit heftier of a computer to run FMLE than some other software encoders, you'll be rewarded by a high-quality, consistent video stream. In this tutorial, I'll walk you through the steps of producing a live event with FMLE.
Configuring Your Streams
FMLE can stream in both VP6 and H.264 formats; I think H.264 is the better choice at this point. Adobe supplies multiple templates for each format in the presets list box (Figure 5, below), which may provide a good starting point, but definitely should be customized as discussed below. For the purposes of this discussion, I'm going to assume that you'll manually configure your settings.
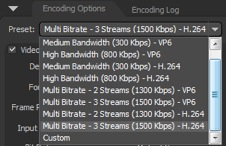
Figure 5. Adobe templates provide a good starting point.
Start by choosing H.264 as your Format, then click the wrench next to the Format tab to open the Advanced Encoder Settings dialog shown in Figure 6 (below). Adobe defaults to the Baseline profile for all their templates, I would use that as well. Most Adobe templates use a Keyframe Frequency of five seconds. I use that value when streaming multiple files, but use ten seconds when streaming a single file, as we are here.
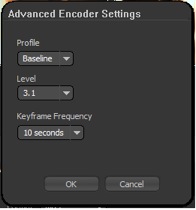
Figure 6. Fine tuning the H.264 encoding controls
Now let's choose our stream configuration options (Figure 7, below). I typically stream at full frame rate, though if I'm working with constrained outbound bandwidth, I may drop to 15 frames per second (fps). The Input Size has to match the actual input of your video; otherwise you'll lose the preview and the incoming stream. On the bottom of the screen, note the Deinterlace and Timecode options as well as cropping. FMLE deinterlaces by using a simple blur filter, so you're much better off working with progressive source if you can.
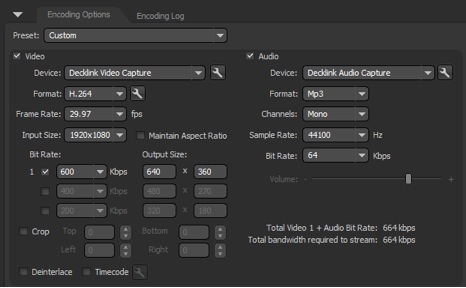
Figure 7. Setting stream configuration options
When choosing your Bit Rate, your most important consideration is the outbound bandwidth of your connection, which you should measure well before the event. I use Speedtest.net (Figure 8, below), which is a free service that measures ping time, download speed and upload speed. As you can see in Figure 8, my max upload speed is .87 Mbps (or 870 Kbps), which is why I'm keeping the data rate in Figure 7 at a conservative 664 Kbps combined audio/video data rate.

Figure 8. Measuring your connection speed
If you get too aggressive with your data rate, FMLE won't be able to deliver the encoded stream to the streaming server in real time, leading to pauses on the viewing end. In my view, it's better to use a bit lower data rate and reduce quality a bit, than to risk delays during viewing, though you can control both options directly in the Auto Adjust control discussed below.
Back to Figure 7 for a moment: Note that I'm streaming at 64 Kbps mono (as promised) in .MP3 format, not AAC, the usual partner to H.264 streams. That's because FMLE doesn't include AAC encoding, though you can purchase an AAC Encoder plug-in from MainConcept for $180 US.
Related Articles
Two types of noises degrade the audio you shoot with your video: random noises like microphone clicks and pops, and consistent noises like white noise or air conditioning hum. This tutorial demonstrates how to remove both of them in Adobe Audition CS6.