Color Calibration in the Field
How do you get all the different cameras you might use to cover an event to match? There is a trick you can use to set up a color profile for each of the cameras, and then use the corrections established there to correct for the rest of the footage from your project.
Correcting Footage
Color correction using the calibration target gives the nonlinear application a "profile" to use to color correct the rest of your footage. That's the theory, anyway; here's how it worked out in testing.
I created a 720p30 project that will handle both the 720p30 footage from the Canon and the 1080i30 footage from the Sony. We're just talking color correction here, so I simply zoomed the Sony's 1080 footage out to 100% and let a good portion of it get lost as overscan, as shown in Figure 5 (below). Also, I had neglected to set the Sony to manual focus so, while setting the cameras up, the Sony focused on the green lights of my router, and when I sat down, my face was out of focus. Again, we're talking about color matching here so, rather than reshoot everything, I just worked with it. I think the results still clearly speak for themselves.

Figure 5. The Sony 1080 footage zoomed in a 720p30 project
I sat down in this mixed-light situation without having changed the white balance setting on either camera. I rolled some footage of me just sitting there and then loaded that into the same timeline as the calibration target footage. Again, for the sake of this article, I did a splitscreen between the footage of the different cameras and, prior to color correction, you can see how different they really were (Figure 6, below).

Figure 6. My interview subject (me) in splitscreen before camera calibration
The Sony is more contrasty. The whites have green in them. The Canon looks a bit lighter overall. The manual white balance got us some 75% of the way there, but there are still critical differences here that would be very difficult to manually iron out just using your eye.
In Final Cut Pro, I can copy the color correction settings from the calibration clip and apply them to the clip of my face. I copy and paste each of the color correction settings, and, in about 5 seconds, I have transformed the uncorrected raw video to footage that looks like it would cut together quite well. Even here in a split screen side by side, the color and luminance is a near enough match that you almost can't tell where the transition line between the cameras is. If it weren't for the change of angle, and the blur on the Sony footage, I could have matched these up so it would be invisible (Figure 7, below).
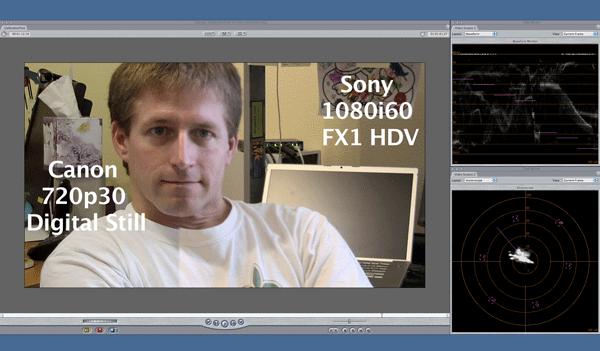
Figure 7. The same splitscreen shot post-calibration
So, correcting the video footage is nothing more than copying the color correction settings from the calibration target footage from each camera, and applying it to the video footage you will be using.
Conclusion
I had this idea for some time before I sought a color calibration target to test this with. I thought it would get me close-far closer than I could come by trying to match the footage manually-but I was surprised by how well it worked, and how quickly the process came together in post.
I heartily recommend trying this out for yourself. It doesn't have to be this calibration target, or even one this big (you can use smaller versions in much the same way by zooming the cameras in). But you do have to follow this process, with all the cameras shooting in the same direction at the same target at the same time (especially if you're outdoors under changing light conditions, such as a partly cloudy sky). You can't do one 10 minutes after the other, when the sun has moved or gone behind a cloud, and expect the calibration to work properly.
Once each of the cameras is calibrated, you don't have to recalibrate unless the cameras need to change all their settings, such as from an outdoor location to an indoor, primarily tungsten-lit location. Then you'll have to change the white balance on the cameras, and reshoot the calibration target.
This way, you can mix footage from expensive primary cameras and much less expensive POV cameras. Understandably, a $300 digital still won't necessarily have the same polish as the prosumer or professional video camera, but this calibration process will get you close enough that, if you are fine with any visible differences in the images (say, from compression artifacts) then you can combine the footage with confidence.