Tutorial: Color Correction with Avid Media Composer
This tutorial demonstrates how to leverage Avid's powerful and efficient color correction by working in Color Correction mode, which allows you quick access to its color grading features but keeps them out of the way while you're editing.
Avid has long been the overwhelming NLE of choice for major feature films and primetime scripted TV shows. One of the many strengths of Avid is the method of applying color correction. In the last few years, color correction has come to be used directly by editors instead of separately by colorists. It’s a process that can make the most obvious difference to your projects in the eyes of your clients, so it’s a very good thing to know how to do, and it’s critical that your NLE allows you to do it easily and to do it well.
Most other NLEs either add color correction as an effect or a completely separate process that requires leaving the NLE then roundtripping back to the editor. In Avid, color correction is a mode, which allows you quick access to its features but keeps them out of the way while you're editing. It’s really the best of both worlds.
Generally, you want to do color correction in context of the shots around it. That means color correction should really be a process done near the end of the edit. But as we all know, when we think the final edit is done, there’s always something else that gets tweaked.
In systems that require roundtripping, this takes a lot of time, requires specialized workflows, and rarely works properly or conveniently. In Avid, though, you're a click of a button from updating the edit or the color correction.
In Avid, you can do color correction using the same input tools that you use for editing, such as a mouse or a trackball or tablet. But if you want to increase efficiency by a quantum leap and impress your clients with a cool-looking interface, you can use something like the Avid Artist Color User Interface shown in Figure 1 (below). I’ll use a trackball in this tutorial, but when I need to do a lot of corrections as quickly as possible, I use the Artist Color to keep me in the moment and tweak stuff in the most convenient manner.
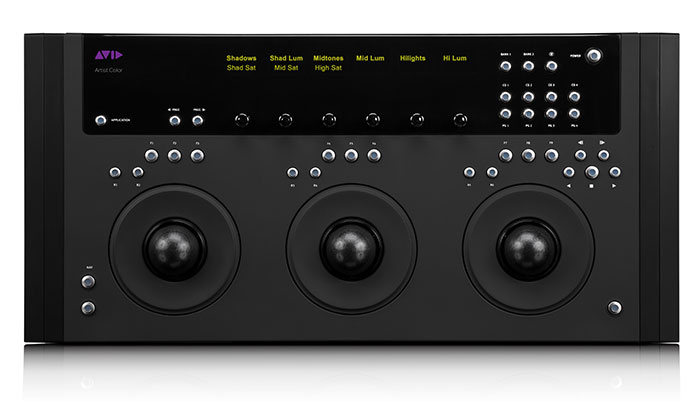
Figure 1. Avid's Artist Color can increase your color correction efficiency.
Getting Started in Avid Color Correction Mode
Let’s have a look at how color correction works inside of Avid.
With the sequence shown in Figure 2 (below) added in Avid, there are two easy ways to start color correction.

Figure 2. The sequence we'll work with in this tutorial. Click the image to see it at full size.
From the Windows pull-down menu (Figure 3, below) you can open a Color Correction workspace with all the tool layouts customized the way you like them. Or you can use the Color Correction Mode button (Figure 4, below Figure 3), one of which is near the bottom left of the timeline under the Smart Tools. Both of these buttons are easily mapable to custom keyboard shortcuts.

Figure 3. Opening a Color Correction workspace via a Windows pull-down.

Figure 4. Entering Color Correction Mode by clicking a button.
In Color Correction Mode there are three windows (Figure 5, below).
The Composer Window
At the top is the Composer window, same as in the Editing mode except there are three monitors instead of two. In the Default mode, these show you the shot you’re grading in the middle, the previous shot in the sequence to the left, and the next shot in the sequence to the right. You can make these monitors be anything you want, including a waveform monitor and a vectorscope. There are also controls below each window for navigating the timeline. You can see a split between your correction and the original with the button to the left. You can jump from one correction to the previous or next correction with the Next buttons. With no corrections made, these jump to the beginning and end of the sequence. You can play just the current correction with the Play button, and you can jump to the previous and next uncorrected shot with the Next To buttons. You can clear or undo or delete the correction with the Final button.

Figure 5. Color Correction Mode. Click the image to see it at full size.
The Timeline
At the bottom is the Timeline. It’s the same timeline you’re looking at in Editing mode and navigating through the timeline in Color Correction mode, is basically the same as in editing. An important tip is to make sure that when you enter Color Correction Mode, you have the video track active that you want to color correct. Color correcting an empty filler layer above the track you want will actually apply that color correction to all the clips under that filler. So be warned, this can be used for good or for evil.
Related Articles
Art of the Cut's Steve Hullfish explains how to customize your keyboard and keyboard shortcuts for smooth and streamlined editing in Avid Media Composer.