Tutorial: Creating Organic Transitions in Adobe After Effects
While there are many built-in transitions available within Adobe After Affects and Premiere Pro, there may come a time where you want to organically create something to switch from one piece of video to another. This tutorial will demonstrate 3 ways to do this in After Effects.
Animating the Wipe
Next, we'll animate the position of this color solid to wipe across the screen from left to right. To begin, select the color solid and press P to open the Position Properties (Figure 5, below). Here, you can see the X and Y values for the color solid. This is where we will animate it over time by adding keyframes.
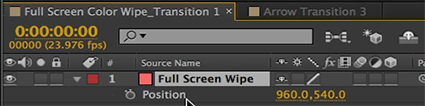
Figure 5. Position Properties open for the color solid.
You can enable keyframes by clicking the clock-like Time-Vary stop watch icon to the left of the position values (Figure 6, below). We want the transition to be complete by the 1-second mark. So we'll place our playhead at that point in the timeline and drag our X value to the right until the color solid is completely off screen.

Figure 6. Enabling keyframes.
Now we can move our playhead to the beginning of the composition and create the starting point keyframe. We'll adjust the X value by dragging it to the left. The color solid will start off screen from the left. Since we have enabled keyframes, as we drag the X value, After Affects adds a beginning keyframe (Figure 7, below). You can see a preview of what that looks like at the 2:21 mark in the tutorial video.

Figure 7. The beginning keyframe. Click the image to see it at full size.
We'll smooth out the keyframes by right-clicking on each keyframe and going down to the Keyframe Assistant and selecting the Easy Ease Out option for the beginning keyframe, and then the Easy Ease In option for the last keyframe (Figure 8, below). This will give our transition a more organic movement.

Figure 8. Easing in and out of the transition for a smooth takeoff and landing.
Related Articles
This tutorial will demonstrate an advanced method of adding a slider or jib effect to timelapse footage in Adobe After Effects CC 2014.
In this tutorial we'll look at using shape layers to create, customize, and animate lower-third graphics with Adobe After Effects CC 2015.
This tutorial demonstrates a versatile and flexible technique that will match animations between layers you choose to connect to enhance, simplify, and accelerate your animation process.
While animating a client's logo can be a time-consuming process, it adds more production value and life to your video projects. This tutorial will demonstrate how to create dynamic logo animations using Adobe After Effects CC and Adobe Illustrator.
Here's a look at 15 keyboard shortcuts that will enhance the efficiency of your After Effects workflow.