Tutorial: Using iShowU HD Pro Screen Captures with Adobe Premiere Pro CC
iShowU, a Mac-based screencam app from ShinyWhiteBox.com, is quick, easy-to-use, and inexpensive; here's a look at how to use it to produce pro screencams that you can import into Adobe Premiere Pro CC to integrate into your video projects.
Advanced Settings: Capture Options
Under the Advanced options, we'll want to make a few adjustments. We'll start with Capture Options (Figure 9, below), and work our way from the top down.
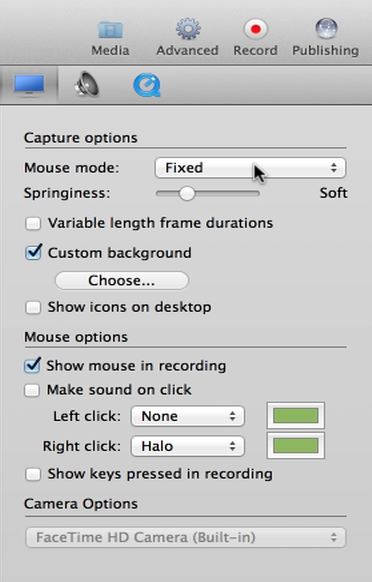
Figure 9. Advanced Capture Options.
Mouse Mode has already been adjusted. We'll also keep Springiness at the default setting. We want to make sure to deselect Variable Length Frame Durations to avoid any syncing issues when we import the screencam into Adobe Premiere Pro. Custom Background (selected in Figure 9) is a nice option that allows you to choose a custom image for your background during the recording. That way you don't have to change a wallpaper that you normally would use.
For this project, we want to adjust some of the mouse options. We want to show the mouse during recording, because that allows viewers to see where we're clicking, which is critical in a software demo or tutorial. I prefer to disable Make Sound on Click to avoid the distraction of incessant mouse-clicking. Other Mouse Options include settings to highlight areas on the screen where you left- or right-click your mouse with a color-coded blob or halo. For this example we'll leave the setting for each of these at "None"; as with many preferences it depends on the inclinations of the producer or client or the demands of the specific project.
Advanced Settings: Sound Options
Moving on to the right under Advanced Settings we find the Sound Options tab (Figure 10, below).

Figure 10. The Sound Options tab under Advanced Settings.
Here we'll select options for recording audio from applications. Keep in mind that selecting Monitor Audio--which means iShowU HD will monitor the audio while you're recording--can result in feedback. You can also adjust microphone options under this tab.
Advanced Settings: Video and Audio Options
Next up are Video and Audio Options. Here you'll choose a format, if you haven't already (we've already chosen ProRes 422, as you can see in Figure 11, below). You'll also want to make sure your quality bar is pushed all the way to the right to ensure that you record at maximum quality.

Figure 11. Advanced Settings for Video and Audio.
You can also adjust audio output settings here, such as format, quality, sampling rate, etc.
Related Articles
In this tutorial, we'll look at how to create screencams with TechSmith Camtasia, and then import them into Adobe Premiere Pro to incorporate them into your existing Premiere Pro projects to create professional-quality instructional videos that seamlessly combine screencams and HD footage.
Here are three quick tips that will streamline your titling workflow in Premiere Pro when you create styles you like and want to use them consistently without reinventing them each time.
New SpeedLooks in SpeedGrade, Mask Tracker in After Effects, Sync Settings in Adobe Media Encoder, improved multicam in Premiere Pro, expanded UltraHD/4k support, and more
Using Adobe Lightroom 5 to color-grade and apply metadata to DSLR video files is simple and efficient and can benefit live-switchers doing minimal edits, editing novices, and pro editors exploring non-traditional workflows.
Recent upgrades to Adobe CC make it easy to apply graded looks in Adobe Premiere Pro CC and match shots with different color temperatures via seamless roundtripping between Premiere Pro CC and SpeedGrade CC.
In this final round between audio editing champs iZotope RX 3 and Adobe Audition CC, we compare the two audio editors in noise reduction and reverb/echo reduction.
In this first installment of a two-part series, Jan Ozer compares the declipping and crackle and pop-removal features in iZotope's new RX 3 pro audio editor to the parallel features in Adobe Audition CC.
Exploring 3 new key features in Audition CC, the newest version of Adobe's professional audio editing application: Sound Removal for eliminating hums and other variable-frequency unwanted noises, the Loudness Radar Meter for matching and adhering to broadcast volume standards, and Automatic Speech Alignment for ADR.
If you ever find yourself having to render multiple sequences from Premiere Pro, there's an easier way to do it than by using the Premiere Pro Export control. This tutorial will explain the easier and more efficient way using Adobe Media Encoder.
Here's a quick tutorial for Premiere Pro CC users on how to migrate encoding presets that you created to customize and streamline encodes in Adobe Media Encoder CS5/6 into Adobe Media Encoder CC so you can pick up right where you left off.
In this tutorial you'll learn how to create and edit industry-standard closed captions for video using the new closed-captioning capabilities in the just-released Adobe Premiere Pro CC.
Two types of noises degrade the audio you shoot with your video: random noises like microphone clicks and pops, and consistent noises like white noise or air conditioning hum. This tutorial demonstrates how to remove both of them in Adobe Audition CS6.