Tutorial: Keyword Tagging in Apple Final Cut Pro X
In this first installment of our new tutorial series, Glen Elliott demystifies Final Cut Pro X, illustrates its core functions, and focuses on one of the most powerful new features for organizing, accelerating, and streamlining your edits: metadata keyword tagging.
Apple made some pretty bold decisions writing Final Cut Pro from the ground up in Final Cut Pro X, causing some paradigm shifts to the editing workflow. But these changes are positive, especially when you take the time to get comfortable with the new interface and workflow.
In this first installment of our new tutorial series, I'm going to try to demystify the program a bit and illustrate how the core of the new program functions. Additionally, we're going to go over one of the most powerful new features, metadata keyword tagging, which has become a huge part of editing workflow at Cord3Films since we switched to FCP X. Let's jump in.
Welcome to the New Paradigm
Figure 1 (below) shows the new interface. In the upper-left corner you see the Event Library and the contents of your events. On the right is the Viewer. And down at the bottom is your Project Library.
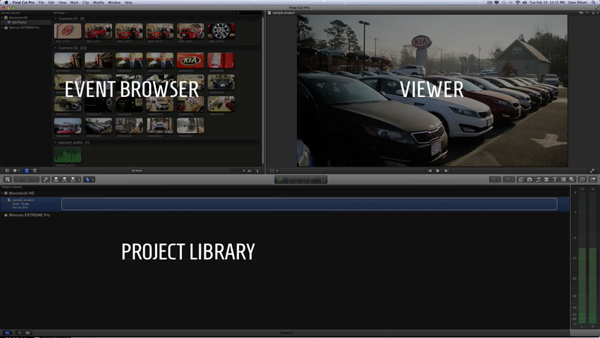
Figure 1. The new Final Cut Pro X interface
Final Cut Pro X has widely been criticized for its visual similarities to iMovie. I'll admit it's very iMovie-ish at first glance, but I promise you it's a much more powerful program. In fact, a lot of its functions are hidden a little bit under the hood, so to speak. There are a lot fewer buttons on the screen than in Final Cut Pro 7, but all the functionality is there. You're definitely going to want to learn your keyboard shortcuts.
Events and Projects
There have been some paradigm shifts in the editing workflow and also, some major changes to the way the program functions as a whole, and the best way to understand its functionality is to illustrate how it compares and contrasts to other applications you use. There are two types of programs out there: file-based programs and non-file based programs. Take Adobe Photoshop and Lightroom, for example. Adobe Photoshop is a file-based program. You open up Photoshop and you open your document or your file and you edit it and you save it. This is very similar to Final Cut Pro 7, where you open up Final Cut Pro 7, and you open up your project file, which houses all the information for the footage that you've imported. And it houses all the information for your timelines or sequences.
Adobe Lightroom, on the other hand, is a non-file based program. When you open up Adobe Lightroom, you have access to all of your photo libraries--very similar to the way, say, iTunes works (Figure 2, below).

Figure 2. File-based programs and non-file based programs
Final Cut Pro X works the same way. Every time you open it up, you have access to all of your events and all of your projects. There's no longer a single project file that unifies everything.
But it's not that complicated or overwhelming as that may sound. There are only two elements to worry about: your event and your project, as shown in Figure 1. And the way those function could be illustrated in the Finder. If you open up your Finder, you're going to see two folders that Final Cut Pro X uses. Basically, these are the two folders that make Final Cut Pro X run. It has your Final Cut Pro Events folder and your Final Cut Pro Projects folder.
In the Final Cut Pro Events folder shown in Figure 3 (below), I've twirled down the disclosure triangle to show Kia Promo, the local car dealership commercial that we're using as the example project in this tutorial. It corresponds with the event that I have in Final Cut Pro X, "Kia Promo," as shown in Figure 1. Pretty simple.
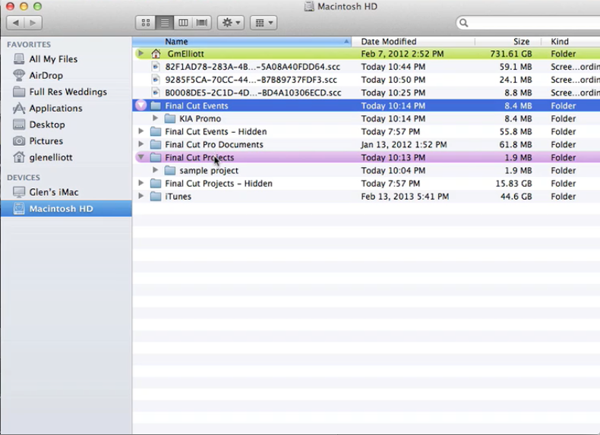
Figure 3. Final Cut Pro Events and Projects folders in the Finder
Under Final Cut Pro Projects, I only have one project and called "Sample Project." You'll see in your Finder as well.
This organizational structure lends itself well to collaboration. Let's say you have multiple editors in your studio. If you wanted to pass a hard drive around to share, all you would need is to have the media available on that hard drive and your event and related projects. And your other editors could just plug in the hard drive, turn Final Cut Pro on, and have everything available. There's no relinking or anything like that.
Related Articles
Here's a look at two workflows for applying film grain to your footage in FCP X using cineLook (with and without Gorilla Grain), first with 4k footage shot with the Blackmagic Production Camera, and then with Cinestyle-flattened DSLR footage.
In our first tutorial on the recently released FCP 10.1, we look at the new Libraries feature, which enhances project and media organization and eases the adjustment for editors transitioning from FCP 7.
This tutorial on Apple Final Cut Pro X takes a closer look at color correction in the Inspector, exploring the Balance Color, Match Color, and Color Mask and Shape Mask features.
This tutorial on Apple Final Cut Pro X inspects the Video Inspector, a context-sensitive area of the FCP X interface that allows you to change settings of various filters and settings, and focuses on making basic but effective color adjustments.
In this video tutorial Glen Elliott of Cord3Films looks at FCP X's Timeline Index which provides innovative options for viewing, navigating, and searching your projects, including three different types of timeline markers and the ability to create a navigable To Do list of editing notes that's indispensable for collaborative workflows.
In this tutorial, Cord3Films' Glen Elliott demonstrates how to mix audio from multiple off-camera sources in a multicam edit in Apple Final Cut Pro X.
In part 2 of our series on multicam editing in Final Cut Pro X, Glen Elliott explains how you can accelerate and streamline the multicam-syncing process in Red Giant's PluralEyes 3.
Our Final Cut Pro X tutorial series continues with the first installment of a 3-part series on multicam editing in FCP X, addressing the basics like creating a multicam clip and cutting and switching audio and video using the Angle Editor.
Working with compound clips in FCP X is similar to nesting sequences in Final Cut Pro 7. Once you understand how it works, and how changes to compound clips can ripple across projects, it's a powerful feature that you'll find yourself using more and more.
In this tutorial, we'll look at several ways you can use connected storylines to enhance your FCP X edits and mix in cutaways and creative shots in a quick and efficient way.
This tutorial explores advanced editing techniques in FCP X including back-timing your edits, replacing edits and auditioning, top-and-tail editing, extend edits, trim-to-selection edits, keyboard trimming, and the Precision Editor.
The magnetic timeline is one of the major revolutionary changes in Apple Final Cut Pro X, and one of the areas editors struggle with when they're coming from track-based NLEs. In this tutorial we'll break it down and show you how to make it work for you.
No matter how fast, efficient, and determined a 48 Hour Film Project production team is, they need to finish strong with a streamlined edit. Final.revised editor Scott Strimple describes how Apple Final Cut Pro X allowed him to deliver the goods on deadline, by leveraging key features that could make any edit cook.
The 48 Hour Film Project offers filmmakers a chance at fame and glory and unleashed creativity, along with the insanity of producing a film from pre to post in two days. Scott Strimple, editor of award-winning 48HFP entries two years running, recounts what it was like putting together this year's film. In Part 2 he'll discuss the instrumental role Apple Final Cut Pro X played in editing and delivering the film with a cool 9 minutes to spare.
Background noise and pops and clicks in audio are an unfortunate fact of life for many productions. In this tutorial we'll explore some fixes you can try in Final Cut Pro X.
One of the most convenient new features in Final Cut Pro 10.0.6 is the ability to quickly and easily export to a single destination, or a bundle of destinations, that contain multiple outputs. In this tutorial, you learn how to create a single destination and a bundle of destinations.
The histogram and the waveform in Apple Final Cut Pro X are effective, easy-to-master tools that provide the clear input you need to diagnose and fix the contrast issues in your video simply and intelligently. In this video tutorial, video editing and encoding expert Jan Ozer explains how they work.