Tutorial: Removing Video Noise with the Neat Video Plug-in
In this tutorial, Jan Ozer demonstrates how you can use the Neat Video plug-in to remove noise from video, improving output quality for all outputs.
Working with the Temporal Filter Settings
Next, we're going to work with the Temporal settings in the Effect Controls view, back in Premiere Pro, that we saw when we first applied the Neat Video filter to the clip. There are three settings here, as shown in Figure 17 (below).

Figure 17. Temporal Settings for the Neat Video filter in the Effect Controls view
The first setting, Temporal Filter Radius, determines how many sequential frames the filter is applied over (Figure 18, below). At a setting of 1, the filter is applied over 3 frames—the frame being filtered and the immediately preceding and succeeding frames. In other words, rather than applying the anti-noise setting to an individual frame, the filter will analyze these 3 frames to figure out what is noise and what is true motion.
At the maximum setting of 5, the filter analyzes 5 frames before the frame being filtered and 5 frames after, which increases the accuracy with which the filter distinguishes noise from true motion. The downside is rendering time. It's going to take a lot longer to process each frame if you've got to consider 11 frames to do so. Still, unless you're in a real hurry, I find the extra quality produced by the filter worth the extra processing time.
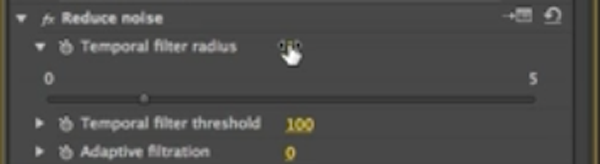
Figure 18. Applying Temporal Filter Radius settings
The next setting, Temporal Filter Threshold, adjusts how the filter distinguishes noise from true motion. Typically, I leave that at the default of 100.
Finally, Adaptive Filtration basically asks the question, "Do you want the filter to adjust its settings for different scenes in the video?" Now, in this particular video, there are no changes scene changes, so I'll say no by leaving the control at 0. If there were scene changes, I would enable adaptive filtration by choosing 1.
Once you've got the filter configured, you render as normal.
Noise Reduction Results
Now, let's take a look at some results of this filter. To do so, I created a new sequence with the clip loaded twice on the timeline, once filtered, once not, and then I rendered out to various output formats. In each case, I'll show the original (non-filtered) video on the left, and the video with the Neat Video filter applied on the right.
The first one we're going to look at is DVD (8 Mbps). This is a very high-quality output format, and even when it's still, you see a lot more noise in the background on the left in Figure 19 (below) than you do on the right. The shirt looks clearer and even brighter than it does in the non-filtered clip. And, of course, if you were to play it back, you'd see much more noise in the background and in the face on the left (non-filtered) side than you would on the right (with the Neat Video filter applied).
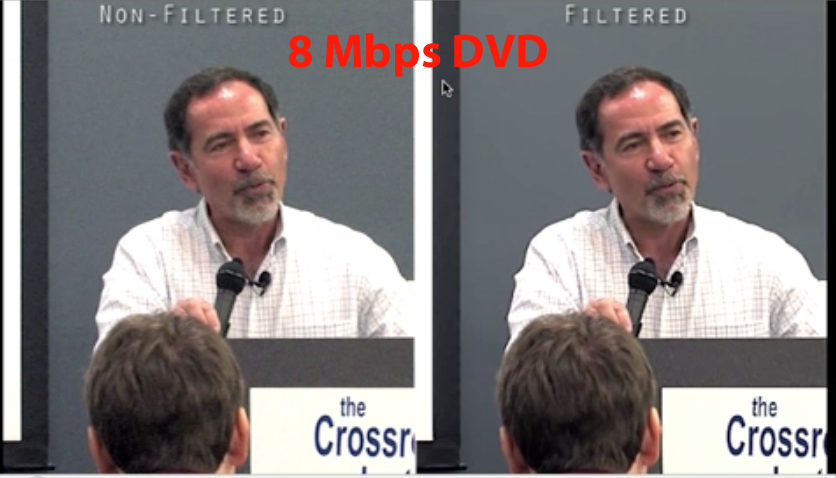
Figure 19. Encoded to 8 Mbps DVD. Original (non-filtered) video on the left; Neat Video-filtered clip on the right.
Let's take a look at a lower-quality output. Figure 20 (below) shows non-filtered and filtered 720p H.264 output at about 2.8 Mpbs, which is what ESPN uses for their 720p for their rendering. And again, we see a lot more noise in the non-filtered background and face. The shirt looks a bit brownish. On the right the shirt looks clearer, a little bit whiter, and obviously sharper. And if we were to play the video, we'd see a lot more artifacting in the background on the left than we would on the right. You're always going to have artifacting with a flat background, but the noise in the background really accentuates that, and you don't see that in the filtered video on the right.
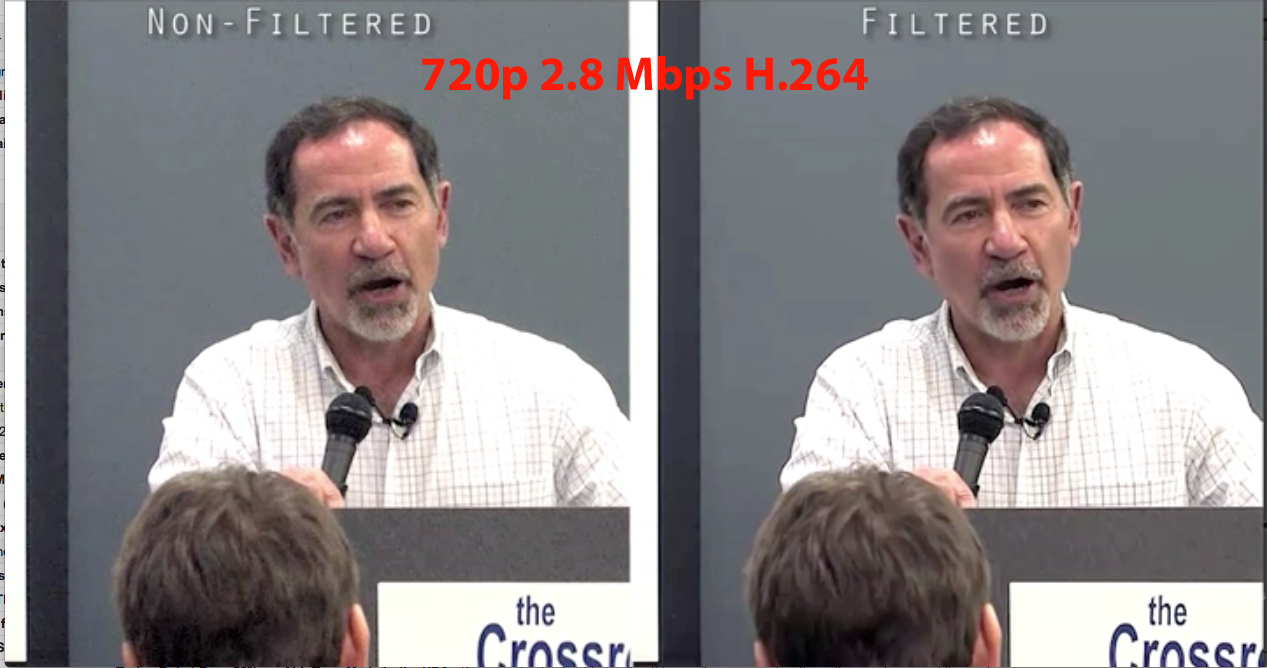
Figure 20. 720p H.264 video encoded at 2.8Mbps; non-filtered on the left, filtered on the right.
The last use case we're going to look at is uploading to You Tube. To produce this, I rendered the project from Premiere Pro at 720p at about 14 Mbps—a very high-quality rendition. Then I posted it to You Tube, and YouTube created the multiple versions it normally does (720p, 480p, 360p, 240p). If you look at the 720p version in the larger player, even without playing it, you see a lot more artifacting in the non-filtered version on the left than in the filtered version on the right; likewise for noise in the face (Figure 21, below).
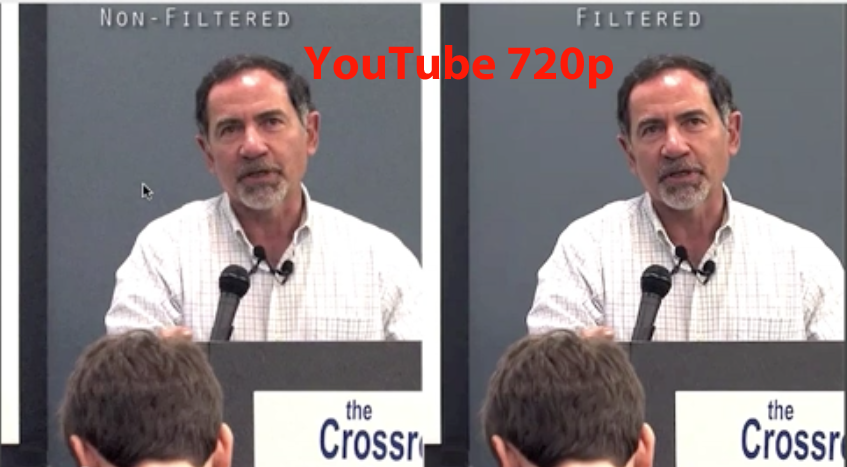
Figure 21. 720p YouTube rendition (non-filtered on the left, filtered on the right).
You can see how the video comparisons play out in the clip below.
The Bottom Line
If you have noisy video from shooting in low-light conditions—and who doesn't—check out the Neat Video filter. It can significantly increase quality for all output types.
Related Articles
Magic Bullet Denoiser II is the latest version of Red Giant's popular plug-in for removing video noise from troublesome footage. Event and documentary filmmaker tests the plug-in on two different clips and shows before-and-after results and assesses Denoiser's usability, effectiveness, and rendering speed.
In this tutorial you'll learn how to maximize the brightness and contrast of your video in Adobe Premiere Pro CS6 using the Brightness, Contrast, and Gamma Correction controls for effective and balanced adjustments.
The histogram and the waveform in Apple Final Cut Pro X are effective, easy-to-master tools that provide the clear input you need to diagnose and fix the contrast issues in your video simply and intelligently. In this video tutorial, video editing and encoding expert Jan Ozer explains how they work.
Video encoding and editing expert Jan Ozer provides three useful tips that will enhance your workflow and get you out of some editing jams in your Adobe Premiere Pro projects: editing audio without unlinking; Fill Left and Fill Right to create stereo audio; and creating nested sequences for smoother edits and creating reusable set pieces in your projects.