Tutorial: Reducing Background Noise and Removing Pops and Clicks in Final Cut Pro X
Background noise and pops and clicks in audio are an unfortunate fact of life for many productions. In this tutorial we'll explore some fixes you can try in Final Cut Pro X.
Background noise and pops and clicks in audio are an unfortunate fact of life for many productions. In this tutorial we'll explore some fixes you can try in Final Cut Pro X.
The video above shows a clip I'm working on, and there are a couple of problems that you can see immediately in Figure 1 (below). Number one, the levels are too low. The audio peaks should be up towards the top of the waveform. Number two, if you play the audio file (begin at 0:40 in the clip above) you'll hear two big pops in the audio track of the clip shown in Figure 1.
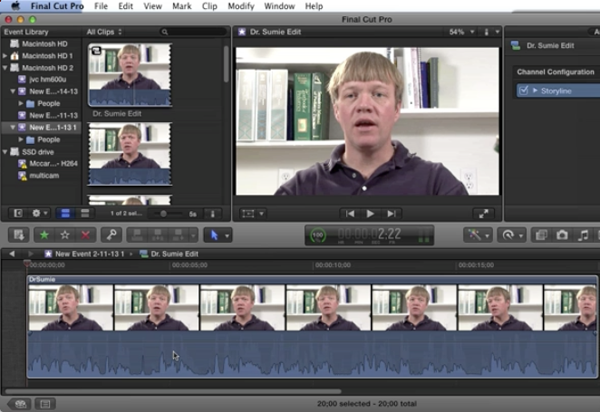
Figure 1. The low-volume clip we'll work with in the tutorial
We'll start by boosting the audio volume, and when we do that we're going to increase some background noise that we'll want to minimize. After we've accomplished both those tasks, we'll remove the pops and the clicks.
Boosting Audio Volume
There are a couple of different audio controls you can use to boost the volume. To begin, click the clip in the timeline and open the Inspector window. There you can choose the Video, Audio, or Info tab. Choose Audio to see FCP X's Volume and Pan settings and Audio Enhancements (Figure 2, below).
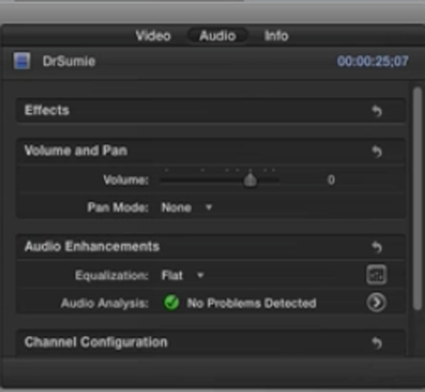
Figure 2. The FCP X Audio Inspector
I already analyzed the clip during import and FCP X detected no problems with the audio (as indicated by the green checkmark next to Audio Analysis in Figure 2, above), so we can move on to Audio Enhancements.
Cick the white circled arrow to the right of "No Problems Detected," and FCP X will open the Audio Enhancements panel with Loudness controls, Background Noise Removal, and Hum Removal, as shown in Figure 3 (below).
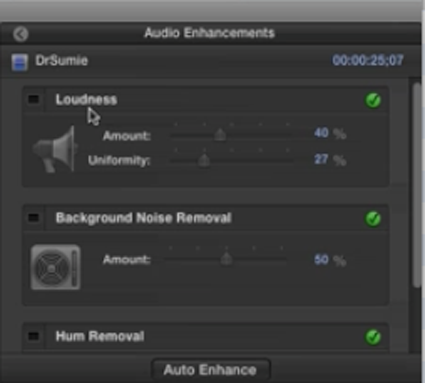
Figure 3. The Audio Enhancements panel
But the first thing you should do before you start any audio editing is to break the audio and the video portions of the clip apart. To do so, click the clip and choose Clip > Break Apart Clip Items (Figure 4, below). Now you can apply your audio edits and rest assured that nothing you do to the audio file is going to affect the video file.
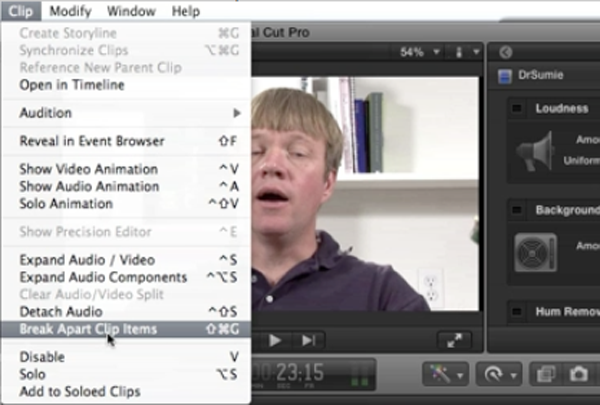
Figure 4. Unlinking audio and video in the clip
There are couple of different ways to adjust volume. You can adjust the Loudness parameters in the Audio Enhancements, or you can use the volume control on the waveform itself (Figure 5, below).
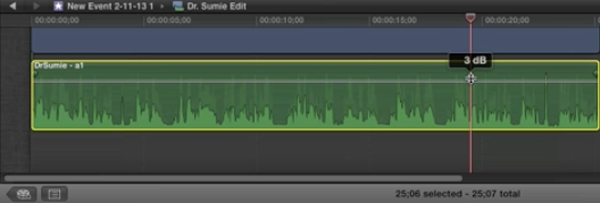
Figure 5. Adjusting audio volume directly in the waveform
Loudness includes a component of compression-not streaming compression, but the kind of compression that makes the voice sound beefier and more testosterone-filled like the voiceovers on Saturday morning car advertisements. But the doctor interviewed in this clip doesn't need that. He's got a very distinctive voice, so we're not going to use the Loudness control in the Audio Enhancements panel; we'll use the volume control on the waveform.
If you look at the waveform in Figure 6 with the volume increased (below), you can see that if I drag the volume closer to the top, we start to see red and yellow peaks. You don't want to hit the reds because that will cause clipping. If we pull it down to 8 dB, we still have the peaks in the yellow, which should give us plenty of volume, and but we've eliminated the clipping peaks in the red except for the click that we're going to cut out in a moment.

Figure 6. Dragging the volume too high causes clipping, indicated by red peaks.
Related Articles
In this first installment of our new tutorial series, Glen Elliott demystifies Final Cut Pro X, illustrates its core functions, and focuses on one of the most powerful new features for organizing, accelerating, and streamlining your edits: metadata keyword tagging.
No matter how fast, efficient, and determined a 48 Hour Film Project production team is, they need to finish strong with a streamlined edit. Final.revised editor Scott Strimple describes how Apple Final Cut Pro X allowed him to deliver the goods on deadline, by leveraging key features that could make any edit cook.
There have been lots of comparisons between Final Cut Pro X and Premiere Pro CS6, with most focusing on features and workflows. This article discusses a series of multiple-format benchmark tests that analyzed comparative performance between the two programs.
Two types of noises degrade the audio you shoot with your video: random noises like microphone clicks and pops, and consistent noises like white noise or air conditioning hum. This tutorial demonstrates how to remove both of them in Adobe Audition CS6.
One of the most convenient new features in Final Cut Pro 10.0.6 is the ability to quickly and easily export to a single destination, or a bundle of destinations, that contain multiple outputs. In this tutorial, you learn how to create a single destination and a bundle of destinations.
The histogram and the waveform in Apple Final Cut Pro X are effective, easy-to-master tools that provide the clear input you need to diagnose and fix the contrast issues in your video simply and intelligently. In this video tutorial, video editing and encoding expert Jan Ozer explains how they work.
When Apple originally released Final Cut Pro 10, the biggest deficit for Pro users was the lack of multicam. With the 10.0.3 release, Apple has addressed this with a highly functional and easy-to-use multicam feature, which Jan Ozer explains in this tutorial.