Tutorial: Animating a Company Logo in Adobe After Effects CC
While animating a client's logo can be a time-consuming process, it adds more production value and life to your video projects. This tutorial will demonstrate how to create dynamic logo animations using Adobe After Effects CC and Adobe Illustrator.
As professional video editors, most of us have had clients ask us to animate their logo in the work we produce for them. Essentially, they are asking for their logo to stand out a little more than in the static version they normally use in their brochures, collateral, and other marketing material.
While this can be a time-consuming process, it does have its rewards. It adds more production value and life to your video projects. There is also a good chance that your client already has the logo created, so you are not exactly starting from scratch. In thuis tutorial, we'll take a few minutes to demonstrate how to animate a static logo using After Effects CC 2014 and Adobe Illustrator.
Getting the Logo in a Vector-Based Format
The first thing you need to do to make this workflow work is to request the logo in an Adobe Illustrator format. These files end with .EPS or .AI. You want to use these file types because they are vector-based. In a nutshell, this means that you can scale the logo in size without losing resolution.
Illustrator is included as an application if you are an active Adobe Creative Cloud member.
Preparing the Logo in Adobe Illustrator
We'll start this project in Adobe Illustrator. Here, we'll make a few adjustments to prepare this logo for use in After Effects. Starting with the layer’s panel, you can see that all of the elements of this logo exist on one layer. We want each piece to exist separately, so that we can add effects and animate logo elements individually. In order to break the logo up, we have to select the triangle drop-down in the upper right of the layer’s panel and choose Release to Layers (Sequence) (Figure 1, below).
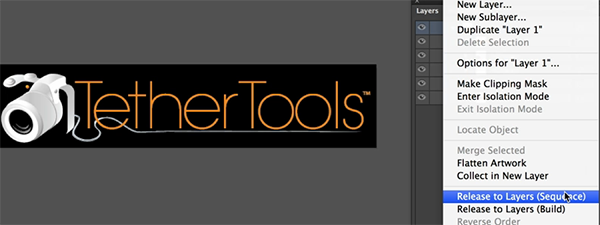
Figure 1. Breaking up the logo.
This gives us the ability to have each piece of the logo exist on separate layers. Select the released layers and drag them above layer 1. Now we can do some housekeeping and rename the layers to something more descriptive than Layer 1, Layer 2, etc. by double-clicking on the name (Figure 2, below). Next, we will save out this version of the logo as an .AI file, while using a different name to prevent overwriting the original logo.

Figure 2. Renaming the layers.
Importing the Logo into After Effects
Now the logo is ready to import into After Effects. With After Effects open, we will import the logo by navigating to File > Import > File.
Select the logo you just saved and make sure to change the Import As option from Footage to Composition - Retain Layer Sizes (Figure 3, below). This will enable us to see all of the logo layers separately inside of After Effects.

Figure 3. Choose Retain Layer Sizes as your import options to see the layers individually in After Effects.
Related Articles
This tutorial will demonstrate an advanced method of adding a slider or jib effect to timelapse footage in Adobe After Effects CC 2014.
While there are many built-in transitions available within Adobe After Affects and Premiere Pro, there may come a time where you want to organically create something to switch from one piece of video to another. This tutorial will demonstrate 3 ways to do this in After Effects.
This tutorial demonstrates a versatile and flexible technique that will match animations between layers you choose to connect to enhance, simplify, and accelerate your animation process.
Here's a look at 15 keyboard shortcuts that will enhance the efficiency of your After Effects workflow.
This tutorial will show you a quick way to create an animated lens flare effect that can enhance your transitions, lower-thirds, and more using Adobe After Effects CC 2014.
This tutorial explores how to add another dimension to your text and titles using some basic 3D capabilities in Adobe After Effects.
By using adjustment layers in Adobe After Effects, you can easily create a variety of looks for your videos and share and compare them with clients
This tutorial demonstrates how to use an After Effects alpha matte to make your video "shine through" your text.