Tutorial: Creating a Gradient Effect in Adobe After Effects CC 2014
Gradients are a popular effect used in both broadcast and online video. You can use them to isolate something in your image, or add some style to your graphics and videos. This tutorial will demonstrate how to create and apply gradients in After Effects CC 2014.
In this tutorial, we’ll explore how to create gradient effects using Adobe After Effects CC 2014.
Gradients are a popular effect used in both broadcast and online video (Figure 1, below). You can use them to isolate something in your image, or add some style to your graphics and videos.

Figure 1. A gradient effect applied to a video
Add a Solid Color Layer
To begin, you’ll need to have an After Effects project open with a new composition. Next, add a solid color layer by navigating up to Layer > New > Solid (Figure 2, below).

Figure 2. Adding the solid color layer
The Solid Settings dialog box opens (Figure 3, below). Make sure the make Comp Size option is enabled so you can select a color option. For this tutorial, choose white. Then press OK.

Figure 3. The Solid Settings dialog box
Applying the Gradient
Next, navigate to Effect > Generate, and then choose Gradient Ramp (Figure 4, below).
 '
'
Figure 4. Generating a gradient ramp
As you can see in Figure 5 (below), we now have a gradient applied to our white color solid layer. In the Effects Control panel, we can adjust some settings to get the desired look we're going for with this background.
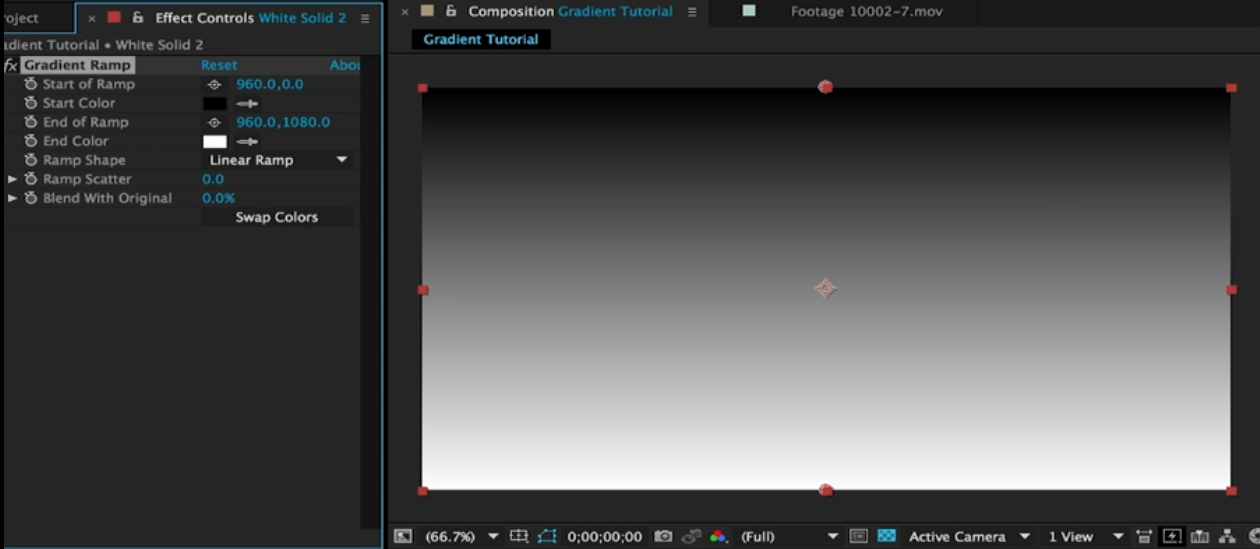
Figure 5. Gradient ramp applied and ready for adjusting. Click the image to see it at full size.
Let’s start with adjusting our Start Color. I’d like to make this a little less extreme by choosing some gray and off-white colors rather than the default black. To do so, I’ll click on the color square next to Start Color, and open the Start Color dialog box. For this example we’ll go with something in the gray area. We can select OK when we’re happy with the color adjustment.
Next, we can change the ramp shape to radial, if so desired, but we’ll stay with linear for now. We’ll also leave our Scatter as it is, and we can even blend our gradient with our original layer by moving these values to the left or right. You also have the option to swap the colors of the gradient if you’d like.
Now we have a nice gradient background that we can use for our projects (Figure 6, below). You can modify this to your liking, but the overall gradient effect gives us a little more of a stylized look, rather than just the solid-colored background.

Figure 6. The completed gradient background and adjusted settings. Click the image to see it at full size.
Related Articles
Clear Online Video's Stjepan Alaupovic walks demonstrates how to use the new gradient tools in the Premiere Pro CC 2018 Essential Graphics panel.
Clear Online Video's Stjepan Alaupovic demonstrates how to spotlight text in your projects using animated lighting effects with this simple technique in Adobe After Effects CC 2015.
The wiggle effect is a common look that editors use to enhance and add some randomness to a logo, text, or graphics. This tutorial demonstrates two quick ways to accomplish this look.
Instagram is quickly emerging as one of the top social media video platforms in online video, and "Instagram looks" have become instantly recognizable to social media users. In this short tutorial, I'll demonstrate how you can achieve some of these stylized filtered looks in your videos by using gradients in Adobe After Effects.
In this tutorial we'll look at using shape layers to create, customize, and animate lower-third graphics with Adobe After Effects CC 2015.