Tutorial: Greenscreen and Virtual Sets with the NewTek TriCaster Mini
Here's a look at the greenscreen and virtual set capabilities of the NewTek TriCaster Mini, which make it look like you spent a fortune on your production, while costing a fraction of what you'd spend if you built out a studio, bought multiple cameras, and hired operators to use them.
Most broadcast-quality productions involve an expensive studio, multiple cameras, and multiple camera operators to provide lots of pans and zooms. You can spend a fortune on all that, or you can get the same look for thousands less with the TriCaster Mini.
In this tutorial, which was sponsored by Videoguys.com, I’ll show you how. Let’s start with a brief look at the new TriCaster model.
Re-Introducing the Mini
This video playing on the virtual screen in Figure 1 (below) is from another TriCaster Mini tutorial you can watch on Streaming Media Producer. The Mini is an extremely compact unit with four HDMI inputs and two outputs. In addition to the audio coming in with the HDMI inputs, there’s also a 1/4" microphone mono input and left and right 1/4" inputs.

Figure 1. That’s me in a TriCaster Mini virtual set, watching myself demo the TriCaster Mini on a screen that’s part of the set. Click the image to see it at full size.
As you can see in Figure 1, there are two HDMI outputs, plus a 1/4" headphone jack and left and right 1/4" audio outputs. On the other side of the unit, shown in Figure 2 (below) are monitor outputs, plus display ports for two additional screens or projectors. There are USB ports for getting content into the unit, and an ethernet port, though the unit also has WiFi.
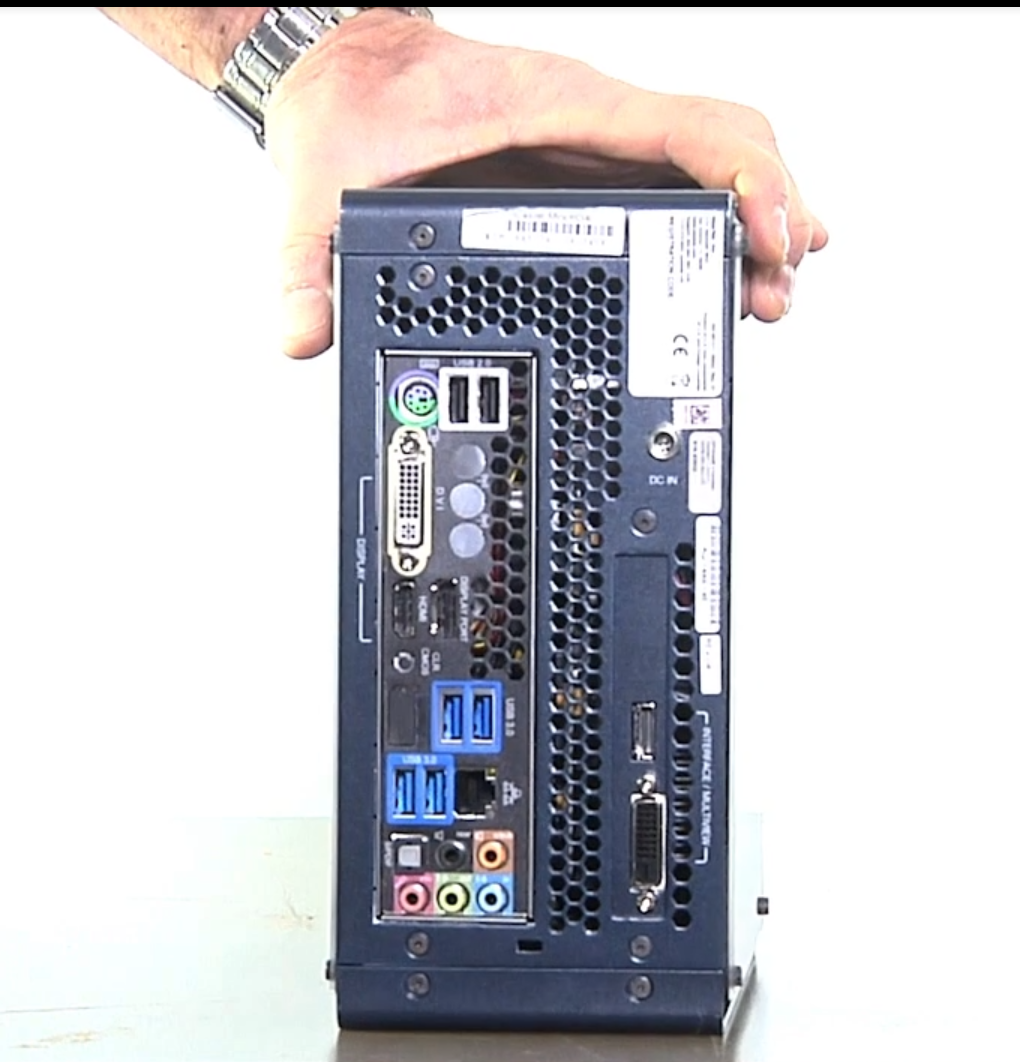
Figure 2. More I/O: monitor outputs, display ports, Ethernet, and USB. Click the image to see it at full size.
The Mini comes in two models, the HD-4i, which includes a 7” LCD output monitor, and 1.5 TB of storage, and the HD-4 base configuration, with no monitor and 750 GB of internal storage.
The rest of that tutorial focuses on software operation. Here we’ll focus on how to choose and use virtual sets with the Tricaster Mini.
Creating the Virtual Set
The Mini uses the same interface as more expensive TriCaster models (Figure 3, below). The inputs are in the upper-left corner; to the right of them is the Preview window; and to the right of the Preview window is the Program window, which shows what’s live at the moment.

Figure 3. The TriCaster interface. Click the image to see it at full size.
There are buttons for all inputs, including the four Mix/Effect buttons shown in Figure 4 (below). This is where we’ll create the virtual set. I’ll work in Mix/Effect 1.

Figure 4. The Mix/Effect, or M/E buttons.
I’ll be compositing input from Camera 1, over a virtual set that I choose just below the Program window, as shown in Figure 5 (below).

Figure 5. Choose your virtual set here.
The set has room for one additional video within the projection screen. Figure 6 (below) shows my office where I’m actually shooting.

Figure 6. My greenscreen setup.
This is a $30 greenscreen cloth; I’ve got two inexpensive lights on the background, because it’s tough to pull a clean key without them. I’ve got one key light on the subject.